チュートリアル
簡単にライブラリーを使用するためのチュートリアルコレクション
HTMLの解析は、Java開発において非常に重要な処理のひとつです。構造化データの抽出、コンテンツ分析、Webベースの情報活用など、さまざまな場面で活用されます。Webスクレイパーの構築、HTMLコンテンツの検証、Webページからのテキストや属性の抽出など、用途は多岐にわたりますが、信頼性の高いツールを使うことで実装は大幅に簡素化できます。
本ガイドでは、Spire.Doc for Java を使用して JavaでHTMLを解析する方法 を解説します。Spire.Docは、HTML解析とドキュメント処理を統合的に扱える強力なライブラリで、実用的なHTMLデータ抽出を効率よく実装できます。
JavaにはJsoupなど複数のHTML解析ライブラリがありますが、Spire.Docはドキュメント処理との親和性と低コードで実装できる点が大きな特長です。効率を重視する開発者にとって、以下の理由からHTML解析用途に適しています。
JavaでHTMLを読み込む前に、以下の環境が整っていることを確認してください。
Mavenを使用する場合
以下のリポジトリと依存関係を pom.xml に追加します。必要なライブラリは自動的にダウンロードされます。
<repositories>
    <repository>
        <id>com.e-iceblue</id>
        <name>e-iceblue</name>
        <url>https://repo.e-iceblue.com/nexus/content/groups/public/</url>
    </repository>
</repositories>
<dependency>
    <groupId>e-iceblue</groupId>
    <artifactId>spire.doc</artifactId>
    <version>13.12.2</version>
</dependency>
手動で導入する場合は、公式サイト からJARファイルをダウンロードし、プロジェクトに追加してください。
デフォルトでは、Spire.Docの出力結果に評価用ウォーターマークが付与されます。制限を解除するには、30日間の無料トライアルライセンス を申請できます。
Spire.Docは、HTMLを構造化されたドキュメントモデルに変換します。段落、表、フィールドなどの要素をJavaオブジェクトとして直接操作できるため、データ抽出が容易になります。ここでは代表的なケースを紹介します。
HTMLタグを除外した純粋なテキスト抽出は、全文検索やコンテンツ分析でよく使われます。以下の例では、HTML文字列を解析し、すべての段落テキストを取得します。
Javaコード:HTML文字列からテキストを抽出
import com.spire.doc.*;
import com.spire.doc.documents.*;

public class ExtractTextFromHtml {
    public static void main(String[] args) {
        // 解析するHTMLコンテンツを定義
        String htmlContent = "<html>" +
                "<body>" +
                "<h1>HTML解析の概要</h1>" +
                "<p>Spire.Doc for Java を使用すると、HTMLからのテキスト抽出を簡単に行えます。</p>" +
                "<ul>" +
                "<li>見出しを抽出</li>" +
                "<li>段落を抽出</li>" +
                "<li>リスト項目を抽出</li>" +
                "</ul>" +
                "</body>" +
                "</html>";

        // 解析したHTMLを格納するためのDocumentオブジェクトを作成
        Document doc = new Document();
        // HTML文字列をドキュメントに解析して追加
        doc.addSection().addParagraph().appendHTML(htmlContent);

        // すべての段落からテキストを抽出
        StringBuilder extractedText = new StringBuilder();
        for (Section section : (Iterable<Section>) doc.getSections()) {
            for (Paragraph paragraph : (Iterable<Paragraph>) section.getParagraphs()) {
                extractedText.append(paragraph.getText()).append("\n");
            }
        }

        // 抽出したテキストを出力または後続処理
        System.out.println("抽出されたテキスト:\n" + extractedText);
    }
}
出力例:

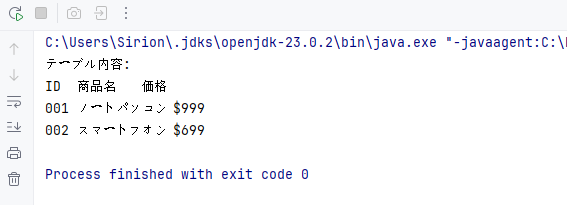
HTMLの <table> 要素は、商品一覧やレポートなどの構造化データを含むことが多くあります。Spire.Docでは、HTMLテーブルを Table オブジェクトとして扱えるため、行やセル単位で簡単にアクセスできます。
Javaコード:HTMLテーブルの行・セルを抽出
import com.spire.doc.*;
import com.spire.doc.documents.*;

public class ExtractTableFromHtml {
    public static void main(String[] args) {
        // テーブルを含むHTMLコンテンツ
        String htmlWithTable = "<html>" +
                "<body>" +
                "<table border='1'>" +
                "<tr><th>ID</th><th>商品名</th><th>価格</th></tr>" +
                "<tr><td>001</td><td>ノートパソコン</td><td>$999</td></tr>" +
                "<tr><td>002</td><td>スマートフォン</td><td>$699</td></tr>" +
                "</table>" +
                "</body>" +
                "</html>";

        // HTMLをDocumentオブジェクトに解析して読み込む
        Document doc = new Document();
        doc.addSection().addParagraph().appendHTML(htmlWithTable);

        // テーブルデータを抽出
        for (Section section : (Iterable<Section>) doc.getSections()) {
            // セクション本文内のすべてのオブジェクトを走査
            for (Object obj : section.getBody().getChildObjects()) {
                if (obj instanceof Table) { // オブジェクトがテーブルかどうかを判定
                    Table table = (Table) obj;
                    System.out.println("テーブル内容:");
                    // 行を順に処理
                    for (TableRow row : (Iterable<TableRow>) table.getRows()) {
                        // 行内のセルを順に処理
                        for (TableCell cell : (Iterable<TableCell>) row.getCells()) {
                            // 各セル内の段落からテキストを抽出
                            for (Paragraph para : (Iterable<Paragraph>) cell.getParagraphs()) {
                                System.out.print(para.getText() + "\t");
                            }
                        }
                        System.out.println(); // 各行の後で改行
                    }
                }
            }
        }
    }
}
出力例:
appendHTML() メソッドでHTMLをWordドキュメントとして解析した後、Spire.DocのAPIを使って ハイパーリンクを抽出 することも可能です。
Spire.Doc for Javaは、ローカルHTMLファイルやWeb上のURLからHTMLを解析することもでき、実運用に適した柔軟性を備えています。
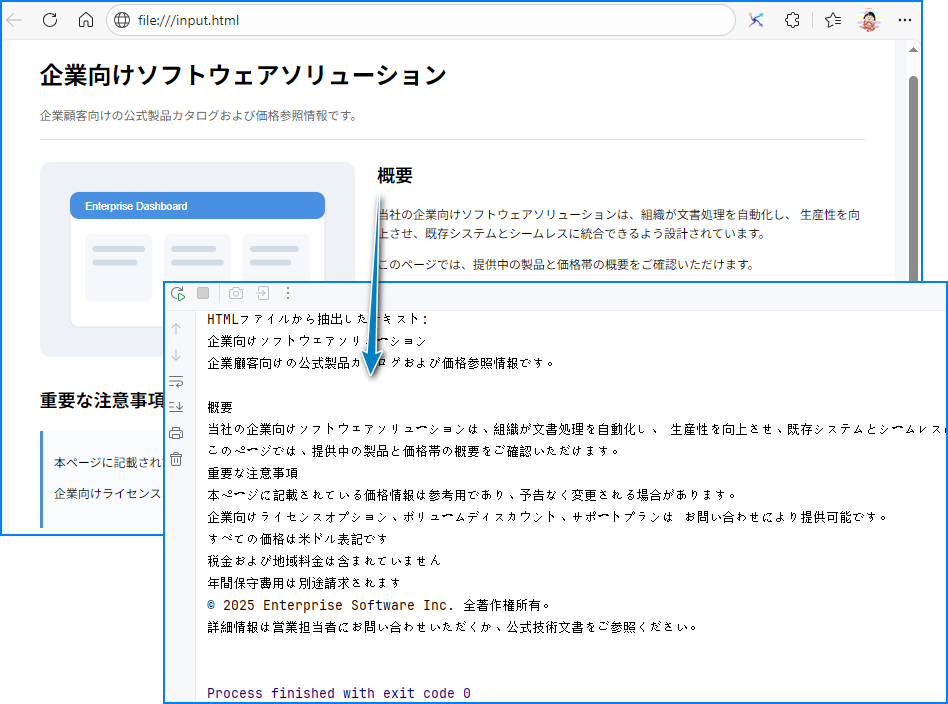
ローカルのHTMLファイルは、loadFromFile(String, FileFormat.Html) メソッドを使用して読み込みます。
Javaコード:ローカルHTMLファイルを解析
import com.spire.doc.*;
import com.spire.doc.documents.*;

public class ParseHtmlFile {
    public static void main(String[] args) {
        // Documentオブジェクトを作成
        Document doc = new Document();
        // HTMLファイルを読み込む
        doc.loadFromFile("input.html", FileFormat.Html);

        // テキストを抽出して出力
        StringBuilder text = new StringBuilder();
        for (Section section : (Iterable<Section>) doc.getSections()) {
            for (Paragraph para : (Iterable<Paragraph>) section.getParagraphs()) {
                text.append(para.getText()).append("\n");
            }
        }
        System.out.println("HTMLファイルから抽出したテキスト:\n" + text);
    }
}
この例ではHTMLファイル内のテキストを抽出しています。段落のスタイル(例:「Heading1」「Normal」)も同時に取得したい場合は、Paragraph.getStyleName() メソッドを使用します。
出力例:
関連情報:JavaでWordをHTMLに変換
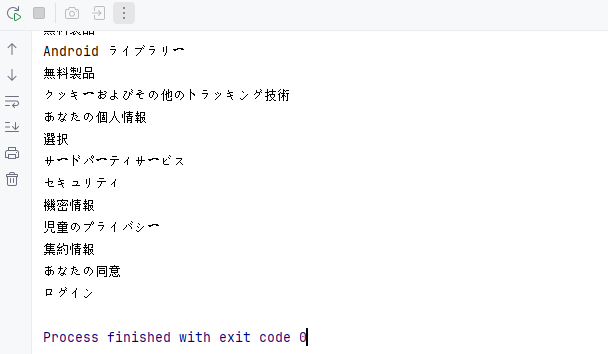
実際のWebスクレイピングでは、URLからHTMLを取得して解析する必要があります。Spire.Docは、JDK 11以降で利用可能な HttpClient と組み合わせて使用できます。
Javaコード:URLからHTMLを取得して解析
import com.spire.doc.*;
import com.spire.doc.documents.*;
import java.net.URI;
import java.net.http.HttpClient;
import java.net.http.HttpRequest;
import java.net.http.HttpResponse;
import java.time.Duration;

public class ParseHtmlFromUrl {
    // 再利用可能な HttpClient(タイムアウトを設定してハングアップを防ぐ)
    private static final HttpClient httpClient = HttpClient.newBuilder()
            .connectTimeout(Duration.ofSeconds(10))
            .build();

    public static void main(String[] args) {
        String url = "https://jp.e-iceblue.com/misc/privacy-policy.html";

        try {
            // URLからHTMLコンテンツを取得
            System.out.println("Fetching from: " + url);
            String html = fetchHtml(url);

            // Spire.DocでHTMLを解析
            Document doc = new Document();
            Section section = doc.addSection();
            section.addParagraph().appendHTML(html);

            System.out.println("--- 見出し ---");

            // 見出しを抽出
            for (Paragraph para : (Iterable<Paragraph>) section.getParagraphs()) {
                // 段落スタイルが見出しかどうかを確認(例:"Heading1", "Heading2")
                if (para.getStyleName() != null && para.getStyleName().startsWith("Heading")) {
                    System.out.println(para.getText());
                }
            }

        } catch (Exception e) {
            System.err.println("エラー: " + e.getMessage());
        }
    }

    // ヘルパーメソッド: 指定したURLからHTMLコンテンツを取得
    private static String fetchHtml(String url) throws Exception {
        // User-Agentヘッダー付きでHTTPリクエストを作成(ブロック回避のため)
        HttpRequest request = HttpRequest.newBuilder()
                .uri(URI.create(url))
                .header("User-Agent", "Mozilla/5.0")
                .timeout(Duration.ofSeconds(10))
                .GET()
                .build();
        // リクエストを送信してレスポンスを取得
        HttpResponse<String> response = httpClient.send(request, HttpResponse.BodyHandlers.ofString());

        // リクエストが成功したか確認(HTTP 200 = OK)
        if (response.statusCode() != 200) {
            throw new Exception("HTTPエラー: " + response.statusCode());
        }

        return response.body(); // 生のHTMLコンテンツを返す
    }
}
処理のポイント:
出力例:
JavaでのHTML解析は、Spire.Doc for Javaを使うことで大幅に簡素化できます。HTML文字列、ローカルファイル、URLのいずれからでも、テキストや表データを最小限のコードで抽出可能です。生のHTMLタグを直接扱ったり、重い依存関係を管理したりする必要はありません。
Webスクレイピング、コンテンツ分析、HTML変換(例:HTMLをPDFに変換)など、さまざまな用途で活用できます。本ガイドの手順に沿って実装すれば、Javaプロジェクトに実用的なHTML解析機能をスムーズに組み込めるでしょう。
A:用途によって異なります。
A:はい。Spire.Doc for Javaでは、XHTMLValidationType.None を指定して厳密な検証を無効化することで、不完全なHTML構造にも対応できます。
doc.loadFromFile("input.html", FileFormat.Html, XHTMLValidationType.None);
ただし、構造が大きく崩れているHTMLでは、解析に失敗する場合があります。
A:可能です。段落テキストの編集、表の行削除、新しい要素の追加などを行った後、HTMLとして保存できます。
doc.saveToFile("modified.html", FileFormat.Html);
A:ローカルファイルやHTML文字列を解析する場合、インターネット接続は不要です。URLからHTMLを取得する場合のみ、事前にネットワーク接続が必要になります。
Word 文書の印刷は、文書管理の基本的な側面であり、デジタルファイルを目に見える物理的なコピーに変換することができます。参照用、配布用、保存用など、どのような目的でハードコピーを作成する必要がある場合でも、Word 文書を印刷する能力は、さまざまな仕事や個人的な場面で役立つ貴重なスキルです。
この記事では、Spire.Doc for Java ライブラリと java.awt.print パッケージを使用して、Java で Word 文書を印刷する方法を説明します。
まず、Spire.Doc for Java を Java プロジェクトに追加する必要があります。JAR ファイルは、このリンクからダウンロードできます。Maven を使用する場合は、次のコードをプロジェクトの pom.xml ファイルに追加する必要があります。
<repositories>
    <repository>
        <id>com.e-iceblue</id>
        <name>e-iceblue</name>
        <url>https://repo.e-iceblue.com/nexus/content/groups/public/</url>
    </repository>
</repositories>
<dependencies>
    <dependency>
        <groupId>e-iceblue</groupId>
        <artifactId>spire.doc</artifactId>
        <version>12.5.1</version>
    </dependency>
</dependencies>Word ドキュメントをデフォルトのプリンターで印刷するのは、便利で簡単な方法です。この方法は、特定のプリンター設定が不要な場合や、プリンターに設定されているデフォルト設定を利用したい場合など、通常の印刷作業に適していることが多い。
以下は、Spire.Doc for Java と java.awt.print.PrinterJob オブジェクトを使用して、デフォルトプリンタで Word ドキュメントを印刷する手順です。
import com.spire.doc.Document;

import java.awt.print.PageFormat;
import java.awt.print.Paper;
import java.awt.print.PrinterException;
import java.awt.print.PrinterJob;

public class PrintWithDefaultPrinter {

    public static void main(String[] args) {

        // ドキュメントオブジェクトを作成する
        Document document = new Document();

        // Wordファイルをロードする
        document.loadFromFile("サンプル.docx");

        // PrinterJobオブジェクトを作成する
        PrinterJob printerJob = PrinterJob.getPrinterJob();

        // PageFormatオブジェクトを作成し、デフォルトのサイズと向きに設定する
        PageFormat pageFormat = printerJob.defaultPage();

        // このPageFormatに関連付けられたPaperオブジェクトのコピーを返す
        Paper paper = pageFormat.getPaper();

        // このPaperの印刷可能な領域を設定する
        paper.setImageableArea(0, 0, pageFormat.getWidth(), pageFormat.getHeight());

        // 印刷するコピーの数を設定する
        printerJob.setCopies(1);

        // このPageFormatに対するPaperオブジェクトを設定する
        pageFormat.setPaper(paper);

        // 指定されたフォーマットでページをレンダリングするためのペインターを呼び出す
        printerJob.setPrintable(document, pageFormat);

        // ドキュメントを印刷する
        try {
            printerJob.print();
        } catch (PrinterException e) {
            e.printStackTrace();
        }
    }
}
Java を使用して指定されたプリンターで Word ドキュメントを印刷すると、印刷タスクを処理する特定のプリンターを選択できます。この方法は、利用可能なプリンタが複数あり、特定のプリンターに印刷出力を指示したい場合に便利です。
以下は、Spire.Doc for Java と java.awt.print.PrinterJob オブジェクトを使用して、指定されたプリンタで Word ドキュメントを印刷する手順です。
import com.spire.doc.Document;

import javax.print.PrintService;
import java.awt.print.PageFormat;
import java.awt.print.Paper;
import java.awt.print.PrinterException;
import java.awt.print.PrinterJob;

public class PrintWithSpecifiedPrinter {

    public static void main(String[] args) throws PrinterException {

        // デフォルトのプリンターに関連付けられたPrinterJobオブジェクトを作成する
        PrinterJob printerJob = PrinterJob.getPrinterJob();

        // プリンター名を指定する
        PrintService myPrintService = findPrintService("\\\\192.168.1.104\\HP LaserJet P1007");
        printerJob.setPrintService(myPrintService);

        // PageFormatインスタンスを作成し、デフォルトのサイズと向きに設定する
        PageFormat pageFormat = printerJob.defaultPage();

        // このPageFormatに関連付けられたPaperオブジェクトのコピーを返す
        Paper paper = pageFormat.getPaper();

        // このPaperの印刷可能な領域を設定する
        paper.setImageableArea(0, 0, pageFormat.getWidth(), pageFormat.getHeight());

        // このPageFormatに対するPaperオブジェクトを設定する
        pageFormat.setPaper(paper);

        // ドキュメントオブジェクトを作成する
        Document document = new Document();

        // Wordファイルをロードする
        document.loadFromFile("サンプル.docx");

        // 指定されたフォーマットでページをレンダリングするためのペインターを呼び出す
        printerJob.setPrintable(document, pageFormat);

        // ドキュメントを印刷する
        try {
            printerJob.print();
        } catch (PrinterException e) {
            e.printStackTrace();
        }
    }

    // プリンターサービスを検索する
    private static PrintService findPrintService(String printerName) {

        PrintService[] printServices = PrinterJob.lookupPrintServices();
        for (PrintService printService : printServices) {
            if (printService.getName().equals(printerName)) {
                return printService;
            }
        }
        return null;
    }
}印刷ダイアログボックスを使用して Word ドキュメントを印刷すると、ユーザーはプロセスを開始する前にプリンタを選択し、印刷設定をカスタマイズすることができます。印刷ダイアログボックスを表示することで、ユーザーに印刷操作の自由度と制御性を提供することができます。
Java で印刷ダイアログボックスを使って Word ドキュメントを印刷するには、以下の手順に従ってください。
import com.spire.doc.Document;

import java.awt.print.PageFormat;
import java.awt.print.Paper;
import java.awt.print.PrinterException;
import java.awt.print.PrinterJob;

public class PrintWithDialogBox {

    public static void main(String[] args) {

        // デフォルトのプリンターに関連付けられたPrinterJobオブジェクトを作成する
        PrinterJob printerJob = PrinterJob.getPrinterJob();

        // PageFormatオブジェクトを作成し、デフォルトのサイズと向きに設定する
        PageFormat pageFormat = printerJob.defaultPage();

        // このPageFormatに関連付けられたPaperオブジェクトのコピーを返す
        Paper paper = pageFormat.getPaper();

        // このPaperの印刷可能な領域を設定する
        paper.setImageableArea(0, 0, pageFormat.getWidth(), pageFormat.getHeight());

        // このPageFormatに対するPaperオブジェクトを設定する
        pageFormat.setPaper(paper);

        // ドキュメントオブジェクトを作成する
        Document document = new Document();

        // Wordファイルをロードする
        document.loadFromFile("サンプル.docx");

        // 指定されたフォーマットでページをレンダリングするためのペインターを呼び出す
        printerJob.setPrintable(document, pageFormat);

        // 印刷ダイアログを表示する
        if (printerJob.printDialog()) {
            try {
                // ドキュメントを印刷する
                printerJob.print();
            } catch (PrinterException e) {
                e.printStackTrace();
            }
        }
    }
}Word ドキュメントの範囲指定印刷は、ドキュメント全体を印刷するのではなく、ドキュメントから特定のページを選択して、そのページのみを印刷できる便利な機能です。これは、長いドキュメントを扱う場合や、特定のセクションだけを印刷する必要がある場合に特に便利です。
Java で Word ドキュメントを印刷する際に印刷範囲を設定する手順は以下の通りです。
import com.spire.doc.Document;

import javax.print.attribute.HashPrintRequestAttributeSet;
import javax.print.attribute.PrintRequestAttributeSet;
import javax.print.attribute.standard.PageRanges;
import java.awt.print.PageFormat;
import java.awt.print.Paper;
import java.awt.print.PrinterException;
import java.awt.print.PrinterJob;

public class PrintPageRange {

    public static void main(String[] args) {

        // ドキュメントオブジェクトを作成する
        Document document = new Document();

        // Wordファイルをロードする
        document.loadFromFile("サンプル.docx");

        // PrinterJobオブジェクトを作成する
        PrinterJob printerJob = PrinterJob.getPrinterJob();

        // PageFormatオブジェクトを作成し、デフォルトのサイズと向きに設定する
        PageFormat pageFormat = printerJob.defaultPage();

        // このPageFormatに関連付けられたPaperオブジェクトのコピーを返す
        Paper paper = pageFormat.getPaper();

        // このPaperの印刷可能な領域を設定する
        paper.setImageableArea(0, 0, pageFormat.getWidth(), pageFormat.getHeight());

        // コピーの数を設定する
        printerJob.setCopies(1);

        // このPageFormatに対するPaperオブジェクトを設定する
        pageFormat.setPaper(paper);

        // 指定されたフォーマットでページをレンダリングするためのペインターを呼び出す
        printerJob.setPrintable(document, pageFormat);

        // PrintRequestAttributeSetオブジェクトを作成する
        PrintRequestAttributeSet attributeSet = new HashPrintRequestAttributeSet();

        // 印刷範囲を設定する
        attributeSet.add(new PageRanges(1, 5));

        // ドキュメントを印刷する
        try {
            printerJob.print(attributeSet);
        } catch (PrinterException e) {
            e.printStackTrace();
        }
    }
}両面印刷は、両面印刷とも呼ばれ、用紙の両面に自動的に印刷できるため、長いレポートやプレゼンテーション、配布資料などに便利です。
Java で Word ドキュメントを両面モードで印刷する手順は以下の通りです。
import com.spire.doc.Document;

import javax.print.attribute.HashPrintRequestAttributeSet;
import javax.print.attribute.PrintRequestAttributeSet;
import javax.print.attribute.standard.Sides;
import java.awt.print.PageFormat;
import java.awt.print.Paper;
import java.awt.print.PrinterException;
import java.awt.print.PrinterJob;

public class PrintInDuplexMode {

    public static void main(String[] args) {

        // ドキュメントオブジェクトを作成する
        Document document = new Document();

        // Wordファイルをロードする
        document.loadFromFile("サンプル.docx");

        // デフォルトのプリンターに関連付けられたPrinterJobオブジェクトを作成する
        PrinterJob printerJob = PrinterJob.getPrinterJob();

        // PageFormatオブジェクトを作成し、デフォルトのサイズと向きに設定する
        PageFormat pageFormat = printerJob.defaultPage();

        // このPageFormatに関連付けられたPaperオブジェクトのコピーを返す
        Paper paper = pageFormat.getPaper();

        // このPaperの印刷可能な領域を設定する
        paper.setImageableArea(0, 0, pageFormat.getWidth(), pageFormat.getHeight());

        // このPageFormatに対するPaperオブジェクトを設定する
        pageFormat.setPaper(paper);

        // 指定されたフォーマットでページをレンダリングするためのペインターを呼び出す
        printerJob.setPrintable(document, pageFormat);

        // PrintRequestAttributeSetオブジェクトを作成する
        PrintRequestAttributeSet attributeSet = new HashPrintRequestAttributeSet();

        // デュプレックス印刷モードを有効にする
        attributeSet.add(Sides.TWO_SIDED_SHORT_EDGE);

        // ドキュメントを印刷する
        try {
            printerJob.print(attributeSet);
        } catch (PrinterException e) {
            e.printStackTrace();
        }
    }
}結果ドキュメントから評価メッセージを削除したい場合、または機能制限を取り除く場合は、についてこのメールアドレスはスパムボットから保護されています。閲覧するにはJavaScriptを有効にする必要があります。にお問い合わせ、30 日間有効な一時ライセンスを取得してください。
Word ドキュメントからコンテンツを抽出することは、仕事でも勉強でも重要な役割を果たします。1 ページ分の内容を抽出すると、重要なポイントをすばやく閲覧して要約するのに役立ち、1 つのセクションから内容を抽出すると、特定のトピックやセクションを詳しく学習するのに役立ちます。ドキュメント全体を抽出することで、ドキュメントの内容を包括的に理解することができ、深い分析や包括的な理解が容易になります。この記事では、Java プロジェクトで Spire.Doc for Java を使用して Word ドキュメントのページ、セクション、コンテンツ全体を読み取る方法を紹介します。
まず、Spire.Doc for Java を Java プロジェクトに追加する必要があります。JAR ファイルは、このリンクからダウンロードできます。Maven を使用する場合は、次のコードをプロジェクトの pom.xml ファイルに追加する必要があります。
<repositories>
    <repository>
        <id>com.e-iceblue</id>
        <name>e-iceblue</name>
        <url>https://repo.e-iceblue.com/nexus/content/groups/public/</url>
    </repository>
</repositories>
<dependencies>
    <dependency>
        <groupId>e-iceblue</groupId>
        <artifactId>spire.doc</artifactId>
        <version>12.3.1</version>
    </dependency>
</dependencies>FixedLayoutDocument クラスと FixedLayoutPage クラスを使用すると、指定したページから内容を簡単に抽出することができます。抽出された内容を見やすくするために、次のコード例では、抽出された内容を新しい Word ドキュメントに保存しています。詳しい手順は以下の通りです:
import com.spire.doc.*;
import com.spire.doc.pages.*;
import com.spire.doc.documents.*;

public class readWordPage {
    public static void main(String[] args) {
        // 新しいドキュメントオブジェクトを作成する
        Document document = new Document();

        // 指定されたファイルからドキュメントの内容を読み込む
        document.loadFromFile("サンプル.docx");

        // 固定レイアウトドキュメントオブジェクトを作成する
        FixedLayoutDocument layoutDoc = new FixedLayoutDocument(document);

        // 最初のページを取得する
        FixedLayoutPage page = layoutDoc.getPages().get(0);

        // ページが所属しているセクションを取得する
        Section section = page.getSection();

        // ページの最初の段落を取得する
        Paragraph paragraphStart = page.getColumns().get(0).getLines().getFirst().getParagraph();
        int startIndex = 0;
        if (paragraphStart != null) {
            // セクション内での段落のインデックスを取得する
            startIndex = section.getBody().getChildObjects().indexOf(paragraphStart);
        }

        // ページの最後の段落を取得する
        Paragraph paragraphEnd = page.getColumns().get(0).getLines().getLast().getParagraph();

        int endIndex = 0;
        if (paragraphEnd != null) {
            // セクション内での段落のインデックスを取得する
            endIndex = section.getBody().getChildObjects().indexOf(paragraphEnd);
        }

        // 新しいドキュメントオブジェクトを作成する
        Document newdoc = new Document();

        // 新しいセクションを追加する
        Section newSection = newdoc.addSection();

        // 元のセクションのプロパティを新しいセクションにクローンする
        section.cloneSectionPropertiesTo(newSection);

        // 元のドキュメントのページの内容を新しいドキュメントにコピーする
        for (int i = startIndex; i <= endIndex; i++) {
            newSection.getBody().getChildObjects().add(section.getBody().getChildObjects().get(i).deepClone());
        }

        // 新しいドキュメントを指定されたファイルに保存する
        newdoc.saveToFile("output/ページの内容.docx", FileFormat.Docx);

        // 新しいドキュメントを閉じて解放する
        newdoc.close();
        newdoc.dispose();

        // 元のドキュメントを閉じて解放する
        document.close();
        document.dispose();
    }
}
Document.Sections[index] プロパティを使用すると、ドキュメントのヘッダー、フッター、本文を含む特定のセクションクラスのオブジェクトにアクセスすることができます。次の例では、あるセクションのすべての内容を別のドキュメントにコピーする簡単な方法を示します。詳しい手順は以下のとおりです:
import com.spire.doc.*;

public class readWordSection {
    public static void main(String[] args) {
        // 新しいドキュメントオブジェクトを作成する
        Document document = new Document();

        // ファイルからWordドキュメントを読み込む
        document.loadFromFile("サンプル.docx");

        // ドキュメントの2番目のセクションを取得する
        Section section = document.getSections().get(1);

        // 新しいドキュメントオブジェクトを作成する
        Document newdoc = new Document();

        // デフォルトスタイルを新しいドキュメントにクローンする
        document.cloneDefaultStyleTo(newdoc);

        // 2番目のセクションを新しいドキュメントにクローンする
        newdoc.getSections().add(section.deepClone());

        // 新しいドキュメントをファイルに保存する
        newdoc.saveToFile("output/セクションの内容.docx", FileFormat.Docx);

        // 新しいドキュメントオブジェクトを閉じて解放する
        newdoc.close();
        newdoc.dispose();

        // 元のドキュメントオブジェクトを閉じて解放する
        document.close();
        document.dispose();
    }
}
この例では、元のドキュメントの各セクションを繰り返し処理して、ドキュメントの内容全体を読み取り、各セクションを新しいドキュメントにコピーする方法を示します。この方法は、ドキュメント全体の構造と内容の両方をすばやく複製し、新しいドキュメントで元のドキュメントの書式とレイアウトを保持するのに役立ちます。このような操作は、ドキュメント構造の整合性と一貫性を維持するために非常に便利です。詳しい手順は以下のとおりです:
import com.spire.doc.*;

public class readWordContent {
    public static void main(String[] args) {
        // 新しいドキュメントオブジェクトを作成する
        Document document = new Document();

        // ファイルからWordドキュメントを読み込む
        document.loadFromFile("サンプル.docx");

        // 新しいドキュメントオブジェクトを作成する
        Document newdoc = new Document();

        // デフォルトスタイルを新しいドキュメントにクローンする
        document.cloneDefaultStyleTo(newdoc);

        // 元のドキュメント内の各セクションをイテレーションし、新しいドキュメントにクローンする
        for (Section sourceSection : (Iterable<Section>) document.getSections()) {
            newdoc.getSections().add(sourceSection.deepClone());
        }

        // 新しいドキュメントをファイルに保存する
        newdoc.saveToFile("output/ドキュメント内容.docx", FileFormat.Docx);

        // 新しいドキュメントオブジェクトを閉じて解放する
        newdoc.close();
        newdoc.dispose();

        // 元のドキュメントオブジェクトを閉じて解放する
        document.close();
        document.dispose();
    }
}
結果ドキュメントから評価メッセージを削除したい場合、または機能制限を取り除く場合は、についてこのメールアドレスはスパムボットから保護されています。閲覧するにはJavaScriptを有効にする必要があります。にお問い合わせ、30 日間有効な一時ライセンスを取得してください。
Word 文書における変数は、テキストの置換や削除など、便利で正確なテキスト管理ができることを特徴とするフィールドの一種です。検索・置換機能に比べ、変数に値を代入してテキストを置換する方が、高速でエラーも少ない。この記事では、Spire.Doc for Java を使用して Word 文書で変数を追加または変更する方法を示します。
まず、Spire.Doc for Java を Java プロジェクトに追加する必要があります。JAR ファイルは、このリンクからダウンロードできます。Maven を使用する場合は、次のコードをプロジェクトの pom.xml ファイルに追加する必要があります。
<repositories>
    <repository>
        <id>com.e-iceblue</id>
        <name>e-iceblue</name>
        <url>https://repo.e-iceblue.com/nexus/content/groups/public/</url>
    </repository>
</repositories>
<dependencies>
    <dependency>
        <groupId>e-iceblue</groupId>
        <artifactId>spire.doc</artifactId>
        <version>11.10.3</version>
    </dependency>
</dependencies>変数は Word のフィールドの一種であるため、Paragraph.appendField(String fieldName, FieldType.Field_Doc_Variable) メソッドを使用して変数をWord文書に挿入し、VariableCollection.add() メソッドを使用して変数に値を割り当てることができます。なお、変数に値を割り当てた後は、文書のフィールドを更新して割り当てられた値を表示する必要があります。詳細な手順は以下の通りです。
import com.spire.doc.*;
import com.spire.doc.documents.Paragraph;
import com.spire.doc.formatting.CharacterFormat;
public class AddVariables {
public static void main(String[] args) {
//Documentのオブジェクトを作成する
Document document = new Document();
//セクションを追加する
Section section = document.addSection();
//段落を追加する
Paragraph paragraph = section.addParagraph();
//テキスト形式を設定する
CharacterFormat characterFormat = paragraph.getStyle().getCharacterFormat();
characterFormat.setFontName("Yu Mincho");
characterFormat.setFontSize(12);
//ページ余白を設定する
section.getPageSetup().getMargins().setTop(80f);
//変数フィールドを段落に追加する
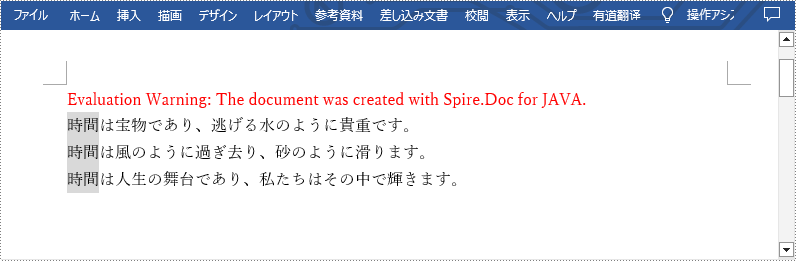
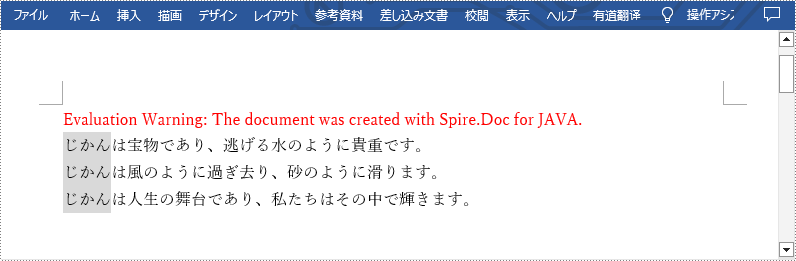
paragraph.appendField("Time", FieldType.Field_Doc_Variable);
paragraph.appendText("は宝物であり、逃げる水のように貴重です。\r\n");
paragraph.appendField("Time", FieldType.Field_Doc_Variable);
paragraph.appendText("は風のように過ぎ去り、砂のように滑ります。\r\n");
paragraph.appendField("Time", FieldType.Field_Doc_Variable);
paragraph.appendText("は人生の舞台であり、私たちはその中で輝きます。");
//変数コレクションを取得する
VariableCollection variableCollection = document.getVariables();
//変数に値を代入する
variableCollection.add("Time", "時間");
//文書内のフィールドを更新する
document.isUpdateFields(true);
//結果文書を保存する
document.saveToFile("AddVariables.docx", FileFormat.Auto);
document.dispose();
}
}
Spire.Doc for Java では、VariableCollection.set() メソッドを使用して変数の値を変更することができます。また、文書内のフィールドを更新した後、変数のすべての出現箇所には新しく割り当てられた値が表示されるため、高速かつ正確なテキストの置換が実現されます。詳細な手順は以下の通りです。
import com.spire.doc.Document;
import com.spire.doc.FileFormat;
import com.spire.doc.VariableCollection;

public class ChangeVariableValue {
    public static void main(String[] args) {

        //Documentのオブジェクトを作成する
        Document document = new Document();

        //Word文書をロードする
        document.loadFromFile("AddVariables.docx");

        //変数コレクションを取得する
        VariableCollection variableCollection = document.getVariables();

        //変数に値を代入する
        variableCollection.set("Time", "じかん");

        //文書内のフィールドを更新する
        document.isUpdateFields(true);

        //結果文書を保存する
        document.saveToFile("ChangeVariable.docx", FileFormat.Auto);
        document.dispose();
    }
}
結果ドキュメントから評価メッセージを削除したい場合、または機能制限を取り除く場合は、についてこのメールアドレスはスパムボットから保護されています。閲覧するにはJavaScriptを有効にする必要があります。にお問い合わせ、30 日間有効な一時ライセンスを取得してください。
数式は、物理学、工学、コンピュータ科学、経済学の分野で一般的に使用される数式です。専門的な Word ドキュメントを作成する際、複雑な概念を説明したり、問題を解決したり、特定の議論をサポートしたりするために、数式を含める必要がある場合があります。この記事では、Spire.Doc for Java を使用して、Java プログラムで Word ドキュメントに数式を挿入する方法について説明します。
まず、Spire.Doc for Java を Java プロジェクトに追加する必要があります。JAR ファイルは、このリンクからダウンロードできます。Maven を使用する場合は、次のコードをプロジェクトの pom.xml ファイルに追加する必要があります。
<repositories>
    <repository>
        <id>com.e-iceblue</id>
        <name>e-iceblue</name>
        <url>https://repo.e-iceblue.com/nexus/content/groups/public/</url>
    </repository>
</repositories>
<dependencies>
    <dependency>
        <groupId>e-iceblue</groupId>
        <artifactId>spire.doc</artifactId>
        <version>11.6.0</version>
    </dependency>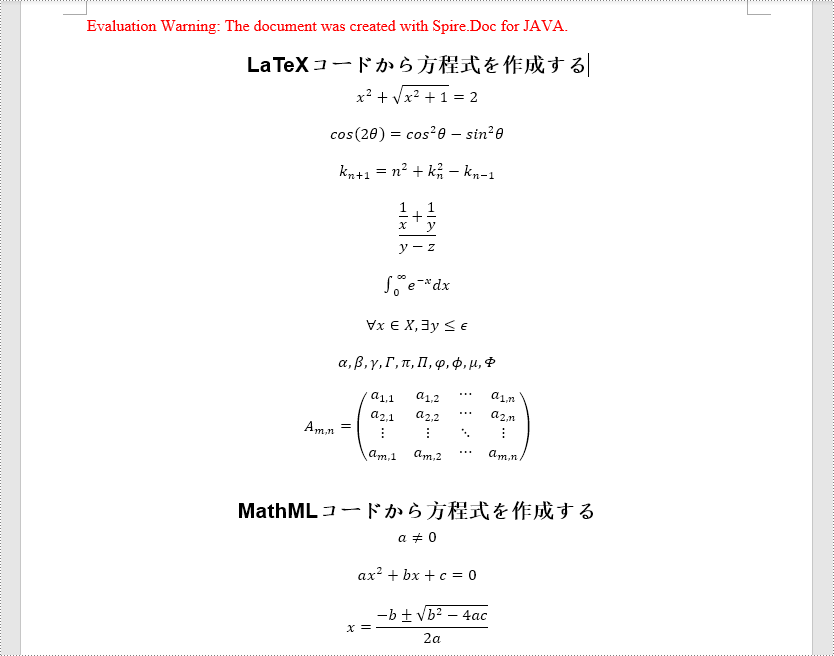
</dependencies>Spire.Doc for Java では、OfficeMath.fromLatexMathCode(String latexMathCode) メソッドと OfficeMath.fromMathMLCode(String mathMLCode) メソッドを使用して、LaTeX コードと MathML コードから数式を生成できます。以下に詳細な手順を示します。
import com.spire.doc.*;
import com.spire.doc.documents.*;
import com.spire.doc.fields.omath.*;

public class AddMathEquations {
    public static void main(String[] args){

        //LaTeXコードから文字列配列を作成する
        String[] latexMathCode = {
                "x^{2}+\\sqrt{x^{2}+1}=2",
                "\\cos (2\\theta) = \\cos^2 \\theta - \\sin^2 \\theta",
                "k_{n+1} = n^2 + k_n^2 - k_{n-1}",
                "\\frac {\\frac {1}{x}+ \\frac {1}{y}}{y-z}",
                "\\int_0^ \\infty \\mathrm {e}^{-x} \\, \\mathrm {d}x",
                "\\forall x \\in X, \\quad \\exists y \\leq \\epsilon",
                "\\alpha, \\beta, \\gamma, \\Gamma, \\pi, \\Pi, \\phi, \\varphi, \\mu, \\Phi",
                "A_{m,n} = \\begin{pmatrix} a_{1,1} & a_{1,2} & \\cdots & a_{1,n} \\\\ a_{2,1} & a_{2,2} & \\cdots & a_{2,n} \\\\ \\vdots  & \\vdots  & \\ddots & \\vdots  \\\\ a_{m,1} & a_{m,2} & \\cdots & a_{m,n} \\end{pmatrix}",
        };

        //MathMLコードから文字列配列を作成する
        String[] mathMLCode = {
                "<math xmlns=\"http://www.w3.org/1998/Math/MathML\"><mi>a</mi><mo>≠</mo><mn>0</mn></math>",
                "<math xmlns=\"http://www.w3.org/1998/Math/MathML\"><mi>a</mi><msup><mi>x</mi><mn>2</mn></msup><mo>+</mo><mi>b</mi><mi>x</mi><mo>+</mo><mi>c</mi><mo>=</mo><mn>0</mn></math>",
                "<math xmlns=\"http://www.w3.org/1998/Math/MathML\"><mi>x</mi><mo>=</mo><mrow><mfrac><mrow><mo>−</mo><mi>b</mi><mo>±</mo><msqrt><msup><mi>b</mi><mn>2</mn></msup><mo>−</mo><mn>4</mn><mi>a</mi><mi>c</mi></msqrt></mrow><mrow><mn>2</mn><mi>a</mi></mrow></mfrac></mrow></math>",
        };

        //ドキュメントのインスタンスを作成する
        Document doc = new Document();

        //セクションを追加する
        Section section = doc.addSection();

        //セクションに段落を追加する
        Paragraph textPara = section.addParagraph();
        textPara.appendText("LaTeXコードから方程式を作成する");
        textPara.applyStyle(BuiltinStyle.Heading_1);
        textPara.getFormat().setHorizontalAlignment(HorizontalAlignment.Center);

        //文字列配列内の各LaTeXコードに対して繰り返す
        for (int i = 0; i < latexMathCode.length; i++)
        {
            //LaTeXコードから数式を作成する
            OfficeMath officeMath = new OfficeMath(doc);
            officeMath.fromLatexMathCode(latexMathCode[i]);

            //数式をセクションに追加する
            Paragraph paragraph = section.addParagraph();
            paragraph.getItems().add(officeMath);
            section.addParagraph();
        }

        //セクションに段落を追加する
        textPara = section.addParagraph();
        textPara.appendText("MathMLコードから方程式を作成する");
        textPara.applyStyle(BuiltinStyle.Heading_1);
        textPara.getFormat().setHorizontalAlignment(HorizontalAlignment.Center);

        //文字列配列内の各MathMLコードに対して繰り返す
        for (int j = 0; j < mathMLCode.length; j++)
        {
            //MathMLコードから数式を作成する
            OfficeMath officeMath = new OfficeMath(doc);
            officeMath.fromMathMLCode(mathMLCode[j]);

            //数式をセクションに追加する
            Paragraph paragraph = section.addParagraph();
            paragraph.getItems().add(officeMath);
            section.addParagraph();
        }

        //結果のドキュメントを保存する
        doc.saveToFile("数式の追加.docx", FileFormat.Docx_2016);
        doc.dispose();
    }
}
結果ドキュメントから評価メッセージを削除したい場合、または機能制限を取り除く場合は、についてこのメールアドレスはスパムボットから保護されています。閲覧するにはJavaScriptを有効にする必要があります。にお問い合わせ、30 日間有効な一時ライセンスを取得してください。
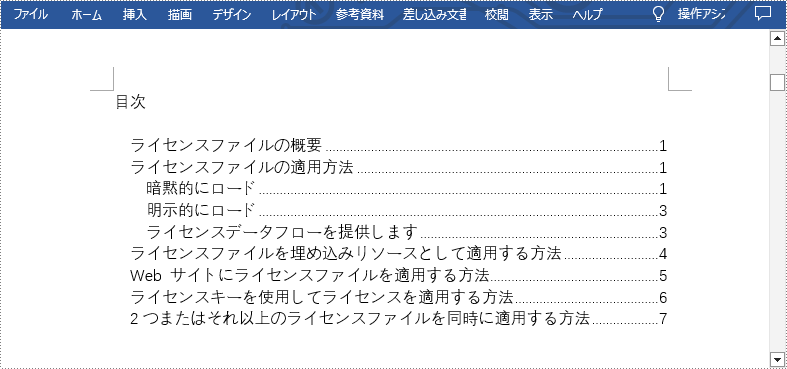
目次は、Word 文書内のフィールドで、文書内のすべてのレベルの見出しとそれに対応するページ番号を表示します。さらに、目次は文書の内容に変更が加えられた後に更新することができ、新しい文書の内容に従って新しい見出しとページ番号を生成することができます。したがって、目次は文書を編集するときにも、読むときにも大変便利であり、また、文書をよりプロフェッショナルなものにすることができます。この記事では、Spire.Doc for Java を使用して Word で目次を作成する方法を示します。
まず、Spire.Doc for Java を Java プロジェクトに追加する必要があります。JAR ファイルは、このリンクからダウンロードできます。Maven を使用する場合は、次のコードをプロジェクトの pom.xml ファイルに追加する必要があります。
<repositories>
    <repository>
        <id>com.e-iceblue</id>
        <name>e-iceblue</name>
        <url> https://repo.e-iceblue.com/nexus/content/groups/public/</url>
    </repository>
</repositories>
<dependencies>
    <dependency>
        <groupId>e-iceblue</groupId>
        <artifactId>spire.doc</artifactId>
        <version>11.10.3</version>
    </dependency>
</dependencies>目次を作成する前に、各見出しのレベルを設定する必要があります。Spire.Doc for Java では、Paragraph.appendTOC() メソッドを使用して段落に目次を挿入することができます。詳細な手順は以下の通りです。
import com.spire.doc.Document;
import com.spire.doc.Section;
import com.spire.doc.documents.Paragraph;
import com.spire.doc.fields.TableOfContent;

public class insertTableOfContents {
    public static void main(String[] args) {

        //Documentクラスのオブジェクトを作成する
        Document doc = new Document();

        //Word文書を読み込む
        doc.loadFromFile("Sample.docx");

        //セクションを追加し、文書の表紙セクションの後に挿入する
        Section section = doc.addSection();
        doc.getSections().insert(1, section);

        //セクションに段落を追加する
        Paragraph paragraph = section.addParagraph();
        paragraph.appendText("目次\r\n");
        paragraph.getStyle().getCharacterFormat().setFontSize(12f);

        //段落内に目次を作成する
        paragraph.appendTOC(2, 3);

        //目次を更新する
        doc.updateTableOfContents();

        //結果文書を保存する
        doc.saveToFile("CreateTableOfContents.docx");
    }
}
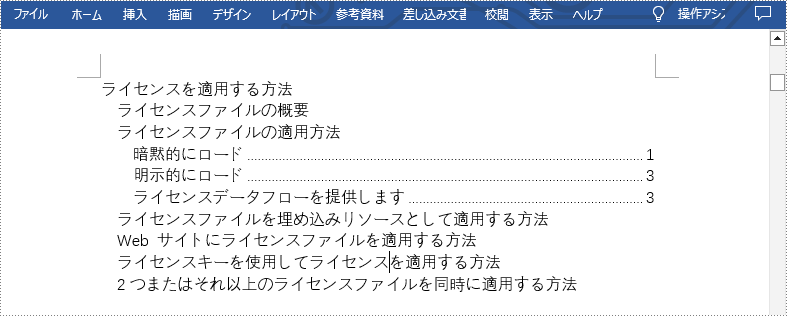
Spire.Doc for Java では、TableOfContent クラスは Word 文書の目次を表します。目次に表示される部分は、TableOfContent クラスのインスタンスを初期化する際にスイッチを使用してカスタマイズすることができます。例えば、スイッチ "{\\o \"1-3\" \\n 1-2}" は、1から3レベルの見出しを表示し、1と2レベルの見出しのページ番号を省略することを意味します。詳細な手順は以下の通りです。
*import com.spire.doc.Document;
import com.spire.doc.Section;
import com.spire.doc.documents.FieldMarkType;
import com.spire.doc.documents.Paragraph;
import com.spire.doc.fields.TableOfContent;

public class insertTableOfContentsWithCustomizedStyle {
    public static void main(String[] args) {

        //Documentクラスのオブジェクトを作成する
        Document doc = new Document();

        //Word文書を読み込む
        doc.loadFromFile("Sample.docx");

        //最初のセクションの後にセクションを挿入し、そのセクションに段落を追加する
        Section section = doc.addSection();
        doc.getSections().insert(1, section);
        Paragraph paragraph = section.addParagraph();
        paragraph.getStyle().getCharacterFormat().setFontSize(12f);

        //TableOfContent クラスのインスタンスを初期化する
        TableOfContent toc = new TableOfContent(doc, "{\\o \"1-3\" \\n 1-2}");

        //目次を挿入する
        paragraph.getItems().add(toc);

        //フィールドマークを挿入してフィールドを終了する
        paragraph.appendFieldMark(FieldMarkType.Field_Separator);
        paragraph.appendFieldMark(FieldMarkType.Field_End);

        //作成した目次を文書の目次として設定する
        doc.setTOC(toc);

        //目次を更新する
        doc.updateTableOfContents();

        //結果文書を保存する
        doc.saveToFile("TableOfContentsWithCustomizedStyle.docx");
        doc.dispose();
    }
}
結果ドキュメントから評価メッセージを削除したい場合、または機能制限を取り除く場合は、についてこのメールアドレスはスパムボットから保護されています。閲覧するにはJavaScriptを有効にする必要があります。にお問い合わせ、30 日間有効な一時ライセンスを取得してください。
ドキュメントの作成プロセスでは、レイアウト要件を満たし、論理的な構造を確立するために、ドキュメントのコンテンツを分割する必要があることがよくあります。セクション区切りやページ区切りの挿入は、コンテンツを分割する最も一般的な方法であり、ページやセクションの分割を柔軟に制御することができます。さらに、改ページや改セクションは、ドキュメントの各部分に独自の書式やスタイルを作成する際にも非常に便利です。この記事では、Spire.Doc for Java を使用して、Java プログラムを通じて Word ドキュメントにページ区切りやセクション区切りを挿入する方法を紹介します。
まず、Spire. Doc for Java を Java プロジェクトに追加する必要があります。JAR ファイルは、このリンクからダウンロードできます。Maven を使用する場合は、次のコードをプロジェクトの pom.xml ファイルに追加する必要があります。
<repositories>
    <repository>
        <id>com.e-iceblue</id>
        <name>e-iceblue</name>
        <url> https://repo.e-iceblue.com/nexus/content/groups/public/</url>
    </repository>
</repositories>
<dependencies>
    <dependency>
        <groupId>e-iceblue</groupId>
        <artifactId>spire.doc</artifactId>
        <version>11.8.1</version>
    </dependency>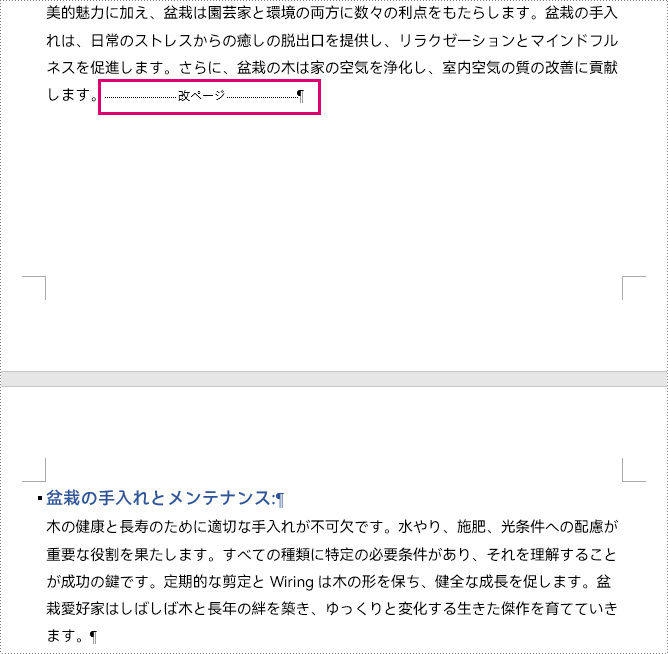
</dependencies>Spire.Doc for Java には、段落の最後に改ページを挿入するための Paragraph.appendBreak(BreakType.PageBreak) メソッドがあります。 その手順は次のとおりです。
import com.spire.doc.Document;
import com.spire.doc.FileFormat;
import com.spire.doc.Section;
import com.spire.doc.documents.BreakType;
import com.spire.doc.documents.Paragraph;

public class InsertPageBreak {
    public static void main(String[] args) {
        //Documentクラスのオブジェクトを作成する
        Document doc = new Document();

        //Word文書を読み込む
        doc.loadFromFile("サンプル.docx");

        //最初のセクションを取得する
        Section section = doc.getSections().get(0);

        //セクション内の8番目の段落を取得する
        Paragraph paragraph = section.getParagraphs().get(7);

        //段落の末尾にページ区切りを追加する
        paragraph.appendBreak(BreakType.Page_Break);

        //文書を保存する
        doc.saveToFile("ページ区切り.docx", FileFormat.Auto);
    }
}
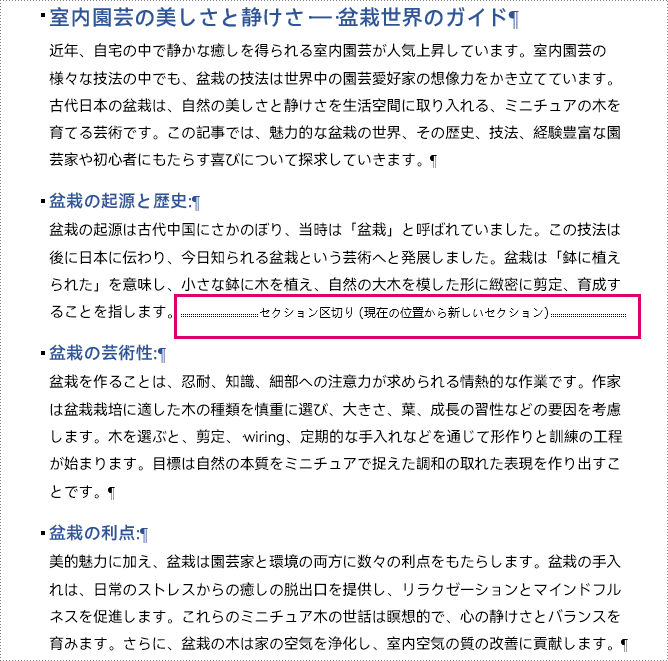
セクション区切りを挿入するには、Paragraph.insertSectionBreak(SectionBreakType) メソッドが必要です。次の表は、セクション区切りの種類と、それに対応する列挙型と説明の一覧です。
| セクション区切り | 列挙型 | 説明 |
| 次のページから開始 | SectionBreakType.New_Page | 次のページで新しいセクションを開始する。 |
| 現在の位置から開始 | SectionBreakType.No_Break | 同じページで新しいセクションを開始する。 |
| 奇数ページから開始 | SectionBreakType.Odd_Page | 次の偶数ページに新しいセクションを開始する。 |
| 偶数ページから開始 | SectionBreakType.Even_Page | 次の奇数ページに新しいセクションを開始する。 |
| 次の段から開始 | SectionBreakType.New_Column | 次の段で新しいセクションを開始する(段分割が有効になっている必要があります)。 |
セクション区切りを挿入する詳しい手順は以下の通りです。
import com.spire.doc.Document;
import com.spire.doc.FileFormat;
import com.spire.doc.Section;
import com.spire.doc.documents.Paragraph;
import com.spire.doc.documents.SectionBreakType;

public class InsertSectionBreak {
    public static void main(String[] args) {
        // Documentクラスのオブジェクトを作成する
        Document doc = new Document();

        // Word文書を読み込む
        doc.loadFromFile("サンプル.docx");

        // 最初のセクションを取得する
        Section section = doc.getSections().get(0);

        // セクション内の4番目の段落を取得する
        Paragraph paragraph = section.getParagraphs().get(3);

        // セクション区切りを挿入する
        paragraph.insertSectionBreak(SectionBreakType.No_Break);

        // 文書を保存する
        doc.saveToFile("セクション区切り.docx", FileFormat.Auto);
    }
}
結果ドキュメントから評価メッセージを削除したい場合、または機能制限を取り除く場合は、についてこのメールアドレスはスパムボットから保護されています。閲覧するにはJavaScriptを有効にする必要があります。にお問い合わせ、30 日間有効な一時ライセンスを取得してください。
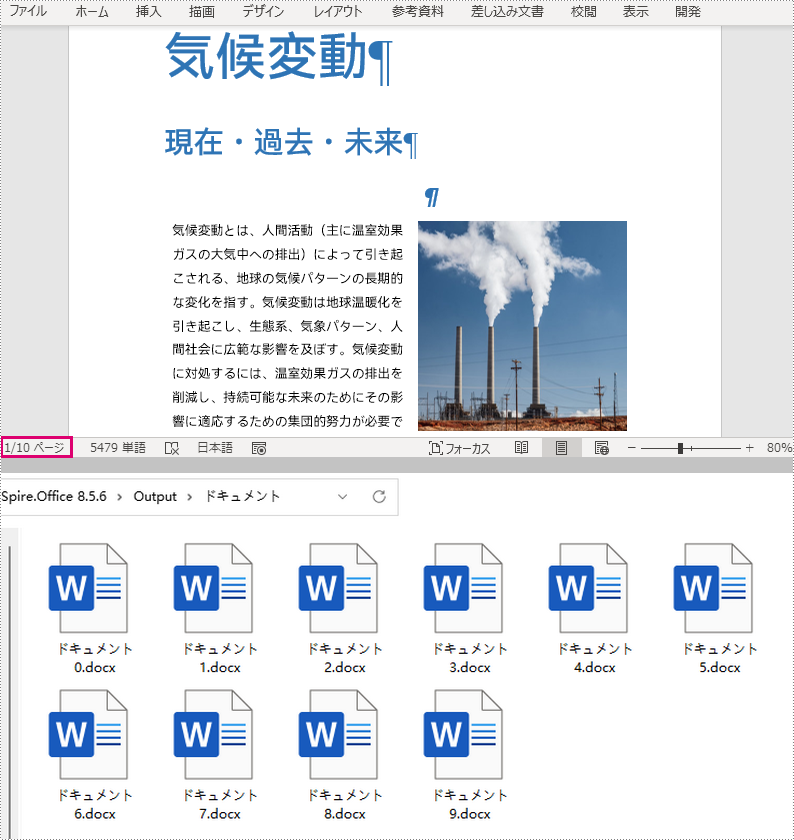
チーム作業が必要なかなり長い Word ドキュメントがある場合、作業を効率化するためにドキュメントをいくつかの短いファイルに分割し、それぞれの担当者に割り当てる必要があるかもしれません。この記事では、手作業でカット&ペーストする代わりに、Spire.Doc for Java を使ってプログラムで Word ドキュメントを分割する方法を紹介します。
まず、Spire. Doc for Java を Java プロジェクトに追加する必要があります。JAR ファイルは、このリンクからダウンロードできます。Maven を使用する場合は、次のコードをプロジェクトの pom.xml ファイルに追加する必要があります。
<repositories>
    <repository>
        <id>com.e-iceblue</id>
        <name>e-iceblue</name>
        <url> https://repo.e-iceblue.com/nexus/content/groups/public/</url>
    </repository>
</repositories>
<dependencies>
    <dependency>
        <groupId>e-iceblue</groupId>
        <artifactId>spire.doc</artifactId>
        <version>11.6.0</version>
    </dependency>
</dependencies>
Word ドキュメントには、改ページで区切られた複数のページを含めることができます。Word ドキュメントを改ページで分割するには、以下の手順とコードを参照してください。
import com.spire.doc.*;
import com.spire.doc.documents.BreakType;
import com.spire.doc.documents.Paragraph;

public class splitByPageBreak {
    public static void main(String[] args) {

        //Documentのインスタンスを作成する
        Document original = new Document();

        //Wordドキュメントを読み込む
        original.loadFromFile("サンプル.docx");

        //新しいWordドキュメントを作成し、そこにセクションを追加する
        Document newWord = new Document();
        Section section = newWord.addSection();
        int index = 0;

        //原文のすべてのセクションをループする
        for (int s = 0; s < original.getSections().getCount(); s++) {
            Section sec = original.getSections().get(s);

            //各セクションに含まれるボディーの子オブジェクトをすべてループする
            for (int c = 0; c < sec.getBody().getChildObjects().getCount(); c++) {
                DocumentObject obj = sec.getBody().getChildObjects().get(c);
                if (obj instanceof Paragraph) {
                    Paragraph para = (Paragraph) obj;
                    sec.cloneSectionPropertiesTo(section);

                    //元のセクションの段落オブジェクトを新しいドキュメントのセクションに追加する
                    section.getBody().getChildObjects().add(para.deepClone());
                    for (int i = 0; i < para.getChildObjects().getCount(); i++) {
                        DocumentObject parobj = para.getChildObjects().get(i);
                        if (parobj instanceof Break) {
                            Break break1 = (Break) parobj;
                            if (break1.getBreakType().equals(BreakType.Page_Break)) {

                                //段落内の改ページのインデックスを取得する
                                int indexId = para.getChildObjects().indexOf(parobj);

                                //段落から改ページを削除する
                                Paragraph newPara = (Paragraph) section.getBody().getLastParagraph();
                                newPara.getChildObjects().removeAt(indexId);

                                //新しいWordドキュメントを保存する
                                newWord.saveToFile("Output/ドキュメント/ドキュメント"+index+".docx", FileFormat.Docx);
                                index++;

                                //新しいWordドキュメントを作成し、そこにセクションを追加する
                                newWord = new Document();
                                section = newWord.addSection();

                                //元のセクションの段落オブジェクトを新しいドキュメントのセクションに追加する
                                section.getBody().getChildObjects().add(para.deepClone());
                                if (section.getParagraphs().get(0).getChildObjects().getCount() == 0) {

                                    //最初の空白段落を削除する
                                    section.getBody().getChildObjects().removeAt(0);
                                } else {

                                    //改ページの前に子オブジェクトを削除する
                                    while (indexId >= 0) {
                                        section.getParagraphs().get(0).getChildObjects().removeAt(indexId);
                                        indexId--;
                                    }
                                }
                            }
                        }
                    }
                }
                if (obj instanceof Table) {

                    //元のセクションの表のオブジェクトを新しいドキュメントのセクションに追加する
                    section.getBody().getChildObjects().add(obj.deepClone());
                }
            }
        }

        //ドキュメントを保存する
        newWord.saveToFile("Output/ドキュメント/ドキュメント"+index+".docx", FileFormat.Docx);
    }
}
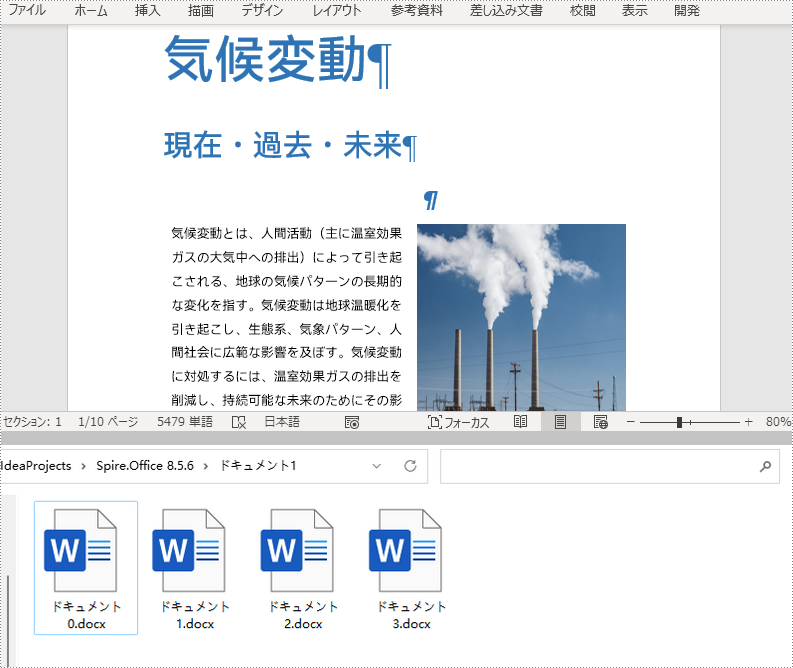
Word ドキュメントでは、セクションは独自のページ書式を含むドキュメントの一部です。複数のセクションを含むドキュメントについては、Spire.Doc for Java はセクション区切りによるドキュメントの分割もサポートしています。詳しい手順は以下の通りです。
import com.spire.doc.Document;
import com.spire.doc.Section;

public class splitBySectionBreak {
    public static void main(String[] args) {

        //Documentのインスタンスを作成する
        Document document = new Document();

        //Word ドキュメントを読み込む
        document.loadFromFile("サンプル.docx");

        //新しいWordドキュメントのオブジェクトを定義する
        Document newWord;

        //元のWordドキュメントのすべてのセクションをループする
        for (int i = 0; i < document.getSections().getCount(); i++) {
            newWord = new Document();

            //元の文書の各セクションをコピーし、新しいセクションとして新しい文書に追加する
            newWord.getSections().add(document.getSections().get(i).deepClone());

            //結果ドキュメントを保存する
            newWord.saveToFile("ドキュメント1/ドキュメント" + i + ".docx");
        }
    }
}
結果ドキュメントから評価メッセージを削除したい場合、または機能制限を取り除く場合は、についてこのメールアドレスはスパムボットから保護されています。閲覧するにはJavaScriptを有効にする必要があります。にお問い合わせ、30 日間有効な一時ライセンスを取得してください。
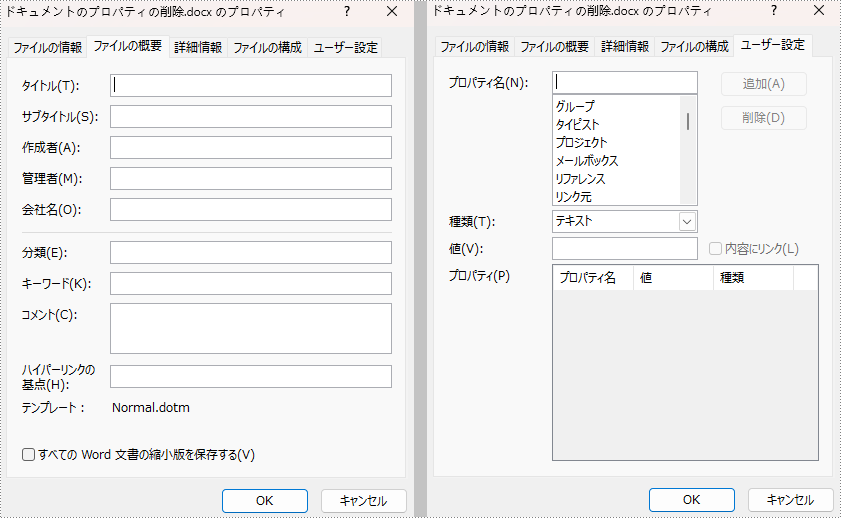
ドキュメントのプロパティとは、タイトル、サブタイトル、作成者、会社名、キーワードなど、Word ドキュメントに含まれるいくつかの重要な情報です。この情報を読み取ることで、ドキュメントの特定、ドキュメントの種類や出所の迅速な確認、ドキュメントの保管や整理の効率化などに役立てることができます。ただし、作成者や会社名などの文書のプロパティが他人に知られることが不適切な場合は、プライバシー保護のために削除することができます。この記事では、Spire.Doc for Java を使用して、プログラム的に Word ドキュメントのプロパティを読んだり削除したりする方法を紹介します。
まず、Spire. Doc for Java を Java プロジェクトに追加する必要があります。JAR ファイルは、このリンクからダウンロードできます。Maven を使用する場合は、次のコードをプロジェクトの pom.xml ファイルに追加する必要があります。
<repositories>
    <repository>
        <id>com.e-iceblue</id>
        <name>e-iceblue</name>
        <url> https://repo.e-iceblue.com/nexus/content/groups/public/</url>
    </repository>
</repositories>
<dependencies>
    <dependency>
        <groupId>e-iceblue</groupId>
        <artifactId>spire.doc</artifactId>
        <version>11.5.5</version>
    </dependency>
</dependencies>
Word ドキュメントには、組み込みのプロパティとユーザー定義のプロパティの2種類があります。組み込みプロパティとは、あらかじめ定義されたプロパティのことで、ユーザー定義プロパティとは、名前、型、値などをカスタマイズしたプロパティのことです。この2種類の文書プロパティを読み取るための詳細な手順は、以下の通りです。
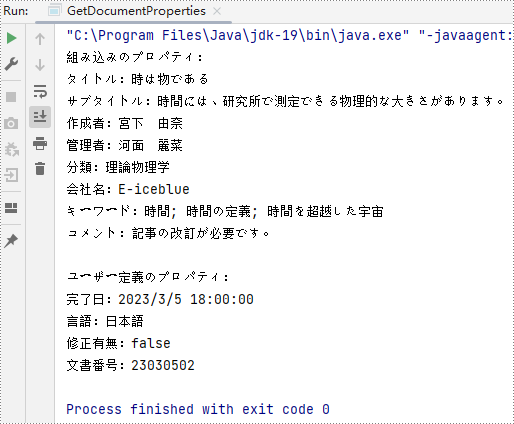
import com.spire.doc.BuiltinDocumentProperties;
import com.spire.doc.CustomDocumentProperties;
import com.spire.doc.Document;

public class GetDocumentProperties {
    public static void main(String[] args) {

        //Documentのオブジェクトを作成する
        Document document = new Document();

        //Wordドキュメントを読み込む
        document.loadFromFile("C:/サンプル.docx");

        //StringBuilderのオブジェクトを作成する
        StringBuilder properties = new StringBuilder();

        //すべての組み込みプロパティとユーザー定義プロパティを取得する
        BuiltinDocumentProperties builtinDocumentProperties = document.getBuiltinDocumentProperties();
        CustomDocumentProperties customDocumentProperties = document.getCustomDocumentProperties();

        //各組み込みプロパティを取得する
        String title = builtinDocumentProperties.getTitle();
        String subject = builtinDocumentProperties.getSubject();
        String author = builtinDocumentProperties.getAuthor();
        String manager = builtinDocumentProperties.getManager();
        String category = builtinDocumentProperties.getCategory();
        String company = builtinDocumentProperties.getCompany();
        String keywords = builtinDocumentProperties.getKeywords();
        String comments = builtinDocumentProperties.getComments();

        //表示する文字列の形式を設定する
        String builtinProperties = String.format("組み込みのプロパティ:\r\nタイトル:" + title
                + "\r\nサブタイトル:" + subject + "\r\n作成者:" + author
                + "\r\n管理者:" + manager + "\r\n分類:" + category
                + "\r\n会社名:" + company + "\r\nキーワード:"+ keywords
                + "\r\nコメント:" + comments
        );

        //StringBuilderのオブジェクトに組み込みのプロパティを追加する
        properties.append(builtinProperties);

        //各ユーザー定義プロパティを取得する
        properties.append("\r\n\r\nユーザー定義のプロパティ:");
        for (int i = 0; i < customDocumentProperties.getCount(); i++) {
            String customProperties = String.format("\r\n" + customDocumentProperties.get(i).getName() + ":" + document.getCustomDocumentProperties().get(i).getValue());

            //StringBuilderのオブジェクトにユーザー定義のプロパティを追加する
            properties.append(customProperties);
        }

        //ドキュメントのプロパティを出力する
        System.out.println(properties);
    }
}
組み込みのドキュメントのプロパティは、その値を空に設定することで削除することができます。ユーザー定義のドキュメントのプロパティについては、CustomDocumentProperties.get().getName() メソッドで名前を取得し、CustomDocumentProperties.remove() メソッドを使用して削除することができます。詳しい手順は以下の通りです。
import com.spire.doc.BuiltinDocumentProperties;
import com.spire.doc.CustomDocumentProperties;
import com.spire.doc.Document;
import com.spire.doc.FileFormat;

public class RemoveDocumentProperties {
    public static void main(String[] args) {

        //Documentのオブジェクトを作成する
        Document document = new Document();

        //Wordドキュメントを読み込む
        document.loadFromFile("C:/サンプル.docx");

        //すべての組み込みプロパティとユーザー定義プロパティを取得する
        BuiltinDocumentProperties builtinDocumentProperties = document.getBuiltinDocumentProperties();
        CustomDocumentProperties customDocumentProperties = document.getCustomDocumentProperties();

        //組み込みプロパティの値を空に設定することで削除する
        builtinDocumentProperties.setTitle("");
        builtinDocumentProperties.setSubject("");
        builtinDocumentProperties.setAuthor("");
        builtinDocumentProperties.setManager("");
        builtinDocumentProperties.setCompany("");
        builtinDocumentProperties.setCategory("");
        builtinDocumentProperties.setKeywords("");
        builtinDocumentProperties.setComments("");

        //ユーザー定義プロパティの件数を取得する
        int count = customDocumentProperties.getCount();

        //ユーザー定義プロパティをループして削除する
        for (int i = count; i > 0; i-- ){

            //ユーザー定義プロパティの名前を取得する
            String name = customDocumentProperties.get(i-1).getName();

            //ユーザー定義プロパティをその名前で削除する
            customDocumentProperties.remove(name);
        }

        //ドキュメントを保存する
        document.saveToFile("ドキュメントのプロパティの削除.docx", FileFormat.Auto);
        document.dispose();
    }
}
結果ドキュメントから評価メッセージを削除したい場合、または機能制限を取り除く場合は、についてこのメールアドレスはスパムボットから保護されています。閲覧するにはJavaScriptを有効にする必要があります。にお問い合わせ、30 日間有効な一時ライセンスを取得してください。
変更履歴とは、Word ドキュメントの機能で、ドキュメントに加えられたすべての変更を確認し、その変更を承諾するか元に戻すかを決定することができるものです。特に、同じ契約書や学校の課題で複数の人と共同作業をしている場合に非常に便利です。この記事では、Spire.Doc for Java を使用して、Word ドキュメントで変更履歴をすべて承諾または元に戻す方法について説明します。
まず、Spire. Doc for Java を Java プロジェクトに追加する必要があります。JAR ファイルは、このリンクからダウンロードできます。Maven を使用する場合は、次のコードをプロジェクトの pom.xml ファイルに追加する必要があります。
<repositories>
    <repository>
        <id>com.e-iceblue</id>
        <name>e-iceblue</name>
        <url> https://repo.e-iceblue.com/nexus/content/groups/public/</url>
    </repository>
</repositories>
<dependencies>
    <dependency>
        <groupId>e-iceblue</groupId>
        <artifactId>spire.doc</artifactId>
        <version>11.4.2</version>
    </dependency>
</dependencies>詳しい手順は以下の通りです。
import com.spire.doc.Document;
import com.spire.doc.FileFormat;

public class AcceptTrackedChanges {
    public static void main(String[] args) {

        //Documentのインスタンスを作成する
        Document doc = new Document();

        //Wordドキュメントを読み込む
        doc.loadFromFile("C:/変更履歴.docx");

        //ドキュメントのすべての変更を承諾する
        doc.acceptChanges();

        //ドキュメントを保存する
        doc.saveToFile("すべての変更の承諾.docx", FileFormat.Docx);
    }
}
詳しい手順は以下の通りです。
import com.spire.doc.Document;
import com.spire.doc.FileFormat;

public class RejectTrackedChanges {
    public static void main(String[] args) {

        //Documentのインスタンスを作成する
        Document doc = new Document();

        //Wordドキュメントを読み込む
        doc.loadFromFile("C:/変更履歴.docx");

        //ドキュメントのすべての変更を元に戻す
        doc.rejectChanges();

        //ドキュメントを保存する
        doc.saveToFile("すべての変更を元に戻す.docx", FileFormat.Docx);
    }
}
結果ドキュメントから評価メッセージを削除したい場合、または機能制限を取り除く場合は、についてこのメールアドレスはスパムボットから保護されています。閲覧するにはJavaScriptを有効にする必要があります。にお問い合わせ、30 日間有効な一時ライセンスを取得してください。