Excel の数式は、スプレッドシート内のデータに対して演算や処理を行うための式です。基本的な加算・減算・乗算・除算に加え、統計処理、日付や時間の計算、論理判定など、さまざまな高度な関数も利用できます。Excel に数式を取り入れることで、作業の効率化、エラーの削減、データからの洞察取得を実現できます。
本記事では、Spire.XLS for Python を使用して、Excel ファイルに数式を追加・読み取る方法 を詳しく解説します。
Spire.XLS for Python のインストール
この操作には、Spire.XLS for Python と plum-dispatch v1.7.4 が必要です。これらは、Spire.XLS for Python の公式ウェブサイトから手動でダウンロードするか、以下の pip コマンドでインストールできます。
pip install Spire.XLS
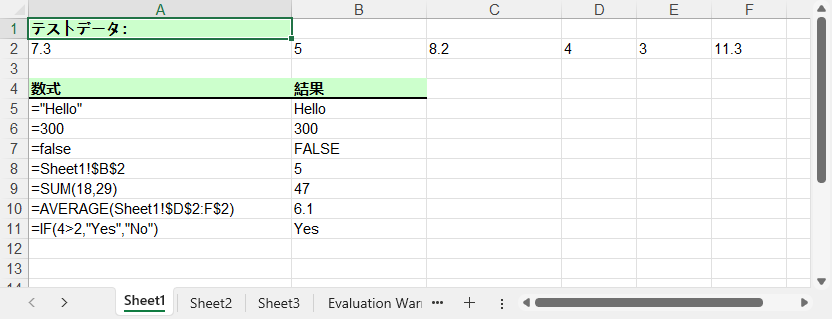
Python で Excel に数式を追加する
Spire.XLS for Python では、特定のセルに数式を追加するために Worksheet.Range[rowIndex, columnIndex].Formula プロパティを使用します。以下は、数式を追加する具体的な手順です。
- Workbook クラスのオブジェクトを作成します。
- Workbook.Worksheets[sheetIndex] プロパティで、対象のワークシートを取得します。
- Worksheet.Range[rowIndex, columnIndex].Text および .NumberValue プロパティで、セルにテキストや数値データを追加します。
- Worksheet.Range[rowIndex, columnIndex].Formula プロパティで、セルに数式を入力します。
- Workbook.SaveToFile() メソッドを使って、結果を Excel ファイルとして保存します。
from spire.xls import *

# Workbook クラスのオブジェクトを作成します
workbook = Workbook()

# 最初のワークシートを取得します
sheet = workbook.Worksheets[0]

# 変数 currentRow と currentFormula を宣言します
currentRow = 1
currentFormula = ""

# ワークシートにテキストを追加し、セルのスタイルを設定します
sheet.Range[currentRow, 1].Text = "テストデータ:"
sheet.Range[currentRow, 1].Style.Font.IsBold = True
sheet.Range[currentRow, 1].Style.FillPattern = ExcelPatternType.Solid
sheet.Range[currentRow, 1].Style.KnownColor = ExcelColors.LightGreen1
sheet.Range[currentRow, 1].Style.Borders[BordersLineType.EdgeBottom].LineStyle = LineStyleType.Medium
currentRow += 1

# ワークシートに数値データを追加します
sheet.Range[currentRow, 1].NumberValue = 7.3
sheet.Range[currentRow, 2].NumberValue = 5
sheet.Range[currentRow, 3].NumberValue = 8.2
sheet.Range[currentRow, 4].NumberValue = 4
sheet.Range[currentRow, 5].NumberValue = 3
sheet.Range[currentRow, 6].NumberValue = 11.3
currentRow += 2

# ワークシートにテキストを追加し、セルのスタイルを設定します
sheet.Range[currentRow, 1].Text = "数式"
sheet.Range[currentRow, 2].Text = "結果"
sheet.Range[currentRow, 1, currentRow, 2].Style.Font.IsBold = True
sheet.Range[currentRow, 1, currentRow, 2].Style.KnownColor = ExcelColors.LightGreen1
sheet.Range[currentRow, 1, currentRow, 2].Style.FillPattern = ExcelPatternType.Solid
sheet.Range[currentRow, 1, currentRow, 2].Style.Borders[BordersLineType.EdgeBottom].LineStyle = LineStyleType.Medium
currentRow += 1

# --- 代表的な数式・関数のみ追加 ---

# 文字列
currentFormula = "=\"Hello\""
sheet.Range[currentRow, 1].Text = "'" + currentFormula
sheet.Range[currentRow, 2].Formula = currentFormula
currentRow += 1

# 整数
currentFormula = "=300"
sheet.Range[currentRow, 1].Text = "'" + currentFormula
sheet.Range[currentRow, 2].Formula = currentFormula
currentRow += 1

# 論理値(ブール値)
currentFormula = "=false"
sheet.Range[currentRow, 1].Text = "'" + currentFormula
sheet.Range[currentRow, 2].Formula = currentFormula
currentRow += 1

# セル参照
currentFormula = "=Sheet1!$B$2"
sheet.Range[currentRow, 1].Text = "'" + currentFormula
sheet.Range[currentRow, 2].Formula = currentFormula
currentRow += 1

# SUM(合計)
currentFormula = "=SUM(18,29)"
sheet.Range[currentRow, 1].Text = "'" + currentFormula
sheet.Range[currentRow, 2].Formula = currentFormula
currentRow += 1

# AVERAGE(平均)
currentFormula = "=AVERAGE(Sheet1!$D$2:F$2)"
sheet.Range[currentRow, 1].Text = "'" + currentFormula
sheet.Range[currentRow, 2].Formula = currentFormula
currentRow += 1

# IF(条件分岐)
currentFormula = "=IF(4>2,\"Yes\",\"No\")"
sheet.Range[currentRow, 1].Text = "'" + currentFormula
sheet.Range[currentRow, 2].Formula = currentFormula
currentRow += 1

# 1列目、2列目、3列目の列幅を設定します
sheet.SetColumnWidth(1, 32)
sheet.SetColumnWidth(2, 16)
sheet.SetColumnWidth(3, 16)

# セルスタイルを作成します
style = workbook.Styles.Add("Style")
style.HorizontalAlignment = HorizontalAlignType.Left
sheet.ApplyStyle(style)

# 結果ファイルを保存します
workbook.SaveToFile("output/Excelに数式を挿入.xlsx", ExcelVersion.Version2016)
workbook.Dispose()
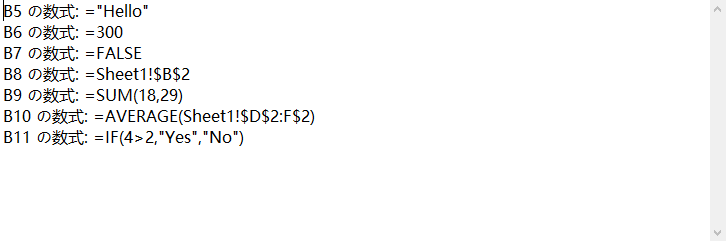
Python で Excel の数式を読み取る
Excel ワークシート内の数式を読み取るには、すべてのセルをループし、Cell.HasFormula プロパティで数式の有無を確認した上で、CellRange.Formula プロパティでその内容を取得します。以下が具体的な手順です。
- Workbook クラスのオブジェクトを作成します。
- Workbook.LoadFromFile() メソッドで Excel ファイルを読み込みます。
- Workbook.Worksheets[sheetIndex] プロパティを使って、対象のワークシートを取得します。
- Worksheet.AllocatedRange プロパティで、使用されているセル範囲を取得します。
- 空のリストを作成します。
- 使用範囲内のすべてのセルをループ処理します。
- 各セルの Cell.HasFormula プロパティで数式の有無をチェックします。
- 数式を含むセルの CellRange.RangeAddressLocal(セル名)と .Formula(数式内容)を取得します。
- セルのアドレスと数式をリストに追加します。
- リストの内容をテキストファイルに書き出します。
from spire.xls import *

# Workbook クラスのオブジェクトを作成する
workbook = Workbook()
# Excel ファイルを読み込む
workbook.LoadFromFile("output/Excelに数式を挿入.xlsx")

# 最初のワークシートを取得する
sheet = workbook.Worksheets[0]

# ワークシートの使用範囲を取得する
usedRange = sheet.AllocatedRange

# 空のリストを作成する
list = []

# 使用範囲の各セルをループ処理する
for cell in usedRange:
    # セルに数式が含まれているか確認する
    if cell.HasFormula:
        # セルのアドレス(例:B3)を取得する
        cellName = cell.RangeAddressLocal
        # セルに設定されている数式を取得する
        formula = cell.Formula
        # セル名と数式をリストに追加する(日本語で)
        list.append(cellName + " の数式: " + formula)

# リストの内容をテキストファイルに書き込む(日本語ファイル名)
with open("output/数式一覧.txt", "w", encoding="utf-8") as text_file:
    for item in list:
        text_file.write(item + "\n")

# Workbook オブジェクトを解放する
workbook.Dispose()
一時ライセンスを申請する
結果ドキュメントから評価メッセージを削除したい場合、または機能制限を取り除く場合は、についてこのメールアドレスはスパムボットから保護されています。閲覧するにはJavaScriptを有効にする必要があります。にお問い合わせ、30 日間有効な一時ライセンスを取得してください。