チュートリアル
簡単にライブラリーを使用するためのチュートリアルコレクション

Spire.Doc 11.5.12のリリースを発表できることを嬉しく思います。このバージョンでは、WordからPDFやHTMLへの変換機能が強化されました。また、文書をロードする際にアプリケーションが「System.InvalidCastException」をスローしたなど、既知の問題も修正されました。詳細は以下の内容を読んでください。
| カテゴリー | ID | 説明 |
| Bug | SPIREDOC-8643 | 文書をロードする際にアプリケーションが「System.InvalidCastException」をスローした問題が修正されました。 |
| Bug | SPIREDOC-8946 | WordをHTMLに変換した後にコンテンツが失われていた問題が修正されました。 |
| Bug | SPIREDOC-9217 | Word文書をロードする際にアプリケーションが「System.InvalidOperationException」をスローした問題が修正されました。 |
| Bug | SPIREDOC-9288 | Word文書をマージする際にアプリケーションが「System.ArgumentException」をスローした問題が修正されました。 |
| Bug | SPIREDOC-9293 | WordをPDFに変換した後にテキストのインデントエラーの問題が修正されました。 |
| Bug | SPIREDOC-9294 | WordをPDFに変換した後の文書の右余白が正しくない問題が修正されました。 |
| Bug | SPIREDOC-9295 | WordをPDFに変換した後にテーブルが整列していない問題が修正されました。 |
| Bug | SPIREDOC-9377 | WordをHTMLに変換した後にコンテンツの文字化けの問題が修正されました。 |
Excel の「検索と置換」機能は、大規模な Excel スプレッドシートを編集する際に不可欠なツールです。この機能により、ユーザーはワークシートまたは指定されたセル範囲内で特定の値を検索し、新しい値で元の値を迅速に置き換えることができます。この機能によって手動の煩雑な検索を回避し、作業効率を向上させることができます。この記事では、Spire.XLS for .NET を使用して、C# および VB.NET でプログラムによって Excel のデータを検索して置換する方法を紹介します。
まず、Spire.XLS for .NET パッケージに含まれている DLL ファイルを .NET プロジェクトの参照として追加する必要があります。DLL ファイルは、このリンクからダウンロードするか、NuGet を介してインストールできます。
PM> Install-Package Spire.XLSSpire.XLS for.NET には、Worksheet.FindAllString(string stringValue, bool formula, bool formulaValue) メソッドが用意されており、Excel で特定の数値を含むセルを検索できます。その後、CellRange.Text プロパティを使用して値を更新します。具体的な手順は次のとおりです。
using Spire.Xls;
using System.Drawing;

namespace ReplaceDataInWorksheet
{
    internal class Program
    {
        static void Main(string[] args)
        {
            //Workbookクラスのインスタンスを初期化する
            Workbook workbook = new Workbook();
            //Excelファイルを読み込む
            workbook.LoadFromFile(@"Sample.xlsx");

            //最初のシートを取得する
            Worksheet worksheet = workbook.Worksheets[0];

            //ワークシート内の特定の文字列値「総額」を持つセルを検索する
            CellRange[] cells = worksheet.FindAllString("総額", true, true);

            //見つかったセルをループする
            foreach (CellRange cell in cells)
            {
                //セルの値を別の値に置き換える
                cell.Text = "差額";
                //セルの背景色を設定する
                cell.Style.Color = Color.Yellow;
            }

            //結果ファイルを保存する
            workbook.SaveToFile("ReplaceDataInWorksheet.xlsx", ExcelVersion.Version2016);
            workbook.Dispose();
        }
    }
}
Imports Spire.Xls
Imports System.Drawing
Namespace ReplaceDataInWorksheet
Friend Class Program
Private Shared Sub Main(ByVal args As String())
'Workbookクラスのインスタンスを初期化する
Dim workbook As Workbook = New Workbook()
'Excelファイルを読み込む
workbook.LoadFromFile("Sample.xlsx")
'最初のシートを取得する
Dim worksheet As Worksheet = workbook.Worksheets(0)
'ワークシート内の特定の文字列値「総額」を持つセルを検索する
Dim cells As CellRange() = worksheet.FindAllString("総額", True, True)
'見つかったセルをループし、セルの値を別の値に置き換える
For Each cell As CellRange In cells
'Replace the value of the cell with another value
cell.Text = "差額"
'セルの背景色を設定する
cell.Style.Color = Color.Yellow
Next
'結果ファイルを保存する
workbook.SaveToFile("ReplaceDataInWorksheet.xlsx", ExcelVersion.Version2016)
workbook.Dispose()
End Sub
End Class
End Namespace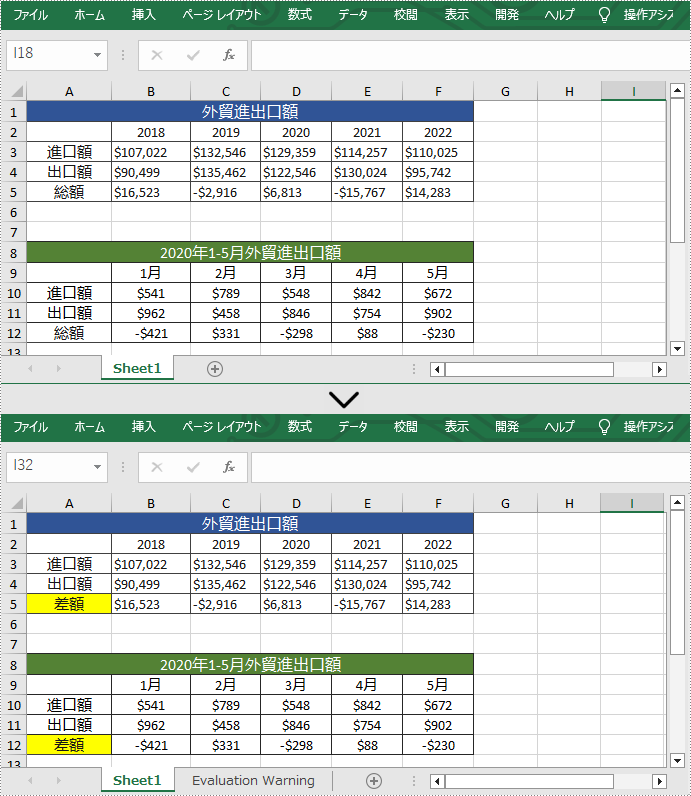
CellRange.FindAllString(string stringValue, bool formula, bool formulaValue) メソッドを使用して、特定の値を含むセルをセル範囲で検索できます。その後、CellRange.Text プロパティを使用して、以前の値を別の値に置き換えます。具体的な手順は次のとおりです。
using Spire.Xls;
using System.Drawing;

namespace ReplaceDataInCellRange
{
    internal class Program
    {
        static void Main(string[] args)
        {
            //Workbookクラスのインスタンスを初期化する
            Workbook workbook = new Workbook();
            //Excelファイルを読み込む
            workbook.LoadFromFile(@"Sample.xlsx");

            //最初のシートを取得する
            Worksheet worksheet = workbook.Worksheets[0];

            //特定のセル範囲を取得する
            CellRange range = worksheet.Range["A3:A5"];

            //特定の値「総額」を持つセルをセル範囲で検索する
            CellRange[] cells = range.FindAllString("総額", true, true);

            //見つかったセルをループする
            foreach (CellRange cell in cells)
            {
                //セルの値を別の値に置き換える
                cell.Text = "差額";
                //セルの背景色を設定する
                cell.Style.Color = Color.Yellow;
            }

            //結果ファイルを保存する
            workbook.SaveToFile("ReplaceDataInCellRange.xlsx", ExcelVersion.Version2016);
            workbook.Dispose();
        }
    }
}
Imports Spire.Xls
Imports System.Drawing
Namespace ReplaceDataInCellRange
Friend Class Program
Private Shared Sub Main(ByVal args As String())
'Workbookクラスのインスタンスを初期化する
Dim workbook As Workbook = New Workbook()
'Excelファイルを読み込む
workbook.LoadFromFile("Sample.xlsx")
'最初のシートを取得する
Dim worksheet As Worksheet = workbook.Worksheets(0)
'特定のセル範囲を取得する
Dim range As CellRange = worksheet.Range("A3:A5")
'特定の値「総額」を持つセルをセル範囲で検索する
Dim cells As CellRange() = range.FindAllString("総額", True, True)
'見つかったセルをループする
For Each cell As CellRange In cells
'セルの値を別の値に置き換える
cell.Text = "差額"
'セルの背景色を設定する
cell.Style.Color = Color.Yellow
Next
'結果ファイルを保存する
workbook.SaveToFile("ReplaceDataInCellRange.xlsx", ExcelVersion.Version2016)
workbook.Dispose()
End Sub
End Class
End Namespace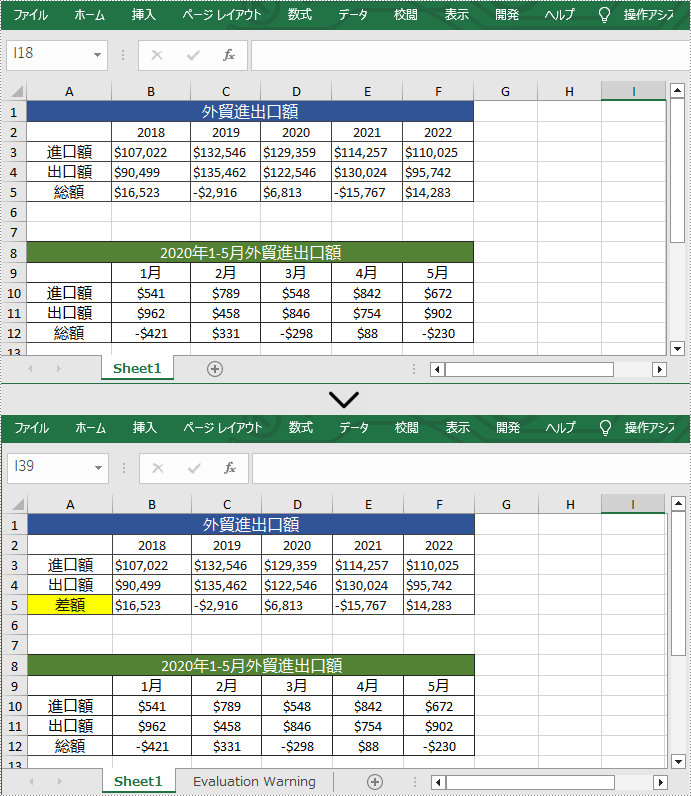
結果ドキュメントから評価メッセージを削除したい場合、または機能制限を取り除く場合は、についてこのメールアドレスはスパムボットから保護されています。閲覧するにはJavaScriptを有効にする必要があります。にお問い合わせ、30 日間有効な一時ライセンスを取得してください。
リストは、情報を効率的に組織するための非常に効果的な方法です。この機能は、情報を明確かつ直感的に表示し、その論理的関係を示すことができるため、読者の注意を引き付けます。具体的なニーズに応じて、Word ドキュメントに番号付きリスト、箇条書きリスト、または多レベルリストを追加することができます。この記事では、Spire.Doc for Java を使用して Word 文書に次のリストを挿入する方法を示します。
まず、Spire.Doc for Java を Java プロジェクトに追加する必要があります。JAR ファイルは、このリンクからダウンロードできます。Maven を使用する場合は、次のコードをプロジェクトの pom.xml ファイルに追加する必要があります。
<repositories>
    <repository>
        <id>com.e-iceblue</id>
        <name>e-iceblue</name>
        <url> https://repo.e-iceblue.com/nexus/content/groups/public/</url>
    </repository>
</repositories>
<dependencies>
    <dependency>
        <groupId>e-iceblue</groupId>
        <artifactId>spire.doc</artifactId>
        <version>11.4.2</version>
    </dependency>
</dependencies>Spire.Doc for Java には、番号付きリストや箇条書きリストを作成するための ListStyle クラスが用意されています。次に、Paragraph.getListFormat().applyStyle() メソッドを使用して、リストスタイルを段落に適用できます。番号付きリストを作成する手順は次のとおりです。
import com.spire.doc.Document;
import com.spire.doc.FileFormat;
import com.spire.doc.Section;
import com.spire.doc.documents.ListPatternType;
import com.spire.doc.documents.ListStyle;
import com.spire.doc.documents.ListType;
import com.spire.doc.documents.Paragraph;
public class InsertNumberedList {
public static void main(String[] args) {
//Documentオブジェクトを作成する
Document document = new Document();
//セクションを追加する
Section section = document.addSection();
//番号付きリストのスタイルを作成する
ListStyle listStyle = new ListStyle(document, ListType.Numbered);
listStyle.setName("numberedList");
listStyle.getLevels().get(0).setPatternType(ListPatternType.Decimal_Half_Width);
listStyle.getLevels().get(0).setTextPosition(20);
document.getListStyles().add(listStyle);
//段落を追加する
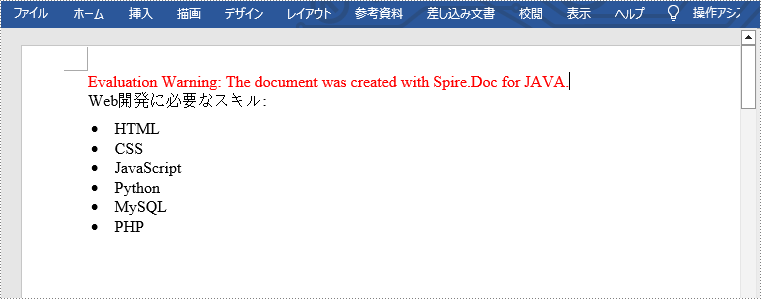
Paragraph paragraph = section.addParagraph();
paragraph.appendText("Web開発に必要なスキル:");
paragraph.getFormat().setAfterSpacing(5);
//段落を追加して番号付きリストのスタイルを適用する
paragraph = section.addParagraph();
paragraph.appendText("HTML");
paragraph.getListFormat().applyStyle("numberedList");
paragraph.getListFormat().setListLevelNumber(0);
//4つの段落を追加し、番号付きリストのスタイルを適用する
paragraph = section.addParagraph();
paragraph.appendText("CSS");
paragraph.getListFormat().applyStyle("numberedList");
paragraph.getListFormat().setListLevelNumber(0);
paragraph = section.addParagraph();
paragraph.appendText("JavaScript");
paragraph.getListFormat().applyStyle("numberedList");
paragraph.getListFormat().setListLevelNumber(0);
paragraph = section.addParagraph();
paragraph.appendText("Python");
paragraph.getListFormat().applyStyle("numberedList");
paragraph.getListFormat().setListLevelNumber(0);
paragraph = section.addParagraph();
paragraph.appendText("MySQL");
paragraph.getListFormat().applyStyle("numberedList");
paragraph.getListFormat().setListLevelNumber(0);
//結果文書を保存する
document.saveToFile("output/NumberedList.docx", FileFormat.Docx);
document.close();
}
}
箇条書きの作成は、番号付きリストを作成するプロセスと似ています。しかし、リストのスタイルを作成するときに、 [Bulleted] として指定してください。また、箇条書き記号も設定してください。次は詳細な手順です。
import com.spire.doc.Document;
import com.spire.doc.FileFormat;
import com.spire.doc.Section;
import com.spire.doc.documents.ListStyle;
import com.spire.doc.documents.ListType;
import com.spire.doc.documents.Paragraph;

public class InsertBulletedList {

    public static void main(String[] args) {

        //Documentオブジェクトを作成する
        Document document = new Document();

        //セクションを追加する
        Section section = document.addSection();

        //箇条書きリストのスタイルを作成する
        ListStyle listStyle = new ListStyle(document, ListType.Bulleted);
        listStyle.setName("bulletedList");
        listStyle.getLevels().get(0).setBulletCharacter("\u00B7");
        listStyle.getLevels().get(0).getCharacterFormat().setFontName("Symbol");
        listStyle.getLevels().get(0).setTextPosition(20);
        document.getListStyles().add(listStyle);

        //段落を追加する
        Paragraph paragraph = section.addParagraph();
        paragraph.appendText("Web開発に必要なスキル:");
        paragraph.getFormat().setAfterSpacing(5);

        //段落を追加して箇条書きリストのスタイルを適用する
        paragraph = section.addParagraph();
        paragraph.appendText("HTML");
        paragraph.getListFormat().applyStyle("bulletedList");
        paragraph.getListFormat().setListLevelNumber(0);

        //5つの段落を追加し、箇条書きリストのスタイルを適用する
        paragraph = section.addParagraph();
        paragraph.appendText("CSS");
        paragraph.getListFormat().applyStyle("bulletedList");
        paragraph.getListFormat().setListLevelNumber(0);

        paragraph = section.addParagraph();
        paragraph.appendText("JavaScript");
        paragraph.getListFormat().applyStyle("bulletedList");
        paragraph.getListFormat().setListLevelNumber(0);

        paragraph = section.addParagraph();
        paragraph.appendText("Python");
        paragraph.getListFormat().applyStyle("bulletedList");
        paragraph.getListFormat().setListLevelNumber(0);

        paragraph = section.addParagraph();
        paragraph.appendText("MySQL");
        paragraph.getListFormat().applyStyle("bulletedList");
        paragraph.getListFormat().setListLevelNumber(0);

        paragraph = section.addParagraph();
        paragraph.appendText("PHP");
        paragraph.getListFormat().applyStyle("bulletedList");
        paragraph.getListFormat().setListLevelNumber(0);

        //結果文書を保存する
        document.saveToFile("output/BulletedList.docx", FileFormat.Docx);
        document.close();
    }
}
多レベルリストは2つ以上のレベルで構成されています。各レベルは、ListStyle.getLevels().get(index) メソッドを使用してアクセスできます。ListLevel オブジェクトを介して、特定のレベルの番号の種類やプレフィックスを設定することができます。次は詳細な手順です。
import com.spire.doc.Document;
import com.spire.doc.FileFormat;
import com.spire.doc.Section;
import com.spire.doc.documents.ListPatternType;
import com.spire.doc.documents.ListStyle;
import com.spire.doc.documents.ListType;
import com.spire.doc.documents.Paragraph;
public class InsertMultilevelNumberedList {
public static void main(String[] args) {
//Documentオブジェクトを作成する
Document document = new Document();
//セクションを追加する
Section section = document.addSection();
//番号付きリストスタイルを作成し、各レベルのプレフィックスとパターンタイプを指定する
ListStyle listStyle = new ListStyle(document, ListType.Numbered);
listStyle.setName("nestedStyle");
listStyle.getLevels().get(0).setPatternType(ListPatternType.Arabic);
listStyle.getLevels().get(0).setTextPosition(20);
listStyle.getLevels().get(1).setNumberPrefix("\u0000.");
listStyle.getLevels().get(1).setPatternType(ListPatternType.Arabic);
listStyle.getLevels().get(2).setNumberPrefix("\u0000.\u0001.");
listStyle.getLevels().get(2).setPatternType(ListPatternType.Arabic);
document.getListStyles().add(listStyle);
//段落を追加する
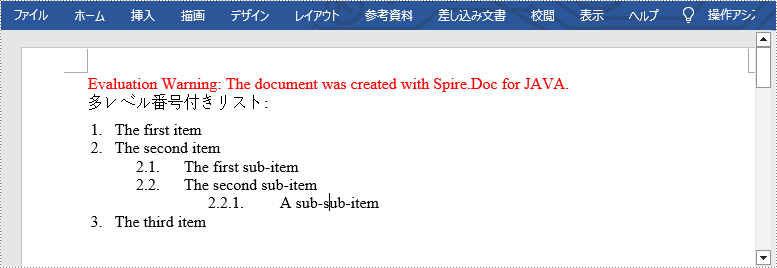
Paragraph paragraph = section.addParagraph();
paragraph.appendText("多レベル番号付きリスト:");
paragraph.getFormat().setAfterSpacing(5f);
//段落を追加して番号付けリストのスタイルを適用する
paragraph = section.addParagraph();
paragraph.appendText("The first item");
paragraph.getListFormat().applyStyle("nestedStyle");
paragraph.getListFormat().setListLevelNumber(0);
//5つの段を追加し、番号付けリストのスタイルを適用する
paragraph = section.addParagraph();
paragraph.appendText("The second item");
paragraph.getListFormat().applyStyle("nestedStyle");
paragraph.getListFormat().setListLevelNumber(0);
paragraph = section.addParagraph();
paragraph.appendText("The first sub-item");
paragraph.getListFormat().applyStyle("nestedStyle");
paragraph.getListFormat().setListLevelNumber(1);
paragraph = section.addParagraph();
paragraph.appendText("The second sub-item");
paragraph.getListFormat().continueListNumbering();
paragraph.getListFormat().applyStyle("nestedStyle");
paragraph = section.addParagraph();
paragraph.appendText("A sub-sub-item");
paragraph.getListFormat().applyStyle("nestedStyle");
paragraph.getListFormat().setListLevelNumber(2);
paragraph = section.addParagraph();
paragraph.appendText("The third item");
paragraph.getListFormat().applyStyle("nestedStyle");
paragraph.getListFormat().setListLevelNumber(0);
//結果文書を保存する
document.saveToFile("output/MultilevelNumberedList.docx", FileFormat.Docx);
document.close();
}
}
多レベルリストで数字と記号を同時に使用したい場合があります。この機能を実現するには、番号付きリストスタイルと箇条書きリストスタイルを作成し、それらを異なる段落に適用するだけです。詳細な手順は次のとおりです。
import com.spire.doc.Document;
import com.spire.doc.FileFormat;
import com.spire.doc.Section;
import com.spire.doc.documents.ListPatternType;
import com.spire.doc.documents.ListStyle;
import com.spire.doc.documents.ListType;
import com.spire.doc.documents.Paragraph;
public class InsertMultilevelMixedTypeList {
public static void main(String[] args) {
//Documentオブジェクトを作成する
Document document = new Document();
//セクションを追加する
Section section = document.addSection();
//番号付きリストスタイルを作成する
ListStyle numberedListStyle = new ListStyle(document, ListType.Numbered);
numberedListStyle.setName("numberedStyle");
numberedListStyle.getLevels().get(0).setPatternType(ListPatternType.Arabic);
numberedListStyle.getLevels().get(0).setTextPosition(20);
numberedListStyle.getLevels().get(1).setPatternType(ListPatternType.Low_Letter);
document.getListStyles().add(numberedListStyle);
//箇条書きリストスタイルを作成する
ListStyle bulletedListStyle = new ListStyle(document, ListType.Bulleted);
bulletedListStyle.setName("bulletedStyle");
bulletedListStyle.getLevels().get(2).setBulletCharacter("\u002A");
bulletedListStyle.getLevels().get(2).getCharacterFormat().setFontName("Symbol");
document.getListStyles().add(bulletedListStyle);
//段落を追加する
Paragraph paragraph = section.addParagraph();
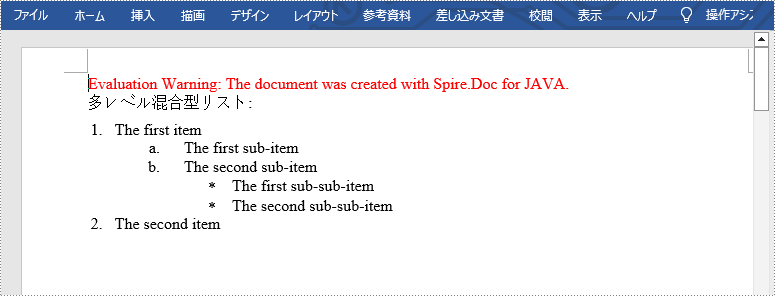
paragraph.appendText("多レベル混合型リスト:");
paragraph.getFormat().setAfterSpacing(5f);
//段落を追加して番号付きリストのスタイルを適用する
paragraph = section.addParagraph();
paragraph.appendText("The first item");
paragraph.getListFormat().applyStyle("numberedStyle");
paragraph.getListFormat().setListLevelNumber(0);
//5つの段落を追加し、異なるリストスタイルを適用する
paragraph = section.addParagraph();
paragraph.appendText("The first sub-item");
paragraph.getListFormat().applyStyle("numberedStyle");
paragraph.getListFormat().setListLevelNumber(1);
paragraph = section.addParagraph();
paragraph.appendText("The second sub-item");
paragraph.getListFormat().setListLevelNumber(1);
paragraph.getListFormat().applyStyle("numberedStyle");
paragraph = section.addParagraph();
paragraph.appendText("The first sub-sub-item");
paragraph.getListFormat().applyStyle("bulletedStyle");
paragraph.getListFormat().setListLevelNumber(2);
paragraph = section.addParagraph();
paragraph.appendText("The second sub-sub-item");
paragraph.getListFormat().applyStyle("bulletedStyle");
paragraph.getListFormat().setListLevelNumber(2);
paragraph = section.addParagraph();
paragraph.appendText("The second item");
paragraph.getListFormat().applyStyle("numberedStyle");
paragraph.getListFormat().setListLevelNumber(0);
//結果文書を保存する
document.saveToFile("output/MultilevelMixedList.docx", FileFormat.Docx);
document.close();
}
}
結果ドキュメントから評価メッセージを削除したい場合、または機能制限を取り除く場合は、についてこのメールアドレスはスパムボットから保護されています。閲覧するにはJavaScriptを有効にする必要があります。にお問い合わせ、30 日間有効な一時ライセンスを取得してください。
段落と文字の背景色は、Word ドキュメントにおけるドキュメント設計の重要な要素であります。適切な段落と文字の背景色は、特定の段落と文字を強調したり、文字のコントラストを高めて読みやすくしたり、レイアウトの隙間を埋めて組版を支援したりする役割を果たします。そのため、Word ドキュメントを作成する際には、段落やテキストの背景色を合理的に使用することが非常に重要です。この記事では、Spire.Doc for Java を使用して、Java で段落とテキストの背景色を設定する方法を説明します。
まず、Spire. Doc for Java を Java プロジェクトに追加する必要があります。JAR ファイルは、このリンクからダウンロードできます。Maven を使用する場合は、次のコードをプロジェクトの pom.xml ファイルに追加する必要があります。
<repositories>
    <repository>
        <id>com.e-iceblue</id>
        <name>e-iceblue</name>
        <url> https://repo.e-iceblue.com/nexus/content/groups/public/</url>
    </repository>
</repositories>
<dependencies>
    <dependency>
        <groupId>e-iceblue</groupId>
        <artifactId>spire.doc</artifactId>
        <version>11.4.2</version>
    </dependency>
</dependencies>段落の背景色を設定するには、段落を取得し、Paragraph.getFormat().setBackColor() メソッドを使用して背景色を変更する必要があります。詳しい手順は以下の通りです。
import com.spire.doc.Document;
import com.spire.doc.FileFormat;
import com.spire.doc.Section;
import com.spire.doc.documents.Paragraph;

import java.awt.*;

public class SetParagraphBackgroundColor {
    public static void main(String[] args) {

        //Documentのオブジェクトを作成する
        Document document = new Document();

        //Wordドキュメントを読み込む
        document.loadFromFile("C:/サンプル.docx");

        //最初のセクションを取得する
        Section section = document.getSections().get(0);

        //2段落目を取得する
        Paragraph paragraph = section.getParagraphs().get(1);

        //この段落の背景色を淡灰色に設定する
        paragraph.getFormat().setBackColor(Color.LIGHT_GRAY);

        //ドキュメントを保存する
        document.saveToFile("段落の背景色.docx", FileFormat.Docx_2013);
        document.dispose();
    }
}
Spire.Doc for Java は、Word ドキュメント内の特定のテキストの出現箇所をすべて検索する Document.findAllString() メソッドと、特定のテキストの背景色を設定する TextRange.getCharacterFormat ().setTextBackgroundColor() メソッドを提供します。既存のテキストの背景色を設定する詳しい手順は以下の通りです。
import com.spire.doc.Document;
import com.spire.doc.FileFormat;
import com.spire.doc.documents.TextSelection;
import com.spire.doc.fields.TextRange;
import java.awt.*;
public class SetTextBackgroundColor {
public static void main(String[] args) {
//Documentのオブジェクトを作成する
Document document = new Document();
//Wordドキュメントを読み込む
document.loadFromFile("C:/サンプル.docx");
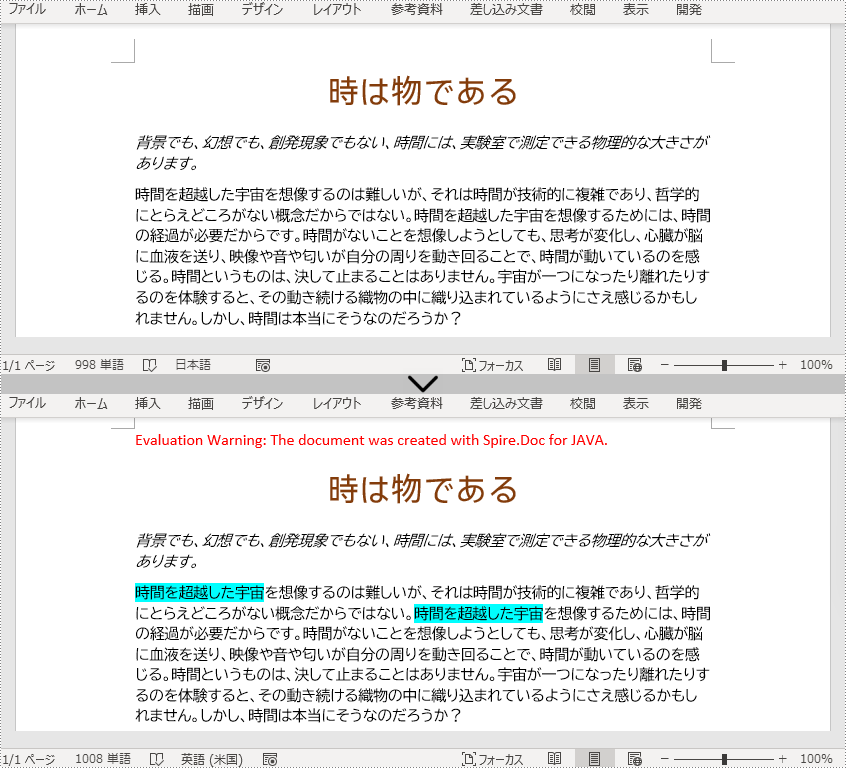
//背景色を設定するテキストを探す
TextSelection[] textSelections = document.findAllString("時間を超越した宇宙", false, true);
//出現するすべてのテキストに背景色を設定する
for (TextSelection selection : textSelections){
//出現箇所をテキスト範囲として取得する
TextRange textRange = selection.getAsOneRange();
//出現するテキストの背景色を設定する
textRange.getCharacterFormat().setTextBackgroundColor(Color.CYAN);
}
//テキストの最初の出現箇所の背景色を設定する
//TextRange textRange = textSelections[0].getAsOneRange();
//textRange.getCharacterFormat().setTextBackgroundColor(Color.CYAN);
//ドキュメントを保存する
document.saveToFile("文字の背景色.docx", FileFormat.Docx_2013);
document.dispose();
}
}
結果ドキュメントから評価メッセージを削除したい場合、または機能制限を取り除く場合は、についてこのメールアドレスはスパムボットから保護されています。閲覧するにはJavaScriptを有効にする必要があります。にお問い合わせ、30 日間有効な一時ライセンスを取得してください。
ドキュメントの外観は、ドキュメントのメッセージを伝えるだけでなく、作成者の情報を明らかにするものです。スペルミスや文法ミスがなく、一貫した書式のコンテンツと適切な画像を含み、よく整理されたドキュメントは、製品やサービスを提供する能力に対する信頼を高めてくれます。
Spire.Doc for Java を使用すると、段落全体だけでなく、個々の単語やフレーズを書式設定することができます。本稿では、Spire.Doc for Java を使用して、Java で Word ドキュメントの文字に様々な書式を適用する方法を紹介します。
まず、Spire.Doc for Java を Java プロジェクトに追加する必要があります。JAR ファイルは、このリンクからダウンロードできます。Maven を使用する場合は、次のコードをプロジェクトの pom.xml ファイルに追加する必要があります。
<repositories>
    <repository>
        <id>com.e-iceblue</id>
        <name>e-iceblue</name>
        <url>https://repo.e-iceblue.com/nexus/content/groups/public/</url>
    </repository>
</repositories>
<dependencies>
    <dependency>
        <groupId>e-iceblue</groupId>
        <artifactId>spire.doc</artifactId>
        <version>11.4.2</version>
    </dependency>
</dependencies>テキストに書式を適用するには、テキストを TextRange で取得し、CharacterFormat クラスのメソッドを使って TextRange 内の文字に書式を設定する必要があります。以下は、Spire.Doc for Java を使用して Word ドキュメントに文字書式を設定する手順です。
import com.spire.doc.Document;
import com.spire.doc.FileFormat;
import com.spire.doc.Section;
import com.spire.doc.documents.BorderStyle;
import com.spire.doc.documents.Paragraph;
import com.spire.doc.documents.SubSuperScript;
import com.spire.doc.documents.UnderlineStyle;
import com.spire.doc.fields.TextRange;
import com.spire.doc.fields.shape.Emphasis;
import java.awt.*;
public class ApplyFormattingToCharacters {
public static void main(String[] args) {
//Documentのオブジェクトを作成する
Document document = new Document();
//セクションを追加する
Section sec = document.addSection();
//段落を追加する
Paragraph paragraph = sec.addParagraph();
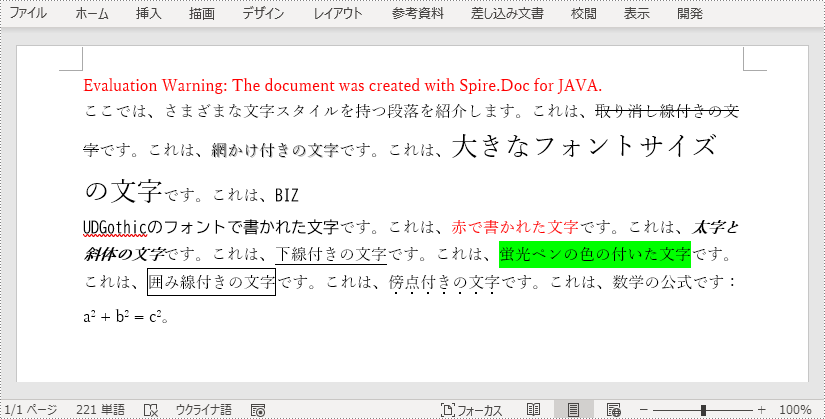
paragraph.appendText("ここでは、さまざまな文字スタイルを持つ段落を紹介します。これは、");
paragraph.getStyle().getCharacterFormat().setFontName("Yu Mincho");
//段落に文字を追加し、TextRangeオブジェクトを返す
TextRange tr = paragraph.appendText("取り消し線付きの文字");
//TextRangeオブジェクトで文字書式を取り消し線に設定する
tr.getCharacterFormat().isStrikeout(true);
//文字に網かけを付ける
paragraph.appendText("です。これは、");
tr = paragraph.appendText("網かけ付きの文字");
tr.getCharacterFormat().isShadow (true);
//フォントサイズを設定する
paragraph.appendText("です。これは、");
tr = paragraph.appendText("大きなフォントサイズの文字");
tr.getCharacterFormat().setFontSize(20);
//フォントを設定する
paragraph.appendText("です。これは、");
tr = paragraph.appendText("BIZ UDGothicのフォントで書かれた文字");
tr.getCharacterFormat().setFontName("BIZ UDGothic");
//フォントの色を設定する
paragraph.appendText("です。これは、");
tr = paragraph.appendText("赤で書かれた文字");
tr.getCharacterFormat().setTextColor(Color.red);
//文字に太字と斜体を適用する
paragraph.appendText("です。これは、");
tr = paragraph.appendText("太字と斜体の文字");
tr.getCharacterFormat().setBold(true);
tr.getCharacterFormat().setItalic(true);
//文字に下線を引く
paragraph.appendText("です。これは、");
tr = paragraph.appendText("下線付きの文字");
tr.getCharacterFormat().setUnderlineStyle(UnderlineStyle.Single);
//文字に背景色をつける
paragraph.appendText("です。これは、");
tr = paragraph.appendText("蛍光ペンの色の付いた文字");
tr.getCharacterFormat().setHighlightColor(Color.green);
//文字に囲み線を適用する
paragraph.appendText("です。これは、");
tr = paragraph.appendText("囲み線付きの文字");
tr.getCharacterFormat().getBorder().setBorderType(BorderStyle.Single);
tr.getCharacterFormat().getBorder().setColor(Color.black);
//文字に傍点を付ける
paragraph.appendText("です。これは、");
tr = paragraph.appendText("傍点付きの文字");
tr.getCharacterFormat().setEmphasisMark(Emphasis.Dot_Below);
//文字に上付き文字を適用する
paragraph.appendText("です。これは、数学の公式です: a");
tr = paragraph.appendText("2");
tr.getCharacterFormat().setSubSuperScript(SubSuperScript.Super_Script);
paragraph.appendText(" + b");
tr = paragraph.appendText("2");
tr.getCharacterFormat().setSubSuperScript(SubSuperScript.Super_Script);
paragraph.appendText(" = c");
tr = paragraph.appendText("2");
tr.getCharacterFormat().setSubSuperScript(SubSuperScript.Super_Script);
paragraph.appendText("。");
//ドキュメントを保存する
document.saveToFile("文字書式の設定.docx", FileFormat.Docx);
}
}
結果ドキュメントから評価メッセージを削除したい場合、または機能制限を取り除く場合は、についてこのメールアドレスはスパムボットから保護されています。閲覧するにはJavaScriptを有効にする必要があります。にお問い合わせ、30 日間有効な一時ライセンスを取得してください。
Spire.Office for Java 8.5.6のリリースを発表できることをうれしく思います。このリリースでは、Spire.Doc for Java はWordからPDFへ、WordからOFDへの変換機能が強化されました。Spire.PDF for JavaはPDFストリーム文書が暗号化されているかどうかを判断する機能をサポートしています。Spire.XLS for JavaはExcelからPDFへの変換機能が強化されました。Spire.Presentation for JavaはPPTから画像への変換機能が強化されました。さらに、多くの既知のバグが正常に修正されました。詳細は以下の内容を読んでください。
| カテゴリー | ID | 説明 |
| Bug | SPIREDOC-7626 | WordをOFDに変換した後に文書の内容が正しくない問題が修正されました。 |
| Bug | SPIREDOC-8666 | DOCをDOCXに変換した後に改ページの不一致が修正されました。 |
| Bug | SPIREDOC-8670 | WordをPDFに変換した後に内容が正しくない問題が修正されました。 |
| Bug | SPIREDOC-8712 | WordをPDFに変換する際にアプリケーションが「java.lang.OutOfMemoryError」をスローするの問題が修正されました。 |
| Bug | SPIREDOC-8766 | 文書をロードする際にアプリケーションが「Attempted to read past the end of the stream」をスローする問題が修正されました。 |
| Bug | SPIREDOC-9030 | DOCをDOCXに変換した後に空白ページが多くなった問題を修正しました。 |
| Bug | SPIREDOC-9064 | テキストを画像に置き換えるとページのレイアウトが正しくない問題が修正されました。 |
| Bug | SPIREDOC-9264 | ブックマークの内容を表に置き換える際にアプリケーションが「java.lang.NullPointerException」をスローする問題が修正されました。 |
| Bug | SPIREDOC-9286 | RTFをPDFに変換した後にドロップダウンボックスの値が正しく変換されなかった問題が修正されました。 |
| Bug | SPIREDOC-9287 | WordをPDFに変換する際にアプリケーションが「This is not a structured storage file」をスローする問題が修正されました。 |
| Bug | SPIREDOC-9290 | WordをPDFに変換する際にアプリケーションが「java.lang.StackOverflow」をスローする問題が修正されました。 |
| Bug | SPIREDOC-9300 | アプリケーションがgetListText()メソッドを呼び出した後に結果文書の番号が変更された問題が修正されました。 |
| Bug | SPIREDOC-9311 | 文書をロードするときにアプリケーションが「java.lang.ClassCastException」をスローする問題が修正されました。 |
| Bug | SPIREDOC-9317 | 文書形式をFileFormat.Docx_2016,FileFormat.Docx_2019として保存した後に、文書が正しくない問題が修正されました。 |
| Bug | SPIREDOC-9327 | IBM websphere環境で実行中にアプリケーションが「X509CertImpl」をスローする問題が修正されました。 |
| Bug | SPIREDOC-9372 | 文書をロードするときにアプリケーションが「Unknown char: <」をスローする問題が修正されました。 |
| Bug | SPIREDOC-9390 | 取得した文書のブックマークの不完全な問題が修正されました。 |
| カテゴリー | ID | 説明 |
| New feature | SPIREPDF-5855 | PDFストリーム文書が暗号化されているかどうかを判断する機能をサポートしています。
boolean result = PdfDocument.isPasswordProtected(PDFstream); |
| Bug | SPIREPDF-5323 | PDFを画像に変換する際、内容が切り取られていた問題が修正されました。 |
| Bug | SPIREPDF-5652 | PDFをWordに変換する際、フォント名の前後に余分な文字があるためにテキストコンテンツが誤って表示される問題が修正されました。 |
| Bug | SPIREPDF-5878 | リフレクションで製品を使用する際、アプリケーションが「java.lang.NullPointerException: Cannot invoke 'java.io.InputStream.close()' because 'a' is null」をスローする問題が修正されました。 |
| Bug | SPIREPDF-5879 | PDFを画像に変換する際、メモリ不足の問題が修正されました。 |
| Bug | SPIREPDF-5914 | PDFをHTMLに変換する際、太字フォントの効果が失われる問題が修正されました。 |
| Bug | SPIREPDF-5926 | PDFを画像に変換する際、アプリケーションが「StringIndexOutOfBoundsException」をスローする問題が修正されました。 |
| Bug | SPIREPDF-5976 | セルを埋める際に、文字が切り捨てられる問題が修正されました。 |
| Bug | SPIREPDF-5984 | OFDをPDFに変換する際にアプリケーションが「NullPointerException」をスローする問題が修正されました。 |
| カテゴリー | ID | 説明 |
| Bug | SPIREXLS-4586 | ExcelをPDFに変換する際に、テキストやラインの位置が不正確になる問題が修正されました。 |
| Bug | SPIREXLS-4606 | sheet.insertArrayメソッドを使用してデータを挿入すると、正しい結果が得られない問題が修正されました。 |
| Bug | SPIREXLS-4612 | Excelファイルを読み込む際に、アプリケーションが「java.lang.NullPointerException」をスローする問題が修正されました。 |
| Bug | SPIREXLS-4615 | チャートを画像に変換する際に、トレンドラインが失われる問題が修正されました。 |
| Bug | SPIREXLS-4634 | ExcelをPDFに変換する際に、アプリケーションが「java.lang.ArrayIndexOfBoundsException」をスローする問題が修正されました。 |
| Bug | SPIREXLS-4635 | ExcelをPDFに変換する際に、アプリケーションが「java.lang.StringIndexOfBoundsException」をスローする問題が修正されました。 |
| Bug | SPIREXLS-4637 | ExcelをPDFに変換する際に日付形式が正しくない問題が修正されました。 |
| カテゴリー | ID | 説明 |
| Bug | SPIREPPT-2237 | テキストのハロカラーの取得に失敗した問題が修正されました。 |
| Bug | SPIREPPT-2239 | SmartArtLayoutType:PICTURE _ORGANIZATION_CHARTが画像を設定する際にアプリケーションが「java.lang.NullPointerException」をスローする問題。 |
| Bug | SPIREPPT-2241 | HTMLコンテンツを追加する際にh 3/h 4タイトルのフォントサイズが正しくない問題が修正されました。 |
| Bug | SPIREPPT-2242 | 保存した文書をWPSツールで閲覧した際に、グラフが表示されない問題が修正されました。 |
| Bug | SPIREPPT-2252 | PPTを画像に変換した後に背景色が正しくない問題が修正されました。 |
| Bug | SPIREPPT-2253 | PPTを画像に変換した後にテキストの位置が正しくない問題が修正されました。 |
Spire.Presentation for Java 8.5.2のリリースを発表できることをうれしく思います。このバージョンでは、PPTから画像への変換機能が強化されました。また、テキストのハローカラーの取得に失敗したなど、既知の問題が修正されました。詳細は以下の内容を読んでください。
| カテゴリー | ID | 説明 |
| Bug | SPIREPPT-2237 | テキストのハロカラーの取得に失敗した問題が修正されました。 |
| Bug | SPIREPPT-2239 | SmartArtLayoutType:PICTURE _ORGANIZATION_CHARTが画像を設定する際にアプリケーションが「java.lang.NullPointerException」をスローする問題。 |
| Bug | SPIREPPT-2241 | HTMLコンテンツを追加する際にh 3/h 4タイトルのフォントサイズが正しくない問題が修正されました。 |
| Bug | SPIREPPT-2242 | 保存した文書をWPSツールで閲覧した際に、グラフが表示されない問題が修正されました。 |
| Bug | SPIREPPT-2252 | PPTを画像に変換した後に背景色が正しくない問題が修正されました。 |
| Bug | SPIREPPT-2253 | PPTを画像に変換した後にテキストの位置が正しくない問題が修正されました。 |
Spire.Doc for Java 11.5.5のリリースを発表できることを嬉しく思います。このバージョンでは、WordからPDFへ、WordからOFDへの変換機能が強化されました。また、文書をロードするときにアプリケーションが「Attempted to read past the end of the stream」をスローする問題を修正するなど、多くの既知の問題が修正されました。詳細は以下の内容を読んでください。
| カテゴリー | ID | 説明 |
| Bug | SPIREDOC-7626 | WordをOFDに変換した後に文書の内容が正しくない問題が修正されました。 |
| Bug | SPIREDOC-8666 | DOCをDOCXに変換した後に改ページの不一致が修正されました。 |
| Bug | SPIREDOC-8670 | WordをPDFに変換した後に内容が正しくない問題が修正されました。 |
| Bug | SPIREDOC-8712 | WordをPDFに変換する際にアプリケーションが「java.lang.OutOfMemoryError」をスローするの問題が修正されました。 |
| Bug | SPIREDOC-8766 | 文書をロードする際にアプリケーションが「Attempted to read past the end of the stream」をスローする問題が修正されました。 |
| Bug | SPIREDOC-9030 | DOCをDOCXに変換した後に空白ページが多くなった問題を修正しました。 |
| Bug | SPIREDOC-9064 | テキストを画像に置き換えるとページのレイアウトが正しくない問題が修正されました。 |
| Bug | SPIREDOC-9264 | ブックマークの内容を表に置き換える際にアプリケーションが「java.lang.NullPointerException」をスローする問題が修正されました。 |
| Bug | SPIREDOC-9286 | RTFをPDFに変換した後にドロップダウンボックスの値が正しく変換されなかった問題が修正されました。 |
| Bug | SPIREDOC-9287 | WordをPDFに変換する際にアプリケーションが「This is not a structured storage file」をスローする問題が修正されました。 |
| Bug | SPIREDOC-9290 | WordをPDFに変換する際にアプリケーションが「java.lang.StackOverflow」をスローする問題が修正されました。 |
| Bug | SPIREDOC-9300 | アプリケーションがgetListText()メソッドを呼び出した後に結果文書の番号が変更された問題が修正されました。 |
| Bug | SPIREDOC-9311 | 文書をロードするときにアプリケーションが「java.lang.ClassCastException」をスローする問題が修正されました。 |
| Bug | SPIREDOC-9317 | 文書形式をFileFormat.Docx_2016,FileFormat.Docx_2019として保存した後に、文書が正しくない問題が修正されました。 |
| Bug | SPIREDOC-9327 | IBM websphere環境で実行中にアプリケーションが「X509CertImpl」をスローする問題が修正されました。 |
| Bug | SPIREDOC-9372 | 文書をロードするときにアプリケーションが「Unknown char: <」をスローする問題が修正されました。 |
| Bug | SPIREDOC-9390 | 取得した文書のブックマークの不完全な問題が修正されました。 |
Spire.Office 8.5.3のリリースを発表できることを嬉しく思います。このバージョンでは、Spire.XLSはISO.CEILING、WORKDAY.INTLとWPSのEVALUATE()関数関数をサポートしています。Spire.Docはグラフを追加する機能がサポートしています。Spire.PDFはPDFドキュメントの圧縮機能が最適化されました。さらに、多くの既知の問題も修正しました。詳細は以下の内容を読んでください。
このバージョンでは、Spire.Doc,Spire.PDF,Spire.XLS,Spire.Email,Spire.DocViewer, Spire.PDFViewer,Spire.Presentation,Spire.Spreadsheet, Spire.OfficeViewer, Spire.Barcode, Spire.DataExportの最新バージョンが含まれています。
| カテゴリー | ID | 説明 |
| New feature | - | グラフを追加する機能がサポートされています。
//Documentを作成する
Document document = new Document();

//新しいセクションを作成する
Section section = document.AddSection();

//新しい段落を作成してテキストを追加する
section.AddParagraph().AppendText("Column chart.");

//新しい段落を作成してカラムグラフを追加する
Paragraph newPara = section.AddParagraph();
ShapeObject shape = newPara.AppendChart(ChartType.Column, 500, 300);

//グラフのシリーズデータを消去して、新しいグラフで始める
Chart chart = shape.Chart;
chart.Series.Clear();

//カスタム・シリーズをグラフに追加します。X軸はカテゴリ、Y軸は対応する大きな数値です
chart.Series.Add("Test Series",
    new[] { "Word", "PDF", "Excel", "GoogleDocs", "Office" },
    new double[] { 1900000, 850000, 2100000, 600000, 1500000 });

//Y軸スケールラベルの数値フォーマットをカンマで数値をグループ化するように設定する
chart.AxisY.NumberFormat.FormatCode = "#,##0";

//docxファイルに保存する
document.SaveToFile("AppendColumnChart.docx", FileFormat.Docx);
//Documentを作成する
Document document = new Document();
//新しいセクションを作成する
Section section = document.AddSection();
//新しい段落を作成してテキストを追加する
section.AddParagraph().AppendText("Bubble chart.");
//新しい段落を作成してバブルグラフを追加する
Paragraph newPara = section.AddParagraph();
ShapeObject shape = newPara.AppendChart(ChartType.Bubble, 500, 300);
//グラフのシリーズデータを消去して、新しいグラフで始める
Chart chart = shape.Chart;
chart.Series.Clear();
//X/Y座標と各気泡直径を持つカスタムシリーズを追加する
ChartSeries series = chart.Series.Add("Test Series",
new[] { 2.9, 3.5, 1.1, 4.0, 4.0 },
new[] { 1.9, 8.5, 2.1, 6.0, 1.5 },
new[] { 9.0, 4.5, 2.5, 8.0, 5.0 });
//docxファイルに保存する
document.SaveToFile("AppendBubbleChart.docx", FileFormat.Docx);//Documentを作成する
Document document = new Document();
//新しいセクションを作成する
Section section = document.AddSection();
//新しい段落を作成してテキストを追加する
section.AddParagraph().AppendText("Line chart.");
//新しい段落を作成して折れ線グラフを追加する
Paragraph newPara = section.AddParagraph();
ShapeObject shape = newPara.AppendChart(ChartType.Line, 500, 300);
//グラフのシリーズデータを消去して、新しいグラフで始める
Chart chart = shape.Chart;
ChartTitle title = chart.Title;
title.Text = "My Chart";
ChartSeriesCollection seriesColl = chart.Series;
seriesColl.Clear();
//新しいデータをグラフに設定
string[] categories = { "C1", "C2", "C3", "C4", "C5", "C6" };
seriesColl.Add("AW Series 1", categories, new double[] { 1, 2, 2.5, 4, 5, 6 });
seriesColl.Add("AW Series 2", categories, new double[] { 2, 3, 3.5, 6, 6.5, 7 });
//docxファイルに保存するする
document.SaveToFile("AppendLineChart.docx", FileFormat.Docx);//Documentを作成する
Document document = new Document();
//新しいセクションを作成する
Section section = document.AddSection();
//新しい段落を作成してテキストを追加する
section.AddParagraph().AppendText("Pie chart.");
//新しい段落を作成して円グラフを追加する
Paragraph newPara = section.AddParagraph();
ShapeObject shape = newPara.AppendChart(ChartType.Pie, 500, 300);
Chart chart = shape.Chart;
//各セクターのカテゴリ名とその頻度値を含むカスタムグラフシリーズを挿入する
ChartSeries series = chart.Series.Add("Test Series",
new[] { "Word", "PDF", "Excel" },
new[] { 2.7, 3.2, 0.8 });
//docxファイルに保存する
document.SaveToFile("AppendPieChart.docx", FileFormat.Docx);//Documentを作成する
Document document = new Document();
//新しいセクションを作成する
Section section = document.AddSection();
//新しい段落を作成してテキストを追加する
section.AddParagraph().AppendText("Scatter chart.");
//新しい段落を作成して散布図を追加する
Paragraph newPara = section.AddParagraph();
ShapeObject shape = newPara.AppendChart(ChartType.Scatter, 450, 300);
Chart chart = shape.Chart;
//グラフのシリーズデータを消去して、新しいグラフで始める
chart.Series.Clear();
//5 点の X/Y 座標を持つシリーズを挿入する
chart.Series.Add("Scatter chart",
new[] { 1.0, 2.0, 3.0, 4.0, 5.0 },
new[] { 1.0, 20.0, 40.0, 80.0, 160.0 });
//docxファイルに保存する
document.SaveToFile("AppendScatterChart.docx", FileFormat.Docx);//Documentを作成する
Document document = new Document();
//新しいセクションを作成する
Section section = document.AddSection();
//新しい段落を作成してテキストを追加する
section.AddParagraph().AppendText("Surface3D chart.");
//新しい段落を作成してsurface 3Dグラフを追加する
Paragraph newPara = section.AddParagraph();
ShapeObject shape = newPara.AppendChart(ChartType.Surface3D, 500, 300);
//グラフのシリーズデータを消去して、新しいグラフで始める
Chart chart = shape.Chart;
chart.Series.Clear();
chart.Title.Text = "My chart";
//3シリーズを追加する
chart.Series.Add("Series 1",
new string[] { "Word", "PDF", "Excel", "GoogleDocs", "Office" },
new double[] { 1900000, 850000, 2100000, 600000, 1500000 });
chart.Series.Add("Series 2",
new string[] { "Word", "PDF", "Excel", "GoogleDocs", "Office" },
new double[] { 900000, 50000, 1100000, 400000, 2500000 });
chart.Series.Add("Series 3",
new string[] { "Word", "PDF", "Excel", "GoogleDocs", "Office" },
new double[] { 500000, 820000, 1500000, 400000, 100000 });
//docxファイルに保存する
document.SaveToFile("AppendSurface3DChart.docx", FileFormat.Docx);//Documentを作成する
Document document = new Document();
//新しいセクションを作成する
Section section = document.AddSection();
//新しい段落を作成してテキストを追加する
section.AddParagraph().AppendText("Bar chart.");
//新しい段落を作成して棒グラフを追加する
Paragraph newPara = section.AddParagraph();
ShapeObject chartShape = newPara.AppendChart(ChartType.Bar, 400, 300);
Chart chart = chartShape.Chart;
//「Title」プロパティを使用して、グラフ領域の上部中央に表示される棒グラフの見出しを提供する
ChartTitle title = chart.Title;
title.Text = "My Chart";
//「Show」プロパティを「true」に設定して見出しを表示する.
title.Show = true;
//「Overlay」プロパティを「true」に設定します。他のグラフ要素がタイトルと重なるようにすることで、より多くのスペースを提供する
title.Overlay = true;
//docxファイルに保存する
document.SaveToFile("AppendBarChart.docx", FileFormat.Docx); |
| New feature | - | SVGドキュメントを追加する機能がサポートされています。
Document document = new Document(); Section section = document.AddSection(); string svgFile = "sample.svg"; Paragraph para = section.AddParagraph(); DocPicture svgPicture = para.AppendPicture(svgFile); svgPicture.Width = 200; svgPicture.Height = 200; String DocxResult = "Result-AddSvg.docx"; document.SaveToFile(DocxResult, FileFormat.Docx2016); |
| New feature | - | 1ページに複数ページを印刷する機能がサポートされています。
doc.LoadFromFile(inputFile, FileFormat.Docx); System.Windows.Forms.PrintDialog printDialog = new System.Windows.Forms.PrintDialog(); printDialog.PrinterSettings.PrintToFile = true; printDialog.PrinterSettings.PrintFileName = "sample-new-4.xps"; doc.PrintDialog = printDialog; doc.PrintMultipageToOneSheet(PagesPreSheet.FourPages, true); |
| New feature | - | ページの内容や内容の座標を取得するなど、ページを操作する機能がサポートされています。
Document doc = new Document();
doc.LoadFromFile(inputFile, FileFormat.Docx);
FixedLayoutDocument layoutDoc = new FixedLayoutDocument(doc);

//最初のページの行にアクセスし、コンソールに印刷する
FixedLayoutLine line = layoutDoc.Pages[0].Columns[0].Lines[0];

StringBuilder stringBuilder = new StringBuilder();
stringBuilder.AppendLine("Line: " + line.Text);

//レンダリングされた行には、元の段落を文書オブジェクトモデルから取得することができる
Paragraph para = line.Paragraph;
stringBuilder.AppendLine("Paragraph text: " + para.Text);

//ヘッダーとフッターを含むプレーンテキスト形式で、最初のページに表示されたすべてのテキストを取得する
string pageText = layoutDoc.Pages[0].Text;
stringBuilder.AppendLine(pageText);

//文書内の各ページをループし、各ページに表示される行数を印刷する
foreach (FixedLayoutPage page in layoutDoc.Pages)
{
    LayoutCollection lines = page.GetChildEntities(LayoutElementType.Line, true);
    stringBuilder.AppendLine("Page " + page.PageIndex + " has " + lines.Count + " lines.");
}

//このメソッドは、任意のノードのレイアウトエンティティの逆引き参照を提供する
//「ヘッダーとフッターのrunsとnodesを除く」
stringBuilder.AppendLine("The lines of the first paragraph:");
foreach (FixedLayoutLine paragraphLine in layoutDoc.GetLayoutEntitiesOfNode(
    ((Section)doc.FirstChild).Body.Paragraphs[0]))
{
    stringBuilder.AppendLine(paragraphLine.Text.Trim());
    stringBuilder.AppendLine(paragraphLine.Rectangle.ToString());
}
File.WriteAllText("page.txt", stringBuilder.ToString()); |
| カテゴリー | ID | 説明 |
| New feature | SPIREXLS-4561 | ISO.CEILING関数をサポートしています。
Workbook workbook = new Workbook();
workbook.Worksheets[0].Range["A1"].Formula = "ISO.CEILING(12.69,2)";
workbook.CalculateAllValue();
workbook.SaveToFile("result.xlsx",ExcelVersion.Version2016); |
| New feature | SPIREXLS-4564 | WORKDAY.INTL関数をサポートしています。
Workbook workbook = new Workbook();
workbook.Worksheets[0].Range["A1"].Formula = "=WORKDAY.INTL(DATE(2023,3,17),25,1,DATE(2023,3,20))";
workbook.CalculateAllValue();
workbook.SaveToFile("result.xlsx",ExcelVersion.Version2016); |
| New feature | SPIREXLS-4608 | WPSのEVALUATE()関数をサポートしています。 |
| Bug | SPIREXLS-4568 | SheetをHTMLに並列変換する際に、アプリケーションが「System.ArgumentException」をスローする問題が修正されました。 |
| Bug | SPIREXLS-4575 | 一部のセルの色を塗ると他のセルも同様に塗られてしまう問題が修正されました。 |
| Bug | SPIREXLS-4599 | 一部のセルをコピーできない問題が修正されました。 |
| Bug | SPIREXLS-4600 | ExcelをHTMLに変換する際、アプリケーションが「System.OutOfMemoryException」をスローする問題が修正されました。 |
| Bug | SPIREXLS-4607 | Excelファイルを読み込む際にアプリケーションが「System.IndexOutOfRangeException」をスローする問題が修正されました。 |
| Bug | SPIREXLS-4613 | 文書を保存した後にメニューバーの機能エリアが正しく表示されない問題が修正されました。 |
| Bug | SPIREXLS-4626 | 隠れた行を削除した後に多数の空白列が生成される問題が修正されました。 |
| Bug | SPIREXLS-4627 | .netstandardパッケージを使用してSheetを画像に変換する際、内容が正しくない問題が修正されました。 |
| カテゴリー | ID | 説明 |
| New feature | SPIREPDF-5840 | PDFドキュメントの圧縮機能が最適化されました。
PdfCompressor compressor = new PdfCompressor("input.pdf");
compressor.Options.TextCompressionOptions.UnembedFonts = true;
compressor.Options.ImageCompressionOptions.CompressImage = true;
compressor.Options.ImageCompressionOptions.ResizeImages = true;
compressor.Options.ImageCompressionOptions.ImageQuality = ImageQuality.Low;
compressor.CompressToFile("output.pdf"); |
| Bug | SPIREPDF-5170 | <ul> タグなどを含むHTMLコードを挿入しても機能しない問題が修正されました。 |
| Bug | SPIREPDF-5601 | PDFページをコピーした後にAdobeツールで結果文書を開くことができない問題が修正されました。 |
| Bug | SPIREPDF-5883 | PDFをWordに変換した後、テキストの改行が正しくない問題が修正されました。 |
| Bug | SPIREPDF-5897 | PDFを画像に変換する際に、単語間のスペースが消失する問題が修正されました。 |
| Bug | SPIREPDF-5903 | テキストをハイライトすることができない問題が修正されました。 |
| Bug | SPIREPDF-5923 | フォームフィールドのフラット化後、文書を保存する際にアプリケーションが「NullPointerException」をスローする問題が修正されました。 |
| Bug | SPIREPDF-5938 | 注釈付きのPDFファイルを印刷する際に注釈が失われていた問題が修正されました。 |
| Bug | SPIREPDF-5939 | PDFからテーブルを抽出する際に結果が正しくない問題が修正されました。 |
| Bug | SPIREPDF-5950 | PDFをOFDに変換する際に、アプリケーションが「System.InvalidOperationException」をスローする問題が修正されました。 |
| Bug | SPIREPDF-5951 | 抽出されたテキストが表の範囲を超えていた問題が修正されました。 |
| Bug | SPIREPDF-5952 | PdfAnnotationBorder border = new PdfAnnotationBorder() {Width = 20f} メソッドを使用して幅を設定しても効果がない問題が修正されました。 |
| Bug | SPIREPDF-5968 | XFA Formフィールドの値の充填に失敗した問題が修正されました。 |
| Bug | SPIREPDF-5970 | OFDをPDFに変換する際に、アプリケーションが「System.ArgumentException」をスローする問題が修正されました。 |
| カテゴリー | ID | 説明 |
| Bug | SPIREEMAIL-76 | NetFrameworkアプリケーションで使用するときにImapサーバとPop3サーバに接続できない問題が修正されました。 |
Excel は、データ分析や財務管理、予算などに広く使用される人気のあるスプレッドシートソフトウェアです。しかし、他のファイルに Excel ファイルを埋め込んだり、他の人と共有する場合、Excel 形式に互換性の問題が生じることがあります。そのような場合には、Excel をイメージに変換することが代替オプションとなります。この記事では、Spire.XLS for C++ を使用して C++ で Excel を画像に変換する方法について説明します。
Spire.XLS for C++ をアプリケーションに組み込むには、2つの方法があります。一つは NuGet 経由でインストールする方法、もう一つは当社のウェブサイトからパッケージをダウンロードし、ライブラリをプログラムにコピーする方法です。NuGet 経由のインストールの方が便利で、より推奨されます。詳しくは、以下のリンクからご覧いただけます。
Spire.XLS for C++ を C++ アプリケーションに統合する方法
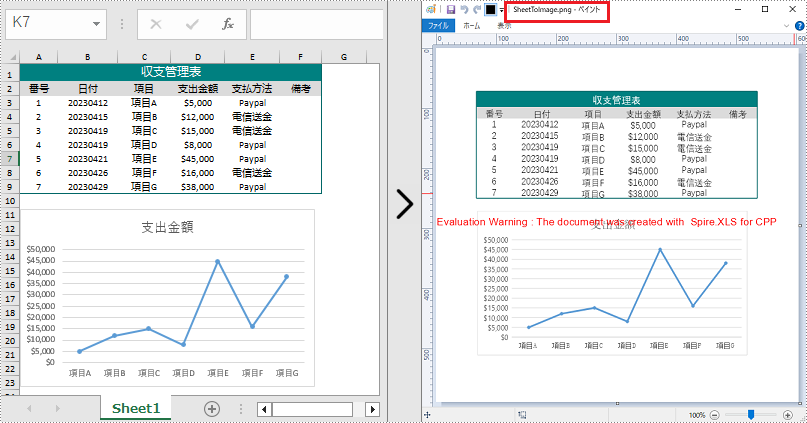
Spire.XLS for C++ では、Worksheet->ToImage() メソッドを使用して特定のワークシートを画像に変換します。次に、Image->Save() メソッドを使用して画像を PNG、JPG、または BMP 形式で保存できます。以下が詳細な手順です。
#include "Spire.Xls.o.h"
#include <iostream>

using namespace Spire::Xls;

int main() {
                 //入出力ファイルパスを指定する
	std::wstring inputFile = L"sample.xlsx";
	std::wstring outputFile = L"SheetToImage.png";

	//Workbookオブジェクトを作成する
	intrusive_ptr<Workbook> workbook = new Workbook();

	//ディスクからExcel文書を読み込む
	workbook->LoadFromFile(inputFile.c_str());

	//最初のワークシートを取得する
	intrusive_ptr<Worksheet> sheet = dynamic_pointer_cast<Worksheet>(workbook->GetWorksheets()->Get(0));

	//画像をPNGファイルとして保存する
	sheet->ToImage(sheet->GetFirstRow(), sheet->GetFirstColumn(), sheet->GetLastRow(), sheet->GetLastColumn())->Save(outputFile.c_str());
	workbook->Dispose();
}
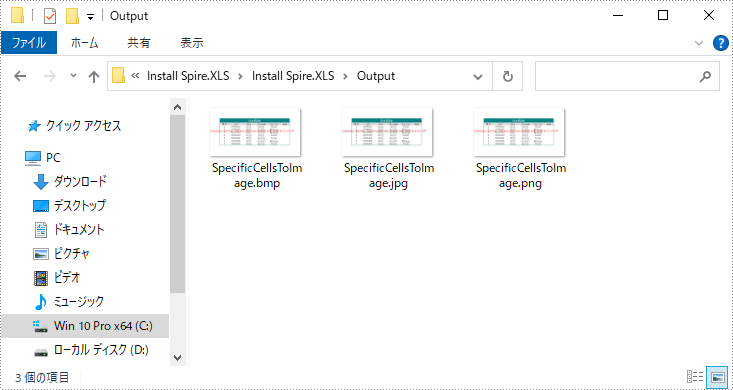
Spire.XLS for C++ では、Worksheet->ToImage(int firstRow, int firstColumn, int lastRow, int lastColumn) メソッドを使用して指定されたセル範囲を画像に変換することもできます。以下が詳細な手順です。
#include "Spire.Xls.o.h"
#include <iostream>

using namespace Spire::Xls;

int main() {
	std::wstring inputFile = L"sample.xlsx";
	std::wstring outputFile = L"Output";

	//Workbookオブジェクトを作成する
	intrusive_ptr<Workbook> workbook = new Workbook();

	//ディスクからExcelドキュメントをロードする
	workbook->LoadFromFile(inputFile.c_str());

	//最初のシートを取得する
	intrusive_ptr<Worksheet> sheet = dynamic_pointer_cast<Worksheet>(workbook->GetWorksheets()->Get(0));

	//セル範囲を指定して特定の画像形式として保存する
	sheet->ToImage(1, 1, 9, 6)->Save(L"Output//SpecificCellsToImage.png", ImageFormat::GetPng());
	sheet->ToImage(1, 1, 9, 6)->Save(L"Output//SpecificCellsToImage.jpg", ImageFormat::GetJpeg());
	sheet->ToImage(1, 1, 9, 6)->Save(L"Output//SpecificCellsToImage.bmp", ImageFormat::GetBmp());

	//ファイルに保存する
	workbook->Dispose();
}
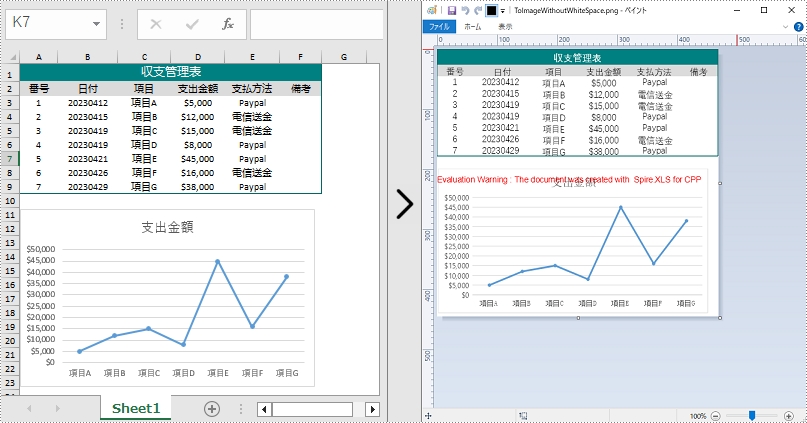
ワークシートを直接画像に変換する場合、変換された画像の周りには余白があります。これらの余白を削除したい場合は、変換時にワークシートの左、右、上、下のマージンをゼロに設定することができます。以下が詳細な手順です。
#include "Spire.Xls.o.h"
#include <iostream>

using namespace Spire::Xls;

int main() {
	std::wstring inputFile =L"sample.xlsx";
	std::wstring outputFile = L"ToImageWithoutWhiteSpace.png";

	//Workbookオブジェクトを作成する
	intrusive_ptr<Workbook> workbook = new Workbook();

	//ディスクからExcelドキュメントをロードする
	workbook->LoadFromFile(inputFile.c_str());

	//最初のシートを取得する
	intrusive_ptr<Worksheet> sheet = dynamic_pointer_cast<Worksheet>(workbook->GetWorksheets()->Get(0));

	//マージンを0に設定して画像の余白を削除する
	sheet->GetPageSetup()->SetLeftMargin(0);
	sheet->GetPageSetup()->SetBottomMargin(0);
	sheet->GetPageSetup()->SetTopMargin(0);
	sheet->GetPageSetup()->SetRightMargin(0);
	intrusive_ptr<Image> image = sheet->ToImage(sheet->GetFirstRow(), sheet->GetFirstColumn(), sheet->GetLastRow(), sheet->GetLastColumn());

	//ファイルに保存する
	image->Save(outputFile.c_str());
	workbook->Dispose();
}
結果ドキュメントから評価メッセージを削除したい場合、または機能制限を取り除く場合は、についてこのメールアドレスはスパムボットから保護されています。閲覧するにはJavaScriptを有効にする必要があります。にお問い合わせ、30 日間有効な一時ライセンスを取得してください。