チュートリアル
簡単にライブラリーを使用するためのチュートリアルコレクション
正式な文書を作成する場合、適切なフォントの選択は極めて重要です。複数のフォントを1つの文書内で使用することにより、見出しや本文、注釈など、異なる種類のコンテンツを区別することができ、文書全体の読みやすさを向上させることができます。また、異なるフォントには独自の感情的なトーンやスタイルがあります。例えば、手書き風のフォントは暖かみや親密さを表現し、セリフ体のフォントは伝統的で形式的な場面で適しています。Microsoft Word には幅広いフォント機能が用意されていますが、フォントをプログラムで設定する必要がある場合もあります。この記事では、Spire.Doc for Java を使用して Word でフォントを設定する方法を示します。
まず、Spire.Doc for Java を Java プロジェクトに追加する必要があります。JAR ファイルは、このリンクからダウンロードできます。Maven を使用する場合は、次のコードをプロジェクトの pom.xml ファイルに追加する必要があります。
<repositories>
    <repository>
        <id>com.e-iceblue</id>
        <name>e-iceblue</name>
        <url>https://repo.e-iceblue.com/nexus/content/groups/public/</url>
    </repository>
</repositories>
<dependencies>
    <dependency>
        <groupId>e-iceblue</groupId>
        <artifactId>spire.doc</artifactId>
        <version>11.6.0</version>
    </dependency>
</dependencies>
Word 文書内の異なる段落に異なるフォントを設定する場合は、複数の段落スタイルを作成し、各段落スタイルに異なるフォントを設定することができます。その後、これらの段落スタイルを特定の段落に適用します。詳細な手順は以下の通りです。
import com.spire.doc.*;
import com.spire.doc.documents.Paragraph;
import com.spire.doc.documents.ParagraphStyle;
public class SetFont {
public static void main(String[] args){
//Documentインスタンスを作成する
Document document = new Document();
//セクションを追加する
Section section = document.addSection();
//3 つの段落を追加して、テキストを段落に追加する
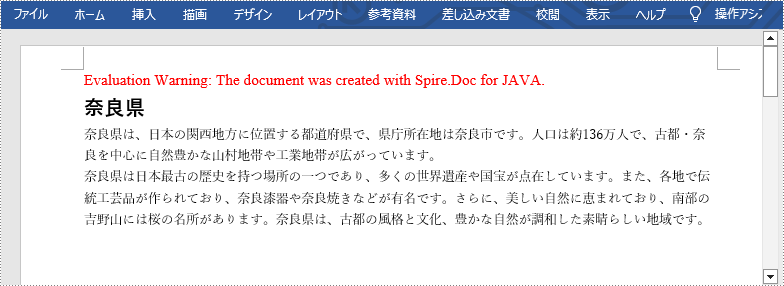
Paragraph para1 = section.addParagraph();
para1.appendText("奈良県");
Paragraph para2 = section.addParagraph();
para2.appendText("奈良県は、日本の関西地方に位置する都道府県で、県庁所在地は奈良市です。人口は約136万人で、古都・奈良を中心に自然豊かな山村地帯や工業地帯が広がっています。");
Paragraph para3 = section.addParagraph();
para3.appendText("奈良県は日本最古の歴史を持つ場所の一つであり、多くの世界遺産や国宝が点在しています。また、各地で伝統工芸品が作られており、奈良漆器や奈良焼きなどが有名です。さらに、美しい自然に恵まれており、南部の吉野山には桜の名所があります。奈良県は、古都の風格と文化、豊かな自然が調和した素晴らしい地域です。");
//ParagraphStyleインスタンスを作成する
ParagraphStyle style1 = new ParagraphStyle(document);
//最初の段落をタイトルとして、そのフォントを設定する
style1.setName("titleStyle");
style1.getCharacterFormat().setFontName("Yu Gothic UI Semibold");
style1.getCharacterFormat().setFontSize(16f);
document.getStyles().add(style1);
para1.applyStyle("titleStyle");
//ParagraphStyleインスタンスを作成する
ParagraphStyle style2 = new ParagraphStyle(document);
//他の2つの段落を本文として、そのフォントを設定する
style2.setName("paraStyle");
style2.getCharacterFormat().setFontName("Yu Mincho");
style2.getCharacterFormat().setFontSize(10f);
document.getStyles().add(style2);
para2.applyStyle("paraStyle");
para3.applyStyle("paraStyle");
//結果文書を保存する
document.saveToFile("output/setFont.docx", FileFormat.Docx);
document.dispose();
}
}
結果ドキュメントから評価メッセージを削除したい場合、または機能制限を取り除く場合は、についてこのメールアドレスはスパムボットから保護されています。閲覧するにはJavaScriptを有効にする必要があります。にお問い合わせ、30 日間有効な一時ライセンスを取得してください。
下付き文字と上付き文字は、どちらも文字列の中で他の文字の後に表示される記号です。上付き文字は通常の文字の基線より上に表示され、下付き文字は文字の基線より下に表示されます。Microsoft Word で上付き文字や下付き文字を挿入する必要がある場合があります。例えば、科学的な数式を含む学術的な文書を作成する場合などです。この記事では、Spire.Doc for Java ライブラリを使用して、Java で Word 文書に上付き文字と下付き文字を挿入する方法について説明します。
まず、Spire. Doc for Java を Java プロジェクトに追加する必要があります。JAR ファイルは、このリンクからダウンロードできます。Maven を使用する場合は、次のコードをプロジェクトの pom.xml ファイルに追加する必要があります。
<repositories>
    <repository>
        <id>com.e-iceblue</id>
        <name>e-iceblue</name>
        <url> https://repo.e-iceblue.com/nexus/content/groups/public/</url>
    </repository>
</repositories>
<dependencies>
    <dependency>
        <groupId>e-iceblue</groupId>
        <artifactId>spire.doc</artifactId>
        <version>10.12.4</version>
    </dependency>
</dependencies>Spire.Doc for Java では、テキストに上付き文字や下付き文字を適用するための TextRange.getCharacterFormat().setSubSuperScript() メソッドを用意しています。
上付き文字と下付き文字の挿入の詳細な手順は以下の通りです。
import com.spire.doc.Document;
import com.spire.doc.FileFormat;
import com.spire.doc.Section;
import com.spire.doc.documents.BreakType;
import com.spire.doc.documents.Paragraph;
import com.spire.doc.documents.SubSuperScript;
import com.spire.doc.fields.TextRange;
public class insertSuperscriptAndSubscript {
public static void main(String[] args){
//Documentクラスのインスタンスを作成する
Document document = new Document();
//Word文書の読み込み
document.loadFromFile("サンプル.docx");
//1つ目のセクションを取得する
Section section = document.getSections().get(0);
//セクションに段落を追加する
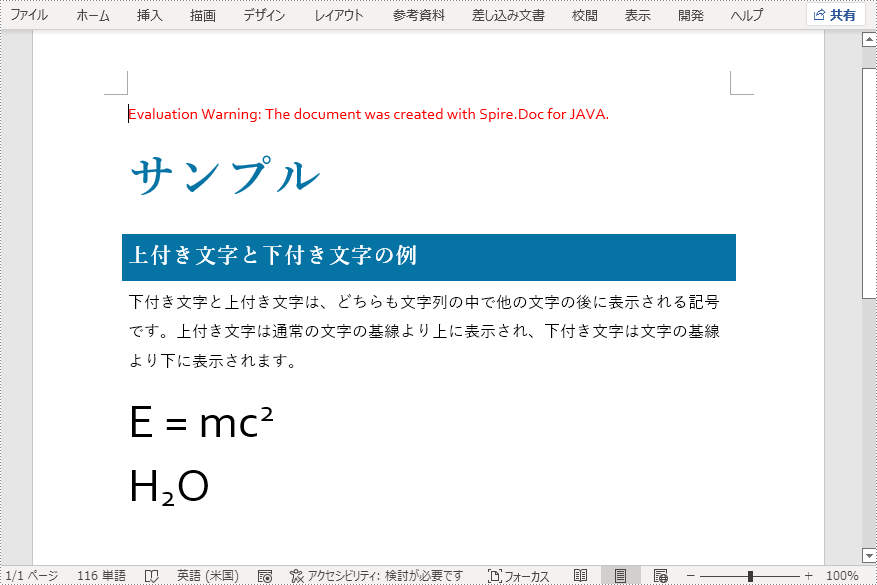
Paragraph paragraph = section.addParagraph();
//段落に通常のテキストを追加する
paragraph.appendText("E = mc");
//上付き文字を適用するテキストを段落に追加する
TextRange superscriptText = paragraph.appendText("2");
//テキストに上付き文字書式を適用する
superscriptText.getCharacterFormat().setSubSuperScript(SubSuperScript.Super_Script);
//新しい行を開始する
paragraph.appendBreak(BreakType.Line_Break);
//段落に通常のテキストを追加する
paragraph.appendText("H");
//下付き文字を適用するテキストを段落に追加する
TextRange subscriptText = paragraph.appendText("2");
//テキストに下付き文字書式を適用する
subscriptText.getCharacterFormat().setSubSuperScript(SubSuperScript.Sub_Script);
//段落に通常のテキストを追加する
paragraph.appendText("O");
//段落内のテキストの文字サイズを設定する
for(Object item : paragraph.getItems())
{
if (item instanceof TextRange)
{
TextRange textRange = (TextRange)item ;
textRange.getCharacterFormat().setFontSize(36f);
}
}
//結果文書を保存する
document.saveToFile("上付き文字と下付き文字.docx", FileFormat.Docx_2013);
}
}
結果ドキュメントから評価メッセージを削除したい場合、または機能制限を取り除く場合は、についてこのメールアドレスはスパムボットから保護されています。閲覧するにはJavaScriptを有効にする必要があります。にお問い合わせ、30 日間有効な一時ライセンスを取得してください。
特定の段落やテキストのフォントの色を変更することで、Word ドキュメント内でその段落やテキストを目立たせることができます。今回は、Spire.Doc for Java を使用して Word ドキュメントのフォントの色を変更する方法を説明します。
まず、Spire. Doc for Java を Java プロジェクトに追加する必要があります。JAR ファイルは、このリンクからダウンロードできます。Maven を使用する場合は、次のコードをプロジェクトの pom.xml ファイルに追加する必要があります。
<repositories>
    <repository>
        <id>com.e-iceblue</id>
        <name>e-iceblue</name>
        <url> https://repo.e-iceblue.com/nexus/content/groups/public/</url>
    </repository>
</repositories>
<dependencies>
    <dependency>
        <groupId>e-iceblue</groupId>
        <artifactId>spire.doc</artifactId>
        <version>10.7.10</version>
    </dependency>
</dependencies>以下は、Word ドキュメントで段落のフォントの色を変更する手順です。
import com.spire.doc.Document;
import com.spire.doc.FileFormat;
import com.spire.doc.Section;
import com.spire.doc.documents.Paragraph;
import com.spire.doc.documents.ParagraphStyle;
import java.awt.*;
public class ChangeFontColorOfParagraph {
public static void main(String[] args) {
//Document クラスのインスタンスを作成する
Document document = new Document();
//Wordドキュメントを読み込む
document.loadFromFile("C:/例.docx");
//最初のセクションを取得する
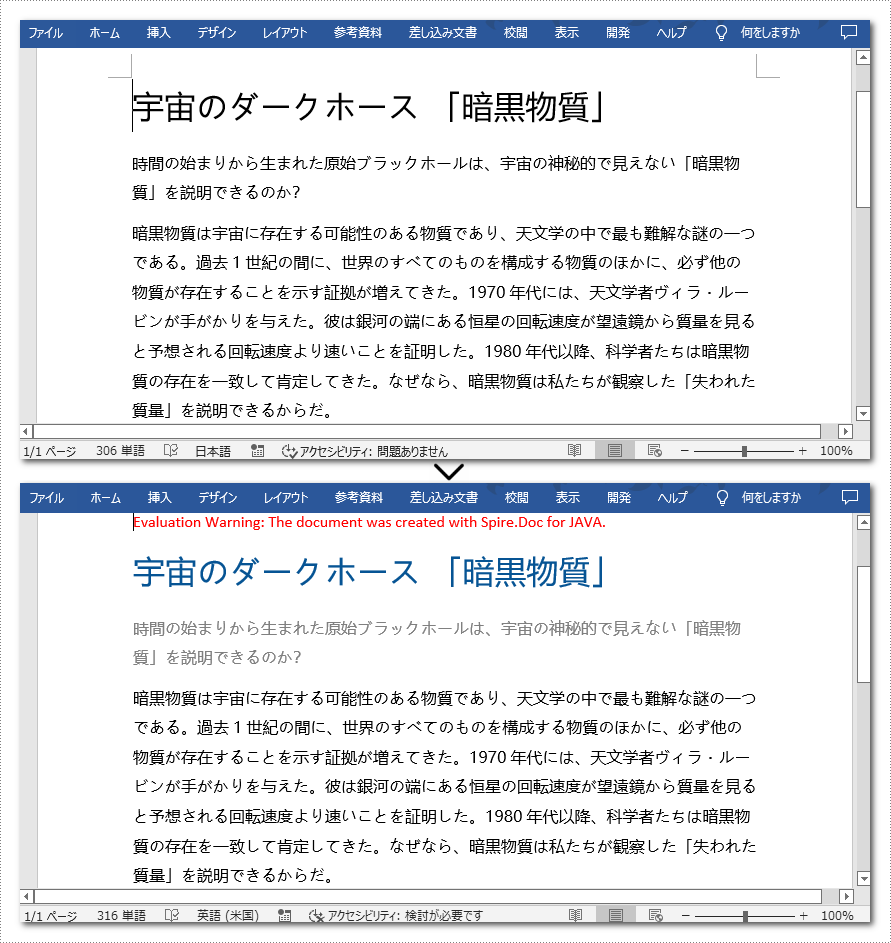
Section section = document.getSections().get(0);
//このセクションで最初の段落のフォント色を変更する
Paragraph p1 = section.getParagraphs().get(0);
ParagraphStyle s1 = new ParagraphStyle(document);
s1.setName("色1");
s1.getCharacterFormat().setTextColor(new Color(6, 84, 148));
document.getStyles().add(s1);
p1.applyStyle(s1.getName());
//このセクションで2番目の段落のフォント色を変更する
Paragraph p2 = section.getParagraphs().get(1);
ParagraphStyle s2 = new ParagraphStyle(document);
s2.setName("色2");
s2.getCharacterFormat().setTextColor(new Color(128, 128, 128));;
document.getStyles().add(s2);
p2.applyStyle(s2.getName());
//ドキュメントを保存する
document.saveToFile("段落のフォント色の変更.docx", FileFormat.Docx);
}
}
以下は、Word ドキュメントに含まれる指定した文字のフォントの色を変更する手順です。
import com.spire.doc.Document;
import com.spire.doc.FileFormat;
import com.spire.doc.documents.TextSelection;
import java.awt.*;
public class ChangeFontColorOfText {
public static void main(String[] args) {
//Documentクラスのインスタンスを作成する
Document document = new Document();
//Wordドキュメントを読み込む
document.loadFromFile("C:/例.docx");
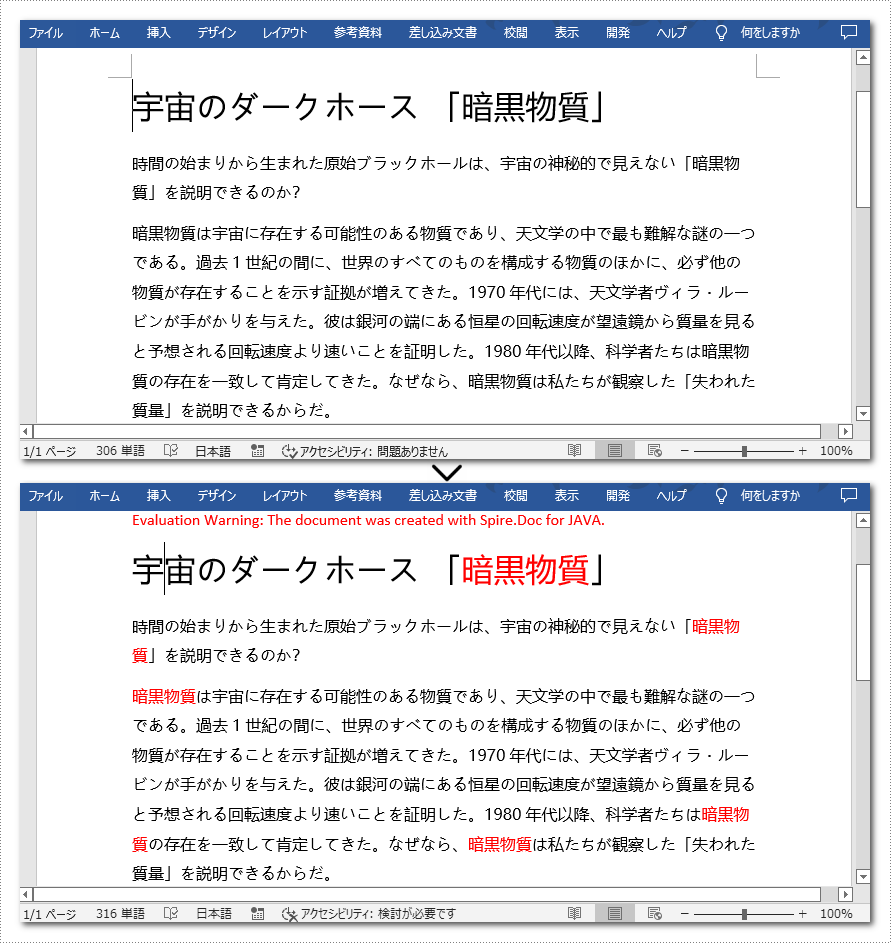
//フォントの色を変更したいテキストを探す
TextSelection[] text = document.findAllString("暗黒物質", false, true);
//検索されたテキストのフォントの色を変更する
for (TextSelection selection : text)
{
selection.getAsOneRange().getCharacterFormat().setTextColor(Color.red);
}
//ドキュメントを保存する
document.saveToFile("テキストのフォント色の変更.docx", FileFormat.Docx);
}
}
結果ドキュメントから評価メッセージを削除したい場合、または機能制限を取り除く場合は、についてこのメールアドレスはスパムボットから保護されています。閲覧するにはJavaScriptを有効にする必要があります。 にお問い合わせ、30 日間有効な一時ライセンスを取得してください。