チュートリアル
簡単にライブラリーを使用するためのチュートリアルコレクション
表は、Word 文書内で情報を構造的に整理・提示するための非常に強力なツールです。行と列から構成され、グリッド状の構造を形成します。表は、スケジュールの作成、データの比較、情報を整然と表示するなど、さまざまな用途で広く利用されています。本記事では、Spire.Doc for Python を使用して、Python で Word 文書に表をプログラム的に作成する方法を解説します。
この操作には Spire.Doc for Python と plum-dispatch v1.7.4 が必要です。これらは、Spire.Doc for Python の公式ウェブサイトから手動でダウンロードするか、以下の pip コマンドでインストールできます。
pip install Spire.PDF
Spire.Doc for Python では、Word 文書内の表を表現するために Table クラスが提供されています。表オブジェクトは、コンストラクターを使用する方法、または Section.AddTable() メソッドを使用して作成できます。表オブジェクトを作成した後は、Table.AddRow() メソッドを使って行を動的に追加することも、あらかじめ行数と列数を指定して一括でデータを設定することも可能です。
また、Spire.Doc for Python は HTML 文字列から表を作成する機能もサポートしています。この方法では Table オブジェクトは返されません。そのため、HTML 文字列から作成された表に対して Table クラスのプロパティやメソッドを使用することはできません。表の内容やスタイルは、HTML 文字列内であらかじめ設定する必要があります。
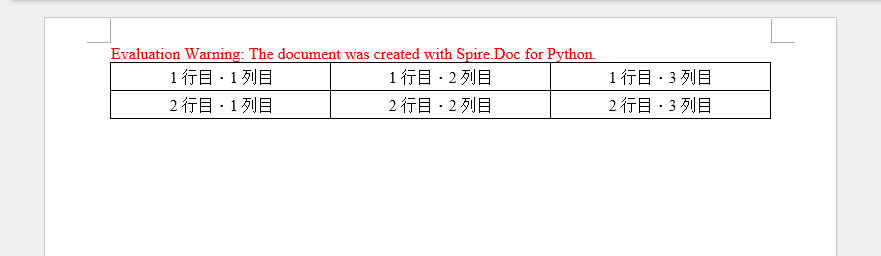
この例では、Table クラスを使用して基本的な表を作成し、行を 1 つずつ追加する方法を示します。主な手順は以下のとおりです。
from spire.doc import *
from spire.doc.common import *

# Document オブジェクトを作成します
doc = Document()

# セクションを追加します
section = doc.AddSection()

# テーブルを作成します
table = Table(doc, True)

# テーブルの幅を設定します(100%)
table.PreferredWidth = PreferredWidth(WidthType.Percentage, int(100))

# テーブルの罫線スタイルを設定します
table.TableFormat.Borders.BorderType = BorderStyle.Single
table.TableFormat.Borders.Color = Color.get_Black()

# 行を追加します(3 列)
row = table.AddRow(False, 3)
row.Height = 20.0

# セルにデータを追加します
cell = row.Cells[0]
cell.CellFormat.VerticalAlignment = VerticalAlignment.Middle
paragraph = cell.AddParagraph()
paragraph.Format.HorizontalAlignment = HorizontalAlignment.Center
paragraph.AppendText("1 行目・1 列目")

cell = row.Cells[1]
cell.CellFormat.VerticalAlignment = VerticalAlignment.Middle
paragraph = cell.AddParagraph()
paragraph.Format.HorizontalAlignment = HorizontalAlignment.Center
paragraph.AppendText("1 行目・2 列目")

cell = row.Cells[2]
cell.CellFormat.VerticalAlignment = VerticalAlignment.Middle
paragraph = cell.AddParagraph()
paragraph.Format.HorizontalAlignment = HorizontalAlignment.Center
paragraph.AppendText("1 行目・3 列目")

# 2 行目を追加します
row = table.AddRow(False, 3)
row.Height = 20.0

cell = row.Cells[0]
cell.CellFormat.VerticalAlignment = VerticalAlignment.Middle
paragraph = cell.AddParagraph()
paragraph.Format.HorizontalAlignment = HorizontalAlignment.Center
paragraph.AppendText("2 行目・1 列目")

cell = row.Cells[1]
cell.CellFormat.VerticalAlignment = VerticalAlignment.Middle
paragraph = cell.AddParagraph()
paragraph.Format.HorizontalAlignment = HorizontalAlignment.Center
paragraph.AppendText("2 行目・2 列目")

cell = row.Cells[2]
cell.CellFormat.VerticalAlignment = VerticalAlignment.Middle
paragraph = cell.AddParagraph()
paragraph.Format.HorizontalAlignment = HorizontalAlignment.Center
paragraph.AppendText("2 行目・3 列目")

# セクションにテーブルを追加します
section.Tables.Add(table)

# ドキュメントを保存します
doc.SaveToFile("output/CreateTable.docx", FileFormat.Docx)
doc.Close()
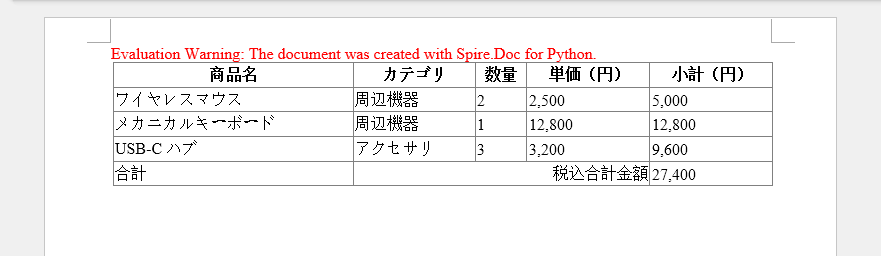
HTML 文字列から表を作成するには、Paragraph.AppendHTML() メソッドを使用します。手順は以下のとおりです。
from spire.doc import *
from spire.doc.common import *

# Document オブジェクトを作成します
document = Document()

# セクションを追加します
section = document.AddSection()

# HTML 形式のテーブル文字列を定義します
HTML = (
    "<table border='1' style='border-collapse:collapse;width:100%'>"
    "<tr>"
        "<th>商品名</th>"
        "<th>カテゴリ</th>"
        "<th>数量</th>"
        "<th>単価(円)</th>"
        "<th>小計(円)</th>"
    "</tr>"
    "<tr>"
        "<td>ワイヤレスマウス</td>"
        "<td>周辺機器</td>"
        "<td>2</td>"
        "<td>2,500</td>"
        "<td>5,000</td>"
    "</tr>"
    "<tr>"
        "<td>メカニカルキーボード</td>"
        "<td>周辺機器</td>"
        "<td>1</td>"
        "<td>12,800</td>"
        "<td>12,800</td>"
    "</tr>"
    "<tr>"
        "<td>USB-C ハブ</td>"
        "<td>アクセサリ</td>"
        "<td>3</td>"
        "<td>3,200</td>"
        "<td>9,600</td>"
    "</tr>"
    "<tr>"
        "<td>合計</td>"
        "<td colspan='3' style='text-align:right'>税込合計金額</td>"
        "<td>27,400</td>"
    "</tr>"
    "</table>"
)

# 段落を追加します
paragraph = section.AddParagraph()

# HTML テーブルを段落に追加します
paragraph.AppendHTML(HTML)

# Word ドキュメントとして保存します
document.SaveToFile("output/HtmlTable.docx", FileFormat.Docx2013)
document.Close()
HTML が完全なドキュメント形式の場合は、表として挿入するのではなく、Word 文書へ直接変換する方法もあります。詳細については「Python を使用して HTML ファイルを Word 文書に変換する方法」をご確認ください。
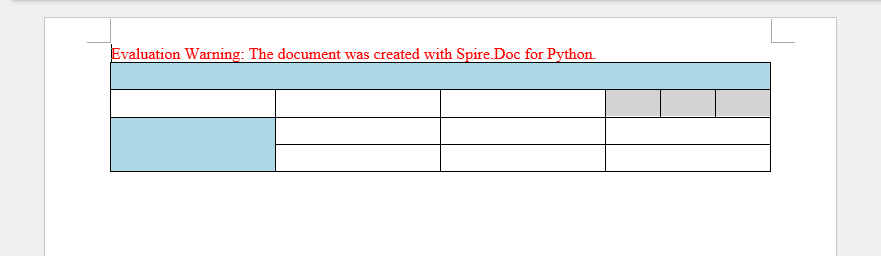
表を操作する際、セルの結合や分割はデータの見せ方を柔軟にカスタマイズするための重要な機能です。この例では、Spire.Doc for Python を使用して、隣接するセルを 1 つに結合する方法と、1 つのセルを複数の小さなセルに分割する方法を紹介します。
from spire.doc import *
from spire.doc.common import *

# Document オブジェクトを作成します
document = Document()

# セクションを追加します
section = document.AddSection()

# テーブルを作成します
table = section.AddTable(True)

# テーブルの行数と列数を設定します(4 行 × 4 列)
table.ResetCells(4, 4)

# テーブルの幅を設定します(100%)
table.PreferredWidth = PreferredWidth(WidthType.Percentage, int(100))

# 行の高さを設定します
for i in range(0, table.Rows.Count):
    table.Rows[i].Height = 20.0

# 2 行目・4 列目のセルを取得します
cell = table.Rows[1].Cells[3]

# セルを縦方向に 3 分割します
cell.SplitCell(3, 0)

# 1 行目を水平方向に結合します
table.ApplyHorizontalMerge(0, 0, 3)

# 1 列目の 3~4 行目を垂直方向に結合します
table.ApplyVerticalMerge(0, 2, 3)

# 見出しセル
table.Rows[0].Cells[0].CellFormat.BackColor = Color.get_LightBlue()

# 左側の結合セル
table.Rows[2].Cells[0].CellFormat.BackColor = Color.get_LightBlue()

# 分割されたセル
table.Rows[1].Cells[3].CellFormat.BackColor = Color.get_LightGray()
table.Rows[1].Cells[4].CellFormat.BackColor = Color.get_LightGray()
table.Rows[1].Cells[5].CellFormat.BackColor = Color.get_LightGray()

# ドキュメントを保存します
document.SaveToFile("output/MergeAndSplit.docx", FileFormat.Docx2013)
document.Close()
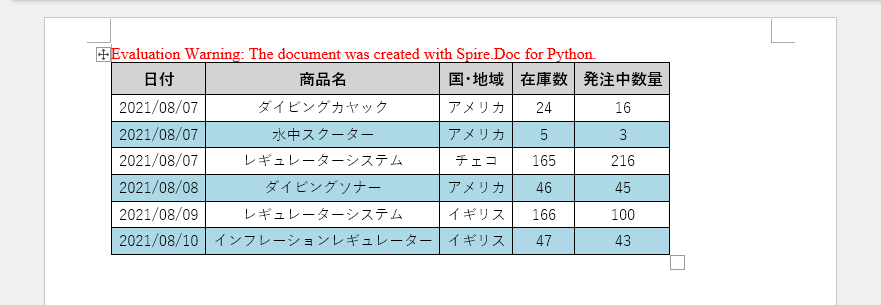
この例では、5 行 7 列の表を作成し、リスト内のデータを各セルに書き込み、ヘッダー行とそれ以外の行に異なる書式を適用します。主な手順は以下のとおりです。
import math
from spire.doc import *
from spire.doc.common import *

# Document オブジェクトを作成します
doc = Document()

# セクションを追加します
section = doc.AddSection()

# テーブルを作成します
table = section.AddTable(True)

# テーブルに使用するデータを定義します
header_data = ["日付", "商品名", "国・地域", "在庫数", "発注中数量"]
row_data = [
    ["2021/08/07", "ダイビングカヤック", "アメリカ", "24", "16"],
    ["2021/08/07", "水中スクーター", "アメリカ", "5", "3"],
    ["2021/08/07", "レギュレーターシステム", "チェコ", "165", "216"],
    ["2021/08/08", "ダイビングソナー", "アメリカ", "46", "45"],
    ["2021/08/09", "レギュレーターシステム", "イギリス", "166", "100"],
    ["2021/08/10", "インフレーションレギュレーター", "イギリス", "47", "43"]
]

# テーブルの行数と列数を設定します
table.ResetCells(len(row_data) + 1, len(header_data))

# テーブルの幅を設定します(100%)
table.PreferredWidth = PreferredWidth(WidthType.Percentage, int(100))

# ヘッダー行を取得します
headerRow = table.Rows[0]
headerRow.IsHeader = True
headerRow.Height = 23
headerRow.RowFormat.BackColor = Color.get_LightGray()

# ヘッダー行にデータを入力し、書式を設定します
i = 0
while i < len(header_data):
    headerRow.Cells[i].CellFormat.VerticalAlignment = VerticalAlignment.Middle
    paragraph = headerRow.Cells[i].AddParagraph()
    paragraph.Format.HorizontalAlignment = HorizontalAlignment.Center
    txtRange = paragraph.AppendText(header_data[i])
    txtRange.CharacterFormat.Bold = True
    txtRange.CharacterFormat.FontSize = 12
    txtRange.CharacterFormat.FontName = "Yu Gothic UI"
    i += 1

# データ行に値を入力し、書式を設定します
r = 0
while r < len(row_data):
    dataRow = table.Rows[r + 1]
    dataRow.Height = 20
    dataRow.HeightType = TableRowHeightType.Exactly
    c = 0
    while c < len(row_data[r]):
        dataRow.Cells[c].CellFormat.VerticalAlignment = VerticalAlignment.Middle
        paragraph = dataRow.Cells[c].AddParagraph()
        paragraph.Format.HorizontalAlignment = HorizontalAlignment.Center
        txtRange = paragraph.AppendText(row_data[r][c])
        txtRange.CharacterFormat.FontSize = 11
        txtRange.CharacterFormat.FontName = "Yu Gothic"
        c += 1
    r += 1

# 行の背景色を交互に設定します
for j in range(1, table.Rows.Count):
    if math.fmod(j, 2) == 0:
        row2 = table.Rows[j]
        for f in range(row2.Cells.Count):
            row2.Cells[f].CellFormat.BackColor = Color.get_LightBlue()

# テーブルの罫線を設定します
table.Format.Borders.BorderType = BorderStyle.Single
table.Format.Borders.LineWidth = 1.0
table.Format.Borders.Color = Color.get_Black()

# テーブルを自動調整します
table.AutoFit(AutoFitBehaviorType.AutoFitToContents)

# Word ドキュメントとして保存します
doc.SaveToFile("output/Table.docx", FileFormat.Docx2013)
doc.Dispose()
生成された文書から評価メッセージを削除したい場合や、機能制限を解除したい場合は、30 日間の試用ライセンスを申請 してください。
現代のワークフローでは、データ分析は Excel で行われ、最終的なレポートは Word で作成されることが一般的です。しかし、データを手動でコピー&ペーストすると、エラーやバージョンの不整合、書式の乱れが発生する可能性があります。Python を活用した自動化により、Excel のデータ処理機能と Word のフォーマット機能をシームレスに統合でき、データの整合性を確保しながら作業の効率を向上させることが可能です。本記事では、Spire.Office for Python を使用して、Python コードで Excel の表を Word 文書に挿入する方法を解説します。
この操作には、Spire.Office for Python と plum-dispatch v1.7.4 が必要です。これらは、Spire.Office for Python の公式ウェブサイトから手動でダウンロードするか、以下の pip コマンドでインストールできます。
pip install Spire.DocSpire.XLS for Python を使用すると、Excel ワークシートから数値書式を保持したままデータを抽出できます(CellRange.NumberText プロパティを使用)。抽出したデータを、Spire.Doc for Python を使用して Word の表に挿入できます。この方法は、単純な Excel ワークシートや、Word で書式を変更する必要があるケースに適しています。
Excel のデータを読み込み Word に挿入する手順
from spire.doc import Document, AutoFitBehaviorType, FileFormat, DefaultTableStyle
from spire.xls import Workbook

# ファイル名を指定します
excel_file = "Sample.xlsx"
word_file = "output/ExcelDataToWord.docx"

# Workbook インスタンスを作成します
workbook = Workbook()
# Excel ファイルを読み込みます
workbook.LoadFromFile(excel_file)

# 最初のワークシートを取得します
sheet = workbook.Worksheets.get_Item(0)
# 最初のワークシートで使用されているセル範囲を取得します
allocatedRange = sheet.AllocatedRange

# Document インスタンスを作成します
doc = Document()

# 文書にセクションを追加し、そのセクションに表を追加します
section = doc.AddSection()
table = section.AddTable()

# Word の表の行数と列数を Excel のワークシートと同じにリセットします
table.ResetCells(allocatedRange.RowCount, allocatedRange.ColumnCount)

# 使用されているセル範囲の各行と各列をループ処理します
for rowIndex in range(allocatedRange.RowCount):
    # 行内の各列をループ処理します
    for colIndex in range(allocatedRange.ColumnCount):
        # Word の表にセルを追加し、そのセルに段落を追加します
        cell = table.Rows.get_Item(rowIndex).Cells.get_Item(colIndex)
        paragraph = cell.AddParagraph()
        # セルの値を Word の表に追加し、フォントを設定します
        textRange = paragraph.AppendText(allocatedRange.get_Item(rowIndex + 1, colIndex + 1).NumberText)
        textRange.CharacterFormat.FontName = "Yu Gothic UI"

# 表のサイズをウィンドウに合わせて自動調整し、表のスタイルを適用します
table.AutoFit(AutoFitBehaviorType.AutoFitToWindow)
table.ApplyStyle(DefaultTableStyle.GridTable1LightAccent6)

# Word 文書を保存します
doc.SaveToFile(word_file, FileFormat.Docx2019)

# リソースを解放します
doc.Dispose()
workbook.Dispose()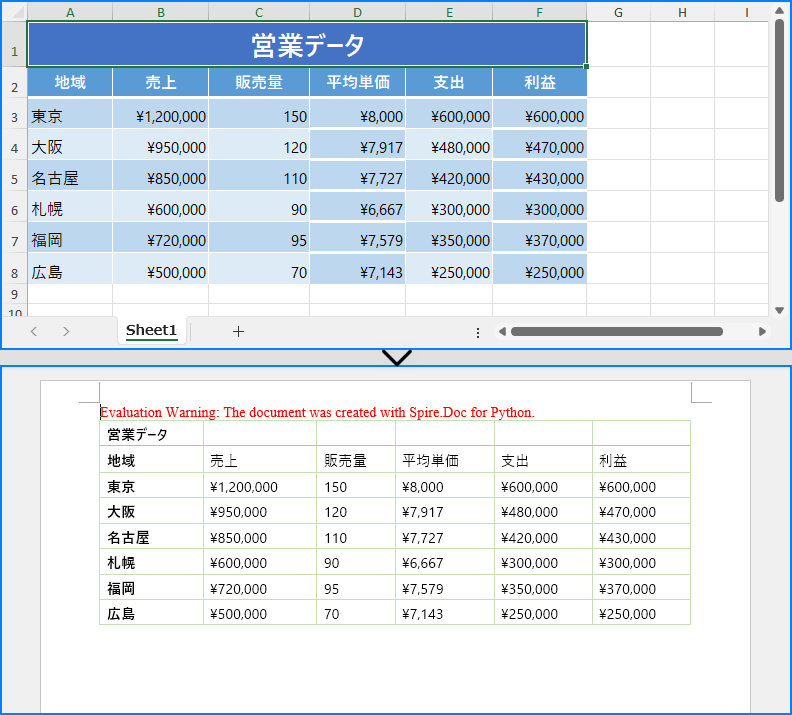
Spire.XLS for Python と Spire.Doc for Python を併用すると、Excel のデータと書式の両方を Word にコピーし、表の構造と外観を保持できます。
書式を保持するために必要な補助メソッド
データと書式をコピーする手順
from spire.xls import Workbook, HorizontalAlignType, ExcelPatternType, VerticalAlignType
from spire.doc import Document, Color, HorizontalAlignment, VerticalAlignment, PageOrientation, FileFormat


def MergeCells(worksheet, wordTable):
    # セルの結合があるか確認します
    if not worksheet.HasMergedCells:
        return
    for cell_range in worksheet.MergedCells:
        start_row, start_col = cell_range.Row, cell_range.Column
        row_count, col_count = cell_range.RowCount, cell_range.ColumnCount
        # 横方向の結合を処理します
        if col_count > 1:
            for row in range(start_row, start_row + row_count):
                wordTable.ApplyHorizontalMerge(row - 1, start_col - 1, start_col - 1 + col_count - 1)
        # 縦方向の結合を処理します
        if row_count > 1:
            wordTable.ApplyVerticalMerge(start_col - 1, start_row - 1, start_row - 1 + row_count - 1)


def CopyFormatting(tableTextRange, excelCell, wordCell):
    # フォントスタイルをコピーします
    font = excelCell.Style.Font
    tableTextRange.CharacterFormat.TextColor = Color.FromRgb(font.Color.R, font.Color.G, font.Color.B)
    tableTextRange.CharacterFormat.FontSize = float(font.Size)
    tableTextRange.CharacterFormat.FontName = font.FontName
    tableTextRange.CharacterFormat.Bold = font.IsBold
    tableTextRange.CharacterFormat.Italic = font.IsItalic
    # 背景色をコピーします
    if excelCell.Style.FillPattern != ExcelPatternType.none:
        wordCell.CellFormat.BackColor = Color.FromRgb(excelCell.Style.Color.R, excelCell.Style.Color.G,
                                                      excelCell.Style.Color.B)
    # 横方向の配置をコピーします
    hAlignMap = {
        HorizontalAlignType.Left: HorizontalAlignment.Left,
        HorizontalAlignType.Center: HorizontalAlignment.Center,
        HorizontalAlignType.Right: HorizontalAlignment.Right
    }
    if excelCell.HorizontalAlignment in hAlignMap:
        tableTextRange.OwnerParagraph.Format.HorizontalAlignment = hAlignMap[excelCell.HorizontalAlignment]
    # 縦方向の配置をコピーします
    vAlignMap = {
        VerticalAlignType.Top: VerticalAlignment.Top,
        VerticalAlignType.Center: VerticalAlignment.Middle,
        VerticalAlignType.Bottom: VerticalAlignment.Bottom
    }
    if excelCell.VerticalAlignment in vAlignMap:
        wordCell.CellFormat.VerticalAlignment = vAlignMap[excelCell.VerticalAlignment]

# ファイル名を指定します
excelFileName = "Sample.xlsx"
wordFileName = "output/ExcelDataFormatToWord.docx"

# Workbook インスタンスを作成し、Excel ファイルを読み込みます
workbook = Workbook()
workbook.LoadFromFile(excelFileName)

# ワークシートを取得します
sheet = workbook.Worksheets.get_Item(0)

# Document インスタンスを作成します
doc = Document()
# 文書にセクションを追加し、ページの向きを設定します
section = doc.AddSection()
section.PageSetup.Orientation = PageOrientation.Landscape

# セクションに表を追加します
table = section.AddTable()
# Word の表の行数と列数を Excel のワークシートと同じに設定します
table.ResetCells(sheet.LastRow, sheet.LastColumn)

# MergeCells メソッドを実行してセルを結合します
MergeCells(sheet, table)

# Excel のワークシート内の各行と各列をループ処理します
for r in range(1, sheet.LastRow + 1):
    tableRow = table.Rows.get_Item(r - 1)
    tableRow.Height = float(sheet.Rows.get_Item(r - 1).RowHeight)
    for c in range(1, sheet.LastColumn + 1):
        # Excel の対応するセルと Word の表のセルを取得します
        eCell = sheet.Range.get_Item(r, c)
        wCell = table.Rows.get_Item(r - 1).Cells.get_Item(c - 1)
        # セルの値を Word の表に追加します
        textRange = wCell.AddParagraph().AppendText(eCell.NumberText)
        # セルの書式をコピーします
        CopyFormatting(textRange, eCell, wCell)

# Word 文書を保存します
doc.SaveToFile(wordFileName, FileFormat.Docx2019)
doc.Dispose()
workbook.Dispo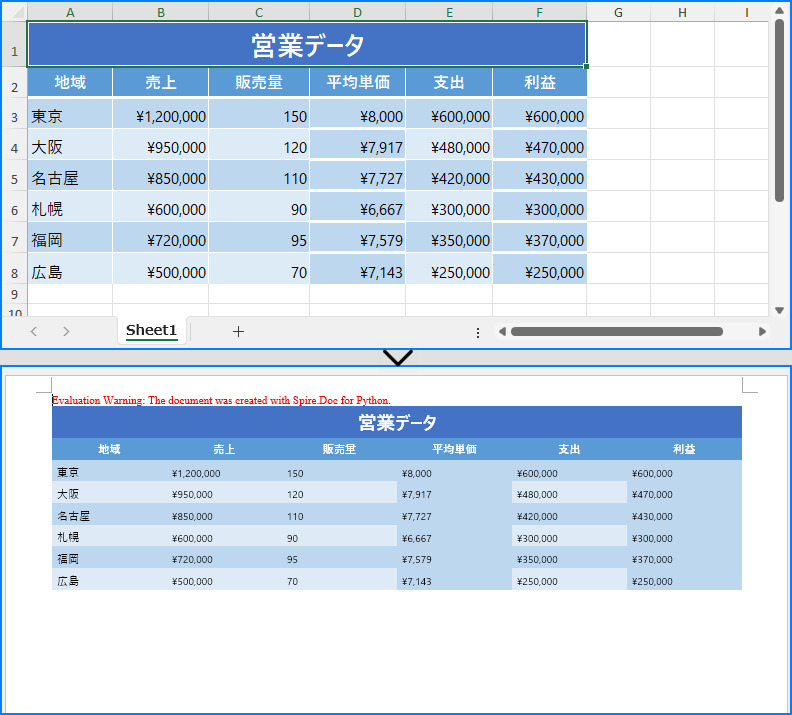
データと書式のコピーに加え、Excel ワークシートを OLE オブジェクトとして Word に埋め込むこともできます。この方法を使用すると、Excel のワークシートを完全な形式で表示できるだけでなく、Word 文書内で直接編集することも可能になります。
Spire.Doc for Python の Paragraph.AppendOleObject(str: filename, DocPicture, OleObjectType.ExcelWorksheet) メソッドを使用すると、Excel ファイルを簡単に OLE オブジェクトとして挿入できます。
Excel ワークシートを OLE オブジェクトとして挿入する手順
from spire.doc import Document, DocPicture, FileFormat, OleObjectType
from spire.xls import Workbook

# ファイルパスとファイル名を指定します
excelFileName = "Sample.xlsx"
wordFileName = "output/ExcelOleToWord.docx"
tempImageName = "SheetImage.png"

# Workbook インスタンスを作成し、Excel ファイルを読み込みます
workbook = Workbook()
workbook.LoadFromFile(excelFileName)

# 最初のワークシートを画像として保存します
sheet = workbook.Worksheets.get_Item(0)
sheet.ToImage(1, 1, sheet.LastRow, sheet.LastColumn).Save(tempImageName)

# Word 文書を作成するために Document インスタンスを初期化します
doc = Document()
# 文書にセクションを追加し、そのセクションに段落を追加します
section = doc.AddSection()
paragraph = section.AddParagraph()

# DocPicture インスタンスを作成し、画像を読み込みます
pic = DocPicture(doc)
pic.LoadImage(tempImageName)

# 画像の幅を設定します
pic.Width = section.PageSetup.PageSize.Width - section.PageSetup.Margins.Left - section.PageSetup.Margins.Right

# Excel ファイルを OLE オブジェクトとして Word 文書に挿入し、保存した画像を表示用に設定します
ole = paragraph.AppendOleObject(excelFileName, pic, OleObjectType.ExcelWorksheet)
# OLE オブジェクトをアイコンとして表示しないように設定します
ole.DisplayAsIcon = False

# Word 文書を保存します
doc.SaveToFile(wordFileName, FileFormat.Docx2019)
workbook.Dispose()
doc.Dispose()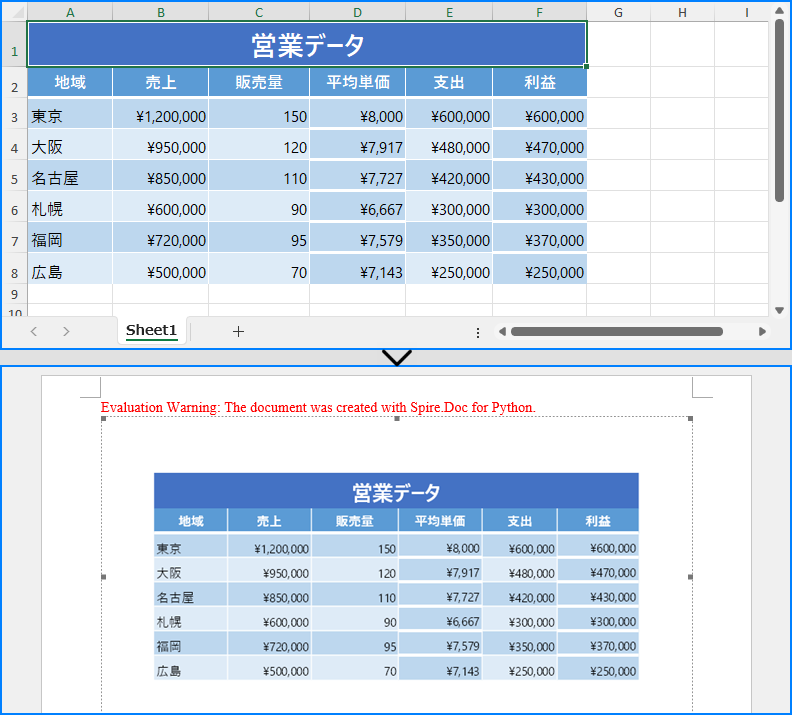
結果ドキュメントから評価メッセージを削除したい場合、または機能制限を取り除く場合は、についてこのメールアドレスはスパムボットから保護されています。閲覧するにはJavaScriptを有効にする必要があります。にお問い合わせ、30 日間有効な一時ライセンスを取得してください。
Word 文書の表に行や列を追加・削除することで、データの構造を適切に調整できます。行や列を追加することで、データの増加に対応し、必要な情報をすべて表示できるようになります。一方で、不必要な行や列を削除すれば、表を整理し、文書の冗長な情報を削減できます。本記事では、Spire.Doc for Python を使用して、Python で Word 文書の表に行や列を追加・削除する方法を解説します。
この操作には、Spire.Doc for Python と plum-dispatch v1.7.4 が必要です。これらは、Spire.Doc for Python の公式ウェブサイトから手動でダウンロードするか、以下の pip コマンドでインストールできます。
pip install Spire.DocWord の表に行を追加するには、表の末尾に追加する方法と、特定の位置に挿入する方法があります。これには Table.AddRow() または Table.InsertRow() メソッドを使用します。以下の手順で実装できます。
from spire.doc import Document, Table, HorizontalAlignment, VerticalAlignment

# Document オブジェクトを作成します。
document = Document()
# Word 文書を読み込みます。
document.LoadFromFile("Sample.docx")

# 文書の最初のセクションを取得します。
section = document.Sections[0]

# 最初のセクションの最初のテーブルを取得します。
table = section.Tables[0] if isinstance(section.Tables[0], Table) else None

# テーブルの 3 行目として新しい行を挿入します。
table.Rows.Insert(2, table.AddRow())
# 挿入された行を取得します。
insertedRow = table.Rows[2]
# 行にデータを追加します。
for i in range(insertedRow.Cells.Count):
    cell = insertedRow.Cells[i]
    paragraph = cell.AddParagraph()
    textRange = paragraph.AppendText("挿入された行")
    textRange.CharacterFormat.FontName = "Yu Gothic UI"
    paragraph.Format.HorizontalAlignment = HorizontalAlignment.Left
    cell.CellFormat.VerticalAlignment = VerticalAlignment.Middle

# テーブルの末尾に新しい行を追加します。
addedRow = table.AddRow()
# 行にデータを追加します。
for i in range(addedRow.Cells.Count):
    cell = addedRow.Cells[i]
    paragraph = cell.AddParagraph()
    textRange = paragraph.AppendText("終了行")
    textRange.CharacterFormat.FontName = "Yu Gothic UI"
    paragraph.Format.HorizontalAlignment = HorizontalAlignment.Left
    cell.CellFormat.VerticalAlignment = VerticalAlignment.Middle

# 変更後の文書を保存します。
document.SaveToFile("output/Wordの表に行を追加・挿入.docx")
document.Close()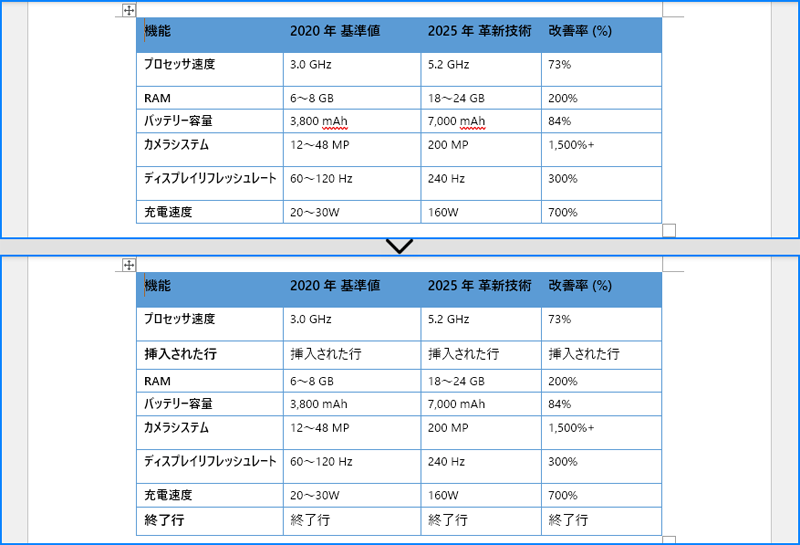
Spire.Doc for Python には、Word の表に直接列を追加・挿入するメソッドはありません。しかし、各行の特定の位置にセルを追加・挿入することで実現できます。TableRow.Cells.Add() または TableRow.Cells.Insert() メソッドを使用し、以下の手順で実装します。
from spire.doc import Document, TableCell, Table, HorizontalAlignment, VerticalAlignment, AutoFitBehaviorType

# Document オブジェクトを作成します。
document = Document()
# Word 文書を読み込みます。
document.LoadFromFile("Sample.docx")

# 文書の最初のセクションを取得します。
section = document.Sections[0]

# 最初のセクションの最初のテーブルを取得します。
table = section.Tables[0] if isinstance(section.Tables[0], Table) else None

# テーブルの各行をループ処理します。
for i in range(table.Rows.Count):
    row = table.Rows[i]
    # TableCell オブジェクトを作成します。
    cell = TableCell(document)
    # 行の 3 列目にセルを挿入し、セルの幅を設定します。
    row.Cells.Insert(2, cell)
    cell.Width = row.Cells[0].Width
    # セルにデータを追加します。
    paragraph = cell.AddParagraph()
    textRange = paragraph.AppendText("挿入された列")
    textRange.CharacterFormat.FontName = "Yu Gothic UI"
    # テキストの配置を設定します。
    paragraph.Format.HorizontalAlignment = HorizontalAlignment.Left
    cell.CellFormat.VerticalAlignment = VerticalAlignment.Middle

    # 行の末尾にセルを追加し、セルの幅を設定します。
    cell = row.AddCell()
    cell.Width = row.Cells[1].Width
    # セルにデータを追加します。
    paragraph = cell.AddParagraph()
    textRange = paragraph.AppendText("終了列")
    textRange.CharacterFormat.FontName = "Yu Gothic UI"
    # テキストの配置を設定します。
    paragraph.Format.HorizontalAlignment = HorizontalAlignment.Left
    cell.CellFormat.VerticalAlignment = VerticalAlignment.Middle

# 列を自動調整する
table.AutoFit(AutoFitBehaviorType.AutoFitToContents)

# 変更後の文書を保存します。
document.SaveToFile("output/Wordの表に列を追加・挿入.docx")
document.Close()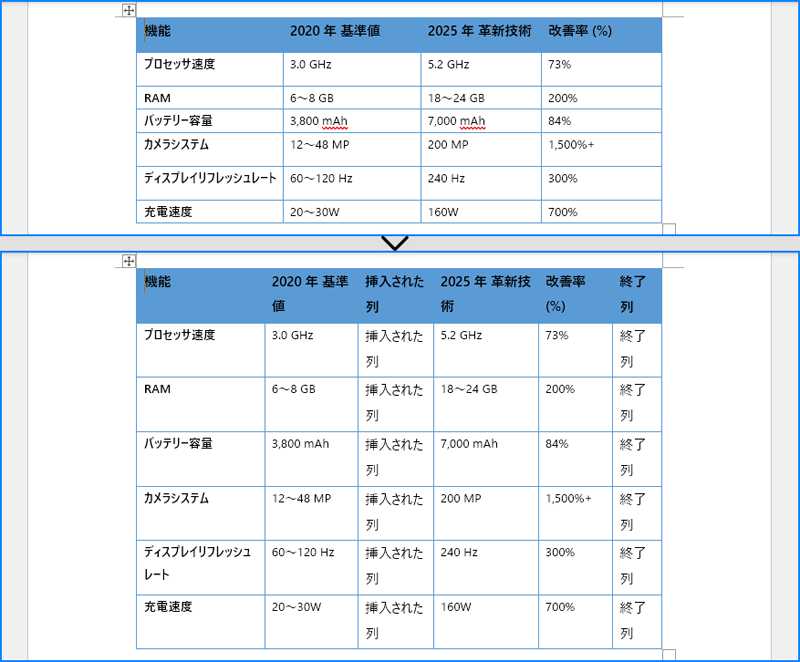
Word の表から特定の行を削除するには、Table.Rows.RemoveAt() メソッドを使用します。以下の手順で実装します。
from spire.doc import Document, Table

# Document オブジェクトを作成します。
document = Document()
# Word 文書を読み込みます。
document.LoadFromFile("Sample.docx")

# 文書の最初のセクションを取得します。
section = document.Sections[0]

# 最初のセクションの最初のテーブルを取得します。
table = section.Tables[0] if isinstance(section.Tables[0], Table) else None

# 行を削除します。
table.Rows.RemoveAt(1)

# 変更後の文書を保存します。
document.SaveToFile("output/Wordの表から行を削除.docx")
document.Close()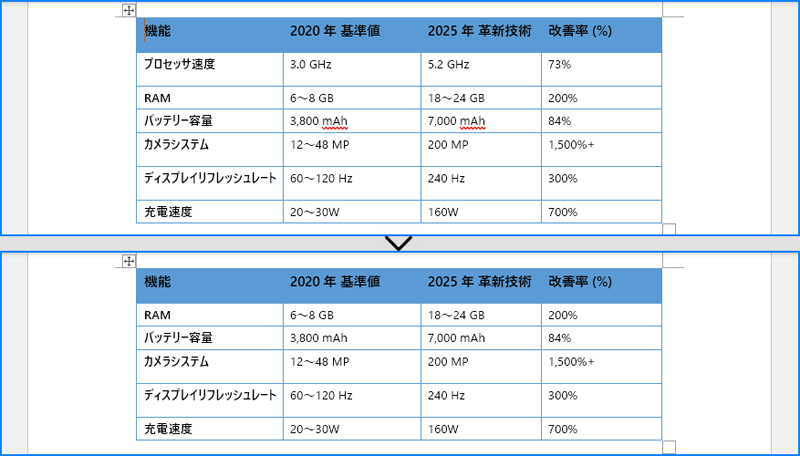
Word の表から特定の列を削除するには、各行から対応するセルを削除する必要があります。これには TableRow.Cells.RemoveAt() メソッドを使用します。以下の手順で実装します。
from spire.doc import Document, Table

# Document オブジェクトを作成します。
document = Document()
# Word 文書を読み込みます。
document.LoadFromFile("Sample.docx")

# 文書の最初のセクションを取得します。
section = document.Sections[0]

# 最初のセクションの最初のテーブルを取得します。
table = section.Tables[0] if isinstance(section.Tables[0], Table) else None

# テーブルの各行をループ処理します。
for i in range(table.Rows.Count):
    row = table.Rows[i]
    # 列のセルを削除します。
    row.Cells.RemoveAt(2)

# 変更後の文書を保存します。
document.SaveToFile("output/Wordの表から列を削除.docx")
document.Close()
結果ドキュメントから評価メッセージを削除したい場合、または機能制限を取り除く場合は、についてこのメールアドレスはスパムボットから保護されています。閲覧するにはJavaScriptを有効にする必要があります。にお問い合わせ、30 日間有効な一時ライセンスを取得してください。