チュートリアル
簡単にライブラリーを使用するためのチュートリアルコレクション
スピーチの内容が非常に抽象的な場合、言葉だけでメッセージを聴衆に明確に伝えるのは難しい場合があります。 PowerPoint プレゼンテーションに画像を追加すると、意見をより明確に伝え、聴衆との間の誤解を最小限に抑えることができます。 必要に応じて、PowerPoint から既存の画像を抽出することもできます。この記事では、Spire.Presentation for Java を使用して PowerPoint に画像を追加または抽出する方法を紹介します。
まず、Spire.Presentation for Java を Java プロジェクトに追加する必要があります。JAR ファイルは、このリンクからダウンロードできます。Maven を使用する場合は、次のコードをプロジェクトの pom.xml ファイルに追加する必要があります。
<repositories>
    <repository>
        <id>com.e-iceblue</id>
        <name>e-iceblue</name>
        <url> https://repo.e-iceblue.com/nexus/content/groups/public/</url>
    </repository>
</repositories>
<dependencies>
    <dependency>
        <groupId>e-iceblue</groupId>
        <artifactId>spire.presentation</artifactId>
        <version>8.1.2</version>
    </dependency>
</dependencies>Spire.Presentation が提供する ISlide.getShapes().appendEmbedImage() メソッドは、特定のスライドに画像の追加をサポートします。詳細な手順は次のとおりです。
import com.spire.presentation.*;
import com.spire.presentation.drawing.FillFormatType;

import java.awt.geom.Rectangle2D;

public class AddImageToSlide {
    public static void main(String []args) throws Exception {
        //Presentationクラスのインスタンスを初期化する
        Presentation presentation = new Presentation();
        //PowerPointドキュメントをロードする
        presentation.loadFromFile("Input.pptx");

        //最初のスライドを取得する
        ISlide slide = presentation.getSlides().get(0);

        //スライドに画像を追加する
        String imageFile = "image.png";
        Rectangle2D.Double rect1 = new Rectangle2D.Double(presentation.getSlideSize().getSize().getWidth() / 2 - 280, 140, 120, 120);
        IEmbedImage image = slide.getShapes().appendEmbedImage(ShapeType.RECTANGLE, imageFile, rect1);
        image.getLine().setFillType(FillFormatType.NONE);

        //結果ドキュメントを保存する
        presentation.saveToFile("AddImageToSlide.pptx", FileFormat.PPTX_2013);
    }
}
スライド マスターは、スライドのテーマ、レイアウト、背景、色、フォントなどの情報を制御できる一番上のスライドです。 スライド マスターの情報は他のスライドにも影響します。 つまり、スライド マスターの情報を変更すると、後で追加されたスライドを含め、他のスライドもそれに応じて変更されます。 画像をすべてのスライドに表示する場合は、スライドマスターに追加できます。
Spire.Presentationが提供する IMasterSlide.getShapes().appendEmbedImage() メソッドは、スライド マスターに画像の追加をサポートします。詳細な手順は次のとおりです。
import com.spire.presentation.*;
import com.spire.presentation.drawing.FillFormatType;

import java.awt.geom.Rectangle2D;

public class AddImageToSlideMaster {
    public static void main(String []args) throws Exception {
        //Presentationクラスのインスタンスを初期化する
        Presentation presentation = new Presentation();
        //PowerPointドキュメントをロードする
        presentation.loadFromFile("Sample.pptx");

        //最初のスライドマスターを取得する
        IMasterSlide master = presentation.getMasters().get(0);

        //スライドマスターに画像を挿入する
        String image = "logo.png";
        Rectangle2D.Double rect = new Rectangle2D.Double(40, 40, 80, 80);
        IEmbedImage pic = master.getShapes().appendEmbedImage(ShapeType.RECTANGLE, image, rect);
        pic.getLine().getFillFormat().setFillType(FillFormatType.NONE);

        //プレゼンテーションへに新しいスライドを追加する
        presentation.getSlides().append();

        //PowerPointドキュメントをロードする
        presentation.saveToFile("AddImageToSlideMaster.pptx", FileFormat.PPTX_2013);
    }
}
特定のスライドから画像を抽出するには、スライドのすべての図形をループします。SlidePicture または PictureShape タイプの図形をを検索し、SlidePicture.getPictureFill().getPicture().getEmbedImage().getImage() または PictureShape.getEmbedImage().getImage() メソッドを使用して画像を取得します。詳細な手順は次のとおりです。
import com.spire.presentation.*;

import javax.imageio.ImageIO;
import java.awt.image.BufferedImage;
import java.io.File;

public class ExtractImageFromSlide {
    public static void main(String []args) throws Exception {
        //Presentationクラスのインスタンスを初期化する
        Presentation ppt = new Presentation();
        //PowerPointドキュメントをロードする
        ppt.loadFromFile("Images.pptx");

        //最初のスライドを取得する
        ISlide slide = ppt.getSlides().get(0);

        //スライドのすべての図形をループする
        for(int i = 0; i< slide.getShapes().getCount(); i++)
        {
            IShape shape = slide.getShapes().get(i);
            //スライドから画像を抽出する
            if(shape instanceof SlidePicture)
            {
                SlidePicture pic = (SlidePicture) shape;
                BufferedImage image = pic.getPictureFill().getPicture().getEmbedImage().getImage();
                ImageIO.write(image, "PNG",  new File(String.format("slide/" + "extractImage-%1$s.png", i)));
            }
            if(shape instanceof PictureShape)
            {
                PictureShape ps = (PictureShape) shape;
                BufferedImage image = ps.getEmbedImage().getImage();
                ImageIO.write(image, "PNG",  new File(String.format("slide/" + "extractImage-%1$s.png", i)));
            }
        }
    }
}
PowerPoint からすべての画像を抽出するには、Presentation.getImages() メソッドを使用してドキュメントの画像コレクションを取得します。その画像コレクションをループし、ImageCollection.get(int).getImage() メソッドを使用して画像を取得します。詳細な手順は次のとおりです。
import com.spire.presentation.Presentation;
import com.spire.presentation.collections.ImageCollection;

import javax.imageio.ImageIO;
import java.awt.image.BufferedImage;
import java.io.File;

public class ExtractAllImagesFromPowerPoint {
    public static void main(String []args) throws Exception {
        //Presentationクラスのインスタンスを初期化する
        Presentation ppt = new Presentation();
        //PowerPointドキュメントをロードする
        ppt.loadFromFile("Images.pptx");

        //ドキュメントの画像コレクションを取得する
        ImageCollection collection = ppt.getImages();

        //画像コレクションをループする
        for (int i = 0; i < collection.getCount(); i++) {
            //コレクションから画像を取得する
            BufferedImage image = collection.get(i).getImage();
            ImageIO.write(image, "PNG",  new File(String.format("presentation/" + "extractImage-%1$s.png", i)));
        }
    }
}
結果ドキュメントから評価メッセージを削除したい場合、または機能制限を取り除く場合は、についてこのメールアドレスはスパムボットから保護されています。閲覧するにはJavaScriptを有効にする必要があります。にお問い合わせ、30 日間有効な一時ライセンスを取得してください。
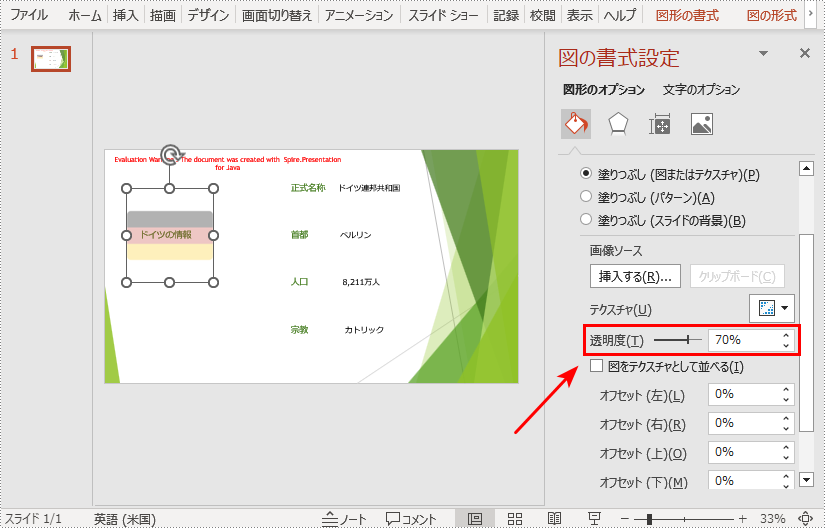
テキストの上に画像が表示されると、テキストが画像に覆われてしまい、表示できなくなります。このとき、文字と画像を同時に表示させるために、画像の透明度を設定することができます。この記事では、Spire.Presentation for Java を使用して、PowerPoint の特定のスライドに画像を挿入し、その画像の透明度を設定する方法を説明します。
まず、Spire.Presentation for Java を Java プロジェクトに追加する必要があります。JAR ファイルは、このリンクからダウンロードできます。Maven を使用する場合は、次のコードをプロジェクトの pom.xml ファイルに追加する必要があります。
<repositories>
    <repository>
        <id>com.e-iceblue</id>
        <name>e-iceblue</name>
        <url>https://repo.e-iceblue.com/nexus/content/groups/public/</url>
    </repository>
</repositories>
<dependencies>
    <dependency>
        <groupId>e-iceblue</groupId>
        <artifactId>spire.presentation</artifactId>
        <version>7.10.1</version>
    </dependency>
</dependencies>以下は、PowerPoint ドキュメントで画像の透明度を設定するために使用されるクラスとメソッドの表です。
| クラス・メソッド | 説明 |
| IAutoShape インターフェース | 形状を表す。 |
| ShapeList クラス | 図形の集合を表す。 |
| PictureFillFormat クラス | 画像の塗りつぶしスタイルを表す。 |
| ShapeList.appendShape(ShapeType.shapeType, Rectangle2D.Double) メソッド | リストに新しい形状を追加します。 |
| IAutoShape.getLine().setFillType(FillFormatType.value) メソッド | 線の塗りつぶし形式を設定します。 |
| IAutoShape.getFill().setFillType(FillFormatType.value) メソッド | 形状の塗りつぶし形式を設定します。 |
| IAutoShape.getFill().getPictureFill() Method | 画像塗りつぶし形式を取得します。 |
| PictureFillFormat.setFillType(PictureFillType.value) メソッド | 画像の塗りつぶしモードを設定します。 |
| PictureFillFormat.getPicture().setUrl(java.lang.String value) メソッド | 画像塗りつぶしのための画像の URL を設定します。 |
| PictureFillFormat.getPicture().setTransparency()メソッド | 画像の塗りつぶしの透明度を設定します。 |
PowerPoint で画像に透明度を設定する手順を説明します。
import com.spire.presentation.*;
import com.spire.presentation.drawing.*;
import java.awt.geom.Rectangle2D;

public class setImageTransparency {
    public static void main(String[] args) throws Exception {

        //Presentationクラスのインスタンスを作成する
        Presentation presentation = new Presentation();

        //PowerPointのドキュメントを読み込む
        presentation.loadFromFile("ドイツの情報.pptx");

        //最初のスライドの指定位置に図形を挿入する
        Rectangle2D.Double rect1 = new   Rectangle2D.Double(50, 130, 200, 150);
        IAutoShape shape =  presentation.getSlides().get(1).getShapes().appendShape(ShapeType.RECTANGLE, rect1);

        //図形を画像で塗りつぶす
        //塗りつぶし形式の種類を設定する
        shape.getLine().setFillType(FillFormatType.NONE);
        //塗りつぶし種類を設定する
        shape.getFill().setFillType(FillFormatType.PICTURE);
        //画像のURLを設定する
        shape.getFill().getPictureFill().getPicture().setUrl("https://icon-icons.com/downloadimage.php?id=29761&root=266/PNG/128/&file=Germany_29761.png");
        //画像の塗りつぶしモードを設定する
        shape.getFill().getPictureFill().setFillType(PictureFillType.STRETCH);

        //画像の透明度を設定する
        shape.getFill().getPictureFill().getPicture().setTransparency(70);

        //ドキュメントを保存する
        presentation.saveToFile("画像の透明度の設定.pptx", FileFormat.PPTX_2010);
    }
}
結果ドキュメントから評価メッセージを削除したい場合、または機能制限を取り除く場合は、についてこのメールアドレスはスパムボットから保護されています。閲覧するにはJavaScriptを有効にする必要があります。にお問い合わせ、30 日間有効な一時ライセンスを取得してください。