チュートリアル
簡単にライブラリーを使用するためのチュートリアルコレクション

Spire.XLS for Java 14.1.1のリリースをお知らせいたします。このバージョンでは、HTML から XLSX への変換機能が強化されました。 さらに、塗りつぶし色のないセルで取得された塗りつぶし色の値が (0,0,0) になる問題など、既知の問題も修正されました。詳細は以下の内容を読んでください。
| カテゴリー | ID | 説明 |
| Bug | SPIREXLS-5020 | WPS ツールで印刷およびプレビューすると、保存された XLSX ドキュメントの余白が正しくないという問題が修正されました。 |
| Bug | SPIREXLS-5037 | 塗りつぶし色のないセルで取得された塗りつぶし色の値が (0,0,0) になる問題が修正されました。 |
| Bug | SPIREXLS-5047 | HTML を XLSX に変換するときにセルの境界線スタイルが失われる問題が修正されました。 |
Spire.Doc 12.1.5 のリリースをお知らせいたします。このバージョンでは、MonoAndroid パッケージと Xamarin.iOS パッケージが削除されます。 また、文書のパスワード機能にも一連の変更が加えられます。 さらに、新しい Document() オブジェクトを作成して LicenseKey を適用した後に、文書をロードすると部分的なデータが失われるなど、既知の問題も修正されました。 詳細は以下の内容を読んでください。
| カテゴリー | ID | 説明 |
| Adjustment | - | MonoAndroid パッケージと Xamarin.iOS パッケージが削除され、netstand 2.0 パッケージが両プラットフォームで利用可能になりました。 |
| Adjustment | - | 文書のパスワード機能に以下の変更が加えられました: 1. 以前のバージョンでは、パスワードで保護された文書を扱う場合、ユーザーは提供されたパスワードで文書を開いたり保存したりすることができましたが、その結果、パスワードも失われていました。今回のアップデートにより、この問題が修正されました。現在、文書を保存した後、開くにはパスワードを再入力する必要があります。ドキュメントから開いたパスワードを削除したい場合は、Document.RemoveEncryption() メソッドを使用してください。この変更により、暗号化された文書をより安全に扱えるようになりました。 2. 新しい WriteProtection 操作: 以前のバージョンの SDK では、Word 文書に対する WriteProtection 操作がサポートされていなかったため、文書の解析時に WriteProtection データが失われていました。しかし、今回の更新では、この制限に対応し、WriteProtection を処理するためのいくつかのメソッドが導入されました。以下のメソッドは、WriteProtection の効率的な処理をサポートします:
|
| Bug | - | 新しい Document() オブジェクトを作成して LicenseKey を適用した後に、文書をロードすると、一部のデータが失われる問題が修正されました。 |
| Bug | - | フォーム修正に関するいくつかの問題が修正されました。 |
Word と Excel ファイルは、使用目的と機能において異なります。Word はエッセイ、メール、手紙、書籍、履歴書、学術論文などのテキスト文書を作成するために主に使用され、テキストのフォーマットが重要です。Excel はデータの保存、テーブルやグラフの作成、複雑な計算を行うために使用されます。
複雑な Word ファイルを Excel スプレッドシートに変換することはお勧めできません。なぜなら、Excel は Word と同じように内容を表示することができないからです。ただし、Wordドキュメントが主にテーブルで構成されており、Excel でテーブルデータを分析したい場合は、Spire.Office for Java を使用して Word を Excel に変換することができます。このコード例では、良好な読みやすさを保ちながら、Word ドキュメントを Excel ファイルに変換します。
まず、Spire.Office for Java を Java プロジェクトに追加する必要があります。JAR ファイルは、このリンクからダウンロードできます。Maven を使用する場合は、次のコードをプロジェクトの pom.xml ファイルに追加する必要があります。
<repositories>
    <repository>
        <id>com.e-iceblue</id>
        <name>e-iceblue</name>
        <url>https://repo.e-iceblue.com/nexus/content/groups/public/</url>
    </repository>
</repositories>
<dependencies>
    <dependency>
        <groupId>e-iceblue</groupId>
        <artifactId>spire.office</artifactId>
        <version>8.12.0</version>
    </dependency>
</dependencies>このシナリオでは、Spire.Office パッケージ内の2つのライブラリ、Spire.Doc for Java と Spire.XLS for Java を使用します。前者は Word ドキュメントからコンテンツを読み取り、抽出するために使用され、後者は Excel ドキュメントを作成し、特定のセルにデータを書き込むために使用されます。このコード例を理解しやすくするために、次の3つのカスタムメソッドを作成しました。
以下の手順は、Spire.Office for Java を使用して Word ドキュメントからワークシートにデータをエクスポートする方法を示しています。
import com.spire.doc.*;
import com.spire.doc.documents.Paragraph;
import com.spire.doc.fields.DocPicture;
import com.spire.doc.fields.TextRange;
import com.spire.xls.*;

import java.awt.*;

public class ConvertWordToExcel {

    public static void main(String[] args) {

        // ドキュメントオブジェクトを作成します
        Document doc = new Document();

        // Wordファイルをロードします
        doc.loadFromFile("サンプル.docx");

        // ワークブックオブジェクトを作成します
        Workbook wb = new Workbook();

        // デフォルトのワークシートを削除します
        wb.getWorksheets().clear();

        // "WordToExcel"という名前のワークシートを作成します
        Worksheet worksheet = wb.createEmptySheet("WordToExcel");
        int row = 1;
        int column = 1;

        // Wordドキュメント内のセクションをループします
        for (int i = 0; i < doc.getSections().getCount(); i++) {
            // 特定のセクションを取得します
            Section section = doc.getSections().get(i);

            // 特定のセクションの下にあるドキュメントオブジェクトをループします
            for (int j = 0; j < section.getBody().getChildObjects().getCount(); j++) {
                // 特定のドキュメントオブジェクトを取得します
                DocumentObject documentObject = section.getBody().getChildObjects().get(j);

                // オブジェクトが段落かどうかを判断します
                if (documentObject instanceof Paragraph) {
                    CellRange cell = worksheet.getCellRange(row, column);
                    Paragraph paragraph = (Paragraph) documentObject;
                    // Wordから特定のセルに段落をコピーします
                    copyTextAndStyle(cell, paragraph);
                    row++;
                }

                // オブジェクトがテーブルかどうかを判断します
                if (documentObject instanceof Table) {
                    Table table = (Table) documentObject;
                    // WordからExcelにテーブルデータをエクスポートします
                    int currentRow = exportTableInExcel(worksheet, row, table);
                    row = currentRow;
                }
            }
        }

        // セル内のテキストを折り返します
        worksheet.getAllocatedRange().isWrapText(true);

        // 行の高さと列の幅を自動調整します
        worksheet.getAllocatedRange().autoFitRows();
        worksheet.getAllocatedRange().autoFitColumns();
        worksheet.setColumnWidth(1, 30);

        // ワークブックをExcelファイルに保存します
        wb.saveToFile("output/WordをExcelに変換.xlsx", ExcelVersion.Version2016);
    }

    // WordのテーブルからExcelのセルにデータをエクスポートします
    private static int exportTableInExcel(Worksheet worksheet, int row, Table table) {
        CellRange cell;
        int column;
        for (int i = 0; i < table.getRows().getCount(); i++) {
            column = 1;
            TableRow tbRow = table.getRows().get(i);
            for (int j = 0; j < tbRow.getCells().getCount(); j++) {
                TableCell tbCell = tbRow.getCells().get(j);
                cell = worksheet.getCellRange(row, column);
                cell.borderAround(LineStyleType.Thin, Color.BLACK);
                copyContentInTable(tbCell, cell);
                column++;
            }
            row++;
        }
        return row;
    }

    // WordのテーブルセルからExcelのセルにコンテンツをコピーします
    private static void copyContentInTable(TableCell tbCell, CellRange cell) {
        Paragraph newPara = new Paragraph(tbCell.getDocument());
        for (int i = 0; i < tbCell.getChildObjects().getCount(); i++) {
            DocumentObject documentObject = tbCell.getChildObjects().get(i);
            if (documentObject instanceof Paragraph) {
                Paragraph paragraph = (Paragraph) documentObject;
                for (int j = 0; j < paragraph.getChildObjects().getCount(); j++) {
                    DocumentObject cObj = paragraph.getChildObjects().get(j);
                    newPara.getChildObjects().add(cObj.deepClone());
                }
                if (i < tbCell.getChildObjects().getCount() - 1) {
                    newPara.appendText("\n");
                }
            }
        }
        copyTextAndStyle(cell, newPara);
    }

    // 段落のテキストとスタイルをセルにコピーします
    private static void copyTextAndStyle(CellRange cell, Paragraph paragraph) {

        RichText richText = cell.getRichText();
        richText.setText(paragraph.getText());
        int startIndex = 0;
        for (int i = 0; i < paragraph.getChildObjects().getCount(); i++) {
            DocumentObject documentObject = paragraph.getChildObjects().get(i);
            if (documentObject instanceof TextRange) {
                TextRange textRange = (TextRange) documentObject;
                String fontName = textRange.getCharacterFormat().getFontName();
                boolean isBold = textRange.getCharacterFormat().getBold();
                Color textColor = textRange.getCharacterFormat().getTextColor();
                float fontSize = textRange.getCharacterFormat().getFontSize();
                String textRangeText = textRange.getText();
                int strLength = textRangeText.length();
                ExcelFont font = new ExcelFont(cell.getWorksheet().getWorkbook().createFont());
                font.setColor(textColor);
                font.isBold(isBold);
                font.setSize(fontSize);
                font.setFontName(fontName);
                int endIndex = startIndex + strLength;
                richText.setFont(startIndex, endIndex, font);
                startIndex += strLength;
            }
            if (documentObject instanceof DocPicture) {
                DocPicture picture = (DocPicture) documentObject;
                cell.getWorksheet().getPictures().add(cell.getRow(), cell.getColumn(), picture.getImage());
                cell.getWorksheet().setRowHeightInPixels(cell.getRow(), 1, picture.getImage().getHeight());
            }
        }
        switch (paragraph.getFormat().getHorizontalAlignment()) {
            case Left:
                cell.setHorizontalAlignment(HorizontalAlignType.Left);
                break;
            case Center:
                cell.setHorizontalAlignment(HorizontalAlignType.Center);
                break;
            case Right:
                cell.setHorizontalAlignment(HorizontalAlignType.Right);
                break;
        }
    }
}
結果ドキュメントから評価メッセージを削除したい場合、または機能制限を取り除く場合は、についてこのメールアドレスはスパムボットから保護されています。閲覧するにはJavaScriptを有効にする必要があります。にお問い合わせ、30 日間有効な一時ライセンスを取得してください。
Spire.PDF for Java 10.1.5を発表できることをうれしく思います。このバージョンでは、複数のPDF文書に対して一括でテキストの置換を行い、保存した後に結果の文書が生成されない問題を修正しました。詳細は以下の内容を読んでください。
| カテゴリー | ID | 説明 |
| Bug | SPIREPDF-6484 | 複数のPDF文書に対して一括でテキストの置換を行い、保存した後に結果の文書が生成されない問題を修正しました。 |
リストは PowerPoint プレゼンテーションでの強力なツールであり、情報を明確かつ簡潔な形式で整理・提示することができます。重要なポイントを紹介したり、アイデアをまとめたり、重要な詳細を強調する場合でも、リストを活用することでスライドの視覚的魅力、読みやすさ、専門性を向上させることができます。この記事では、Spire.Presentation for .NET を使用して PowerPoint で番号付きリストまたは箇条書きリストを作成する方法について説明します。
まず、Spire.Presentation for .NET パッケージに含まれている DLL ファイルを .NET プロジェクトの参照として追加する必要があります。DLL ファイルは、このリンクからダウンロードするか、NuGet を介してインストールできます。
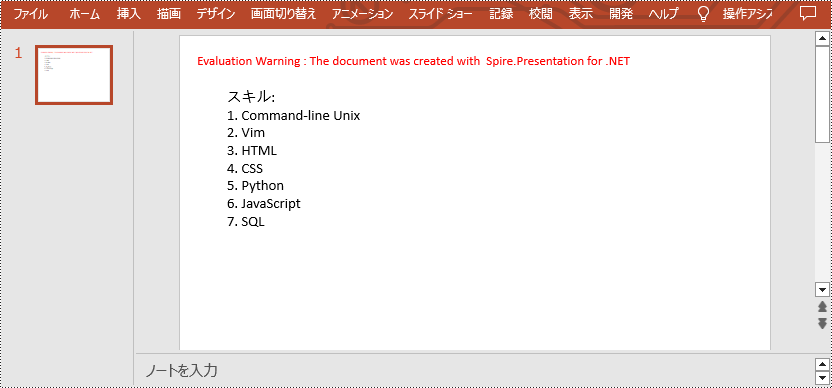
PM> Install-Package Spire.PresentationPowerPoint の番号付きリストは、各アイテムの前に番号または一連の数字が付けられるアイテムのリストです。通常は1から始まり、順次進行します。番号付きリストは、ステップ、指示、ランキング、特定の順序を必要とする情報などを提示するためによく使用されます。
Spire.Presentation for .NET を使用して PowerPoint プレゼンテーションに番号付きリストを作成するには、次の手順を実行します。
using Spire.Presentation;
using Spire.Presentation.Drawing;
using System.Drawing;

namespace CreateNumberedList
{
    internal class Program
    {
        static void Main(string[] args)
        {
            //Presentationオブジェクトを作成する
            Presentation presentation = new Presentation();

            //最初のスライドを取得する
            ISlide slide = presentation.Slides[0];

            //スライドに図形を追加し、図形のスタイルを設定する
            IAutoShape shape = slide.Shapes.AppendShape(ShapeType.Rectangle, new RectangleF(50, 50, 300, 200));
            shape.Fill.FillType = FillFormatType.None;
            shape.Line.FillType = FillFormatType.None;

            //デフォルト段落にテキストを追加する
            TextParagraph paragraph = shape.TextFrame.Paragraphs[0];
            paragraph.Text = "スキル:";
            paragraph.Alignment = TextAlignmentType.Left;
            paragraph.TextRanges[0].Fill.FillType = FillFormatType.Solid;
            paragraph.TextRanges[0].Fill.SolidColor.Color = Color.Black;

            //リスト内容を指定する
            string[] listItems = new string[] {
                " Command-line Unix",
                " Vim",
                " HTML",
                " CSS",
                " Python",
                " JavaScript",
                " SQL"
            };

            //番号付きリストを作成する
            foreach (string item in listItems)
            {
                TextParagraph textParagraph = new TextParagraph();
                textParagraph.Text = item;
                textParagraph.Alignment = TextAlignmentType.Left;
                textParagraph.TextRanges[0].Fill.FillType = FillFormatType.Solid;
                textParagraph.TextRanges[0].Fill.SolidColor.Color = Color.Black;
                textParagraph.BulletType = TextBulletType.Numbered;
                textParagraph.BulletStyle = NumberedBulletStyle.BulletArabicPeriod;
                shape.TextFrame.Paragraphs.Append(textParagraph);
            }

            //ドキュメントをPowerPointに保存する
            presentation.SaveToFile("NumberedList.pptx", FileFormat.Pptx2013);
        }
    }
}
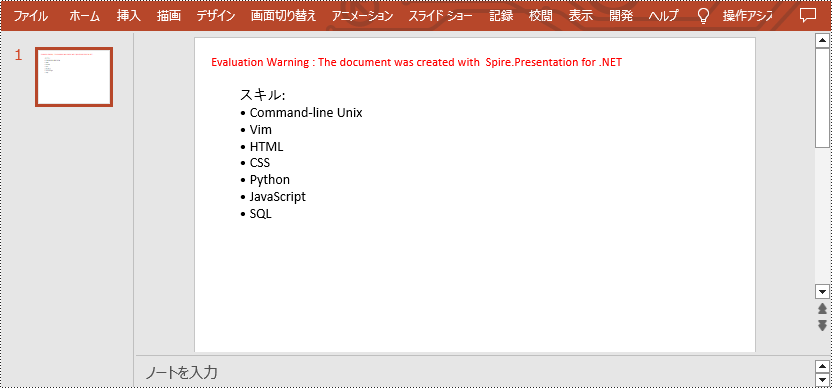
PowerPoint の記号の箇条書きリストでは、各アイテムを視覚的に表現するために数字の代わりに記号を使用します。このリストは、順序のない情報や特定の順序を持たないポイントの集まりを提示するのに便利です。 Spire.Presentation for .NET を使用して PowerPoint プレゼンテーションで記号の箇条書きリストを作成するには、以下の手順に従うことができます。
using Spire.Presentation;
using Spire.Presentation.Drawing;
using System.Drawing;

namespace CreateSymbolBulletedList
{
    internal class Program
    {
        static void Main(string[] args)
        {
            //Presentationオブジェクトを作成する
            Presentation presentation = new Presentation();

            //最初のスライドを取得する
            ISlide slide = presentation.Slides[0];

            //スライドに図形を追加し、図形のスタイルを設定する
            IAutoShape shape = slide.Shapes.AppendShape(ShapeType.Rectangle, new RectangleF(50, 50, 350, 200));
            shape.Fill.FillType = FillFormatType.None;
            shape.Line.FillType = FillFormatType.None;

            //デフォルト段落にテキストを追加する
            TextParagraph paragraph = shape.TextFrame.Paragraphs[0];
            paragraph.Text = "スキル:";
            paragraph.Alignment = TextAlignmentType.Left;
            paragraph.TextRanges[0].Fill.FillType = FillFormatType.Solid;
            paragraph.TextRanges[0].Fill.SolidColor.Color = Color.Black;

            //リスト内容を指定する
            string[] listItems = new string[] {
                " Command-line Unix",
                " Vim",
                " HTML",
                " CSS",
                " Python",
                " JavaScript",
                " SQL"
            };

            //記号の箇条書きリストを作成する
            foreach (string item in listItems)
            {
                TextParagraph textParagraph = new TextParagraph();
                textParagraph.Text = item;
                textParagraph.Alignment = TextAlignmentType.Left;
                textParagraph.TextRanges[0].Fill.FillType = FillFormatType.Solid;
                textParagraph.TextRanges[0].Fill.SolidColor.Color = Color.Black;
                textParagraph.BulletType = TextBulletType.Symbol;
                shape.TextFrame.Paragraphs.Append(textParagraph);
            }

            //ドキュメントをPowerPointに保存する
            presentation.SaveToFile("SymbolBulletedList.pptx", FileFormat.Pptx2013);
        }
    }
}
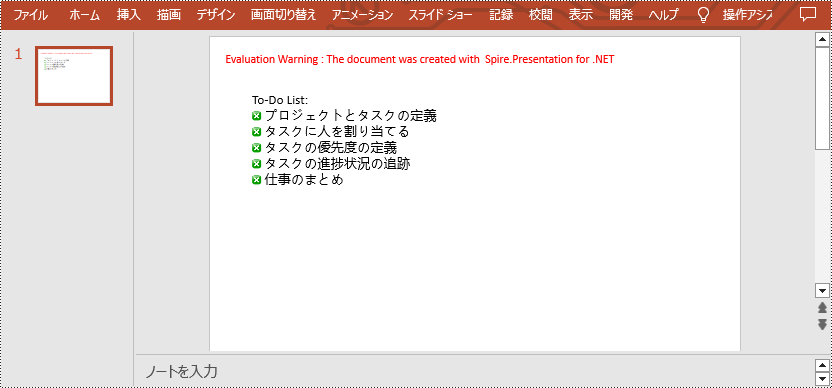
PowerPoint の画像箇条書きリストは、従来の箇条書きを小さな画像またはアイコンに置き換えます。 数字や記号を使用する代わりに、各項目は画像で表され、リストに視覚的な要素が追加されます。このリストは、豊富なビジュアルが必要な場合や、項目を表すために関連するアイコンを使用する必要がある場合によく使用されます。Spire.Presentation for .NET を使用して、PowerPoint プレゼンテーションで画像付き箇条書きリストを作成するには、以下の手順に従うことができます。
using Spire.Presentation;
using Spire.Presentation.Drawing;
using System.Drawing;

namespace CreateImageBulletedList
{
    internal class Program
    {
        static void Main(string[] args)
        {
            //Presentationオブジェクトを作成する
            Presentation presentation = new Presentation();

            //最初のスライドを取得する
            ISlide slide = presentation.Slides[0];

            //スライドに図形を追加し、図形のスタイルを設定する
            IAutoShape shape = slide.Shapes.AppendShape(ShapeType.Rectangle, new RectangleF(50, 50, 400, 180));
            shape.Fill.FillType = FillFormatType.None;
            shape.Line.FillType = FillFormatType.None;

            //デフォルト段落にテキストを追加する
            TextParagraph paragraph = shape.TextFrame.Paragraphs[0];
            paragraph.Text = "To-Do List:";
            paragraph.Alignment = TextAlignmentType.Left;
            paragraph.TextRanges[0].Fill.FillType = FillFormatType.Solid;
            paragraph.TextRanges[0].Fill.SolidColor.Color = Color.Black;

            //リスト内容を指定する
            string[] listItems = new string[] {
                " プロジェクトとタスクの定義",
                " タスクに人を割り当てる",
                " タスクの優先度の定義",
                " タスクの進捗状況の追跡",
                " 仕事のまとめ"
            };

            //画像の箇条書きリストを作成する
            foreach (string item in listItems)
            {
                TextParagraph textParagraph = new TextParagraph();
                textParagraph.Text = item;
                textParagraph.Alignment = TextAlignmentType.Left;
                textParagraph.TextRanges[0].Fill.FillType = FillFormatType.Solid;
                textParagraph.TextRanges[0].Fill.SolidColor.Color = Color.Black;
                textParagraph.BulletType = TextBulletType.Picture;
                IImageData image = presentation.Images.Append(Image.FromFile("image.png"));
                textParagraph.BulletPicture.EmbedImage = image;
                shape.TextFrame.Paragraphs.Append(textParagraph);
            }

            //ドキュメントをPowerPointに保存する
            presentation.SaveToFile("ImageBulletedList.pptx", FileFormat.Pptx2013);
        }
    }
}
結果ドキュメントから評価メッセージを削除したい場合、または機能制限を取り除く場合は、についてこのメールアドレスはスパムボットから保護されています。閲覧するにはJavaScriptを有効にする必要があります。にお問い合わせ、30 日間有効な一時ライセンスを取得してください。
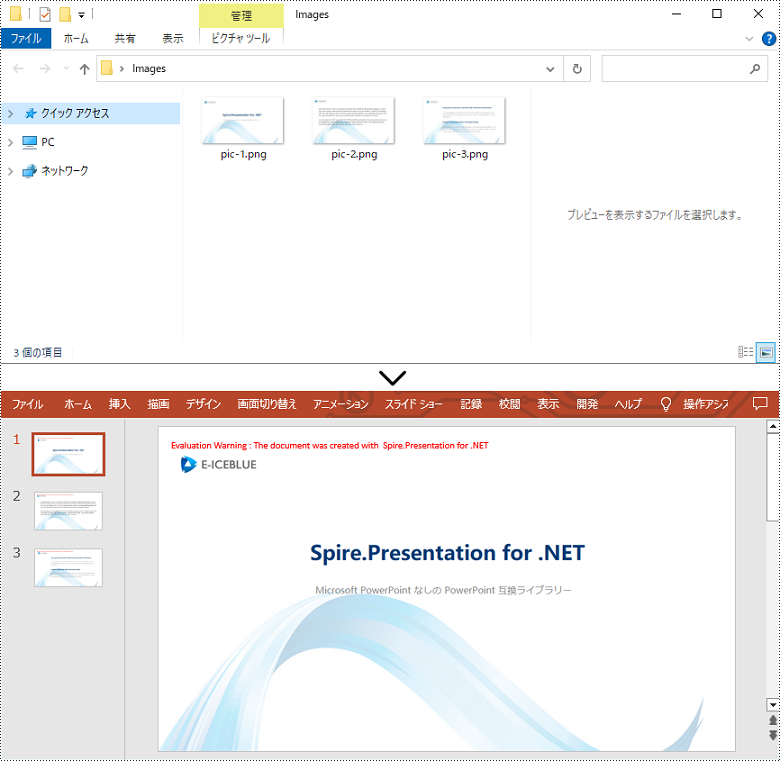
時々、あらかじめ作成された画像ファイルのセットから PowerPoint 文書を作成する必要があります。 たとえば、会社から素敵なチラシが提供され、それらを1つの PowerPoint 文書にまとめて、各画像を整然と表示する必要があります。この記事では、Spire.Presentation for .NET を使用して画像ファイル(PNG、JPG、BMP など)を PowerPoint に変換する方法について説明します。
まず、Spire.Presentation for .NET パッケージに含まれている DLL ファイルを .NET プロジェクトの参照として追加する必要があります。DLL ファイルは、このリンクからダウンロードするか、NuGet を介してインストールできます。
PM> Install-Package Spire.PresentationPowerPoint の各スライドの背景として画像が変換される場合、それらは移動や拡大縮小ができません。以下は、Spire.Presentation for .NET を使用して、画像を PowerPoint ファイルに背景画像として変換する手順です。
using Spire.Presentation;
using Spire.Presentation.Drawing;
using System.Drawing;
using System.IO;

namespace ConvertImageToBackground
{
    class Program
    {
        static void Main(string[] args)
        {
            //Presentationオブジェクトを作成する
            Presentation presentation = new Presentation();

            //スライドのサイズの種類を設定する
            presentation.SlideSize.Type = SlideSizeType.Screen16x9;

            //デフォルトのスライドを削除する
            presentation.Slides.RemoveAt(0);

            //ファイルパスを文字列配列で取得する
            string[] picFiles = Directory.GetFiles(@"C:\Users\Administrator\Desktop\Images");

            //画像をループする
            for (int i = 0; i < picFiles.Length; i++)
            {
                //スライドを追加する
                ISlide slide = presentation.Slides.Append();

                //特定の画像を取得する
                string imageFile = picFiles[i];
                Image image = Image.FromFile(imageFile);

                //画像コレクションに追加する
                IImageData imageData = presentation.Images.Append(image);

                //画像をスライドの背景画像として設定する
                slide.SlideBackground.Type = BackgroundType.Custom;
                slide.SlideBackground.Fill.FillType = FillFormatType.Picture;
                slide.SlideBackground.Fill.PictureFill.FillType = PictureFillType.Stretch;
                slide.SlideBackground.Fill.PictureFill.Picture.EmbedImage = imageData;
            }

            //結果文書を保存する
            presentation.SaveToFile("ImagesToBackground.pptx", FileFormat.Pptx2013);
        }
    }
}
PowerPoint ファイルで画像を移動可能かつサイズ変更可能にしたい場合は、それらを図形として変換することができます。以下は、Spire.Presentation for .NET を使用して PowerPoint 文書内の画像を図形に変換する手順です。
using Spire.Presentation;
using Spire.Presentation.Drawing;
using System.Drawing;
using System.IO;

namespace ConvertImageToShape
{
    class Program
    {
        static void Main(string[] args)
        {
            //Presentationオブジェクトを作成する
            Presentation presentation = new Presentation();

            //スライドのサイズの種類を設定する
            presentation.SlideSize.Type = SlideSizeType.Screen16x9;

            //デフォルトのスライドを削除する
            presentation.Slides.RemoveAt(0);

            //ファイルパスを文字列配列で取得する
            string[] picFiles = Directory.GetFiles(@"C:\Users\Administrator\Desktop\Images");

            //画像をループする
            for (int i = 0; i < picFiles.Length; i++)
            {
                //スライドを追加する
                ISlide slide = presentation.Slides.Append();

                //特定の画像を取得する
                string imageFile = picFiles[i];
                Image image = Image.FromFile(imageFile);

                //画像コレクションに追加する
                IImageData imageData = presentation.Images.Append(image);

                //スライドと同じサイズの図形を追加する
                IAutoShape shape = slide.Shapes.AppendShape(ShapeType.Rectangle, new RectangleF(new PointF(0, 0), presentation.SlideSize.Size));

                //図形を画像で塗りつぶす
                shape.Line.FillType = FillFormatType.None;
                shape.Fill.FillType = FillFormatType.Picture;
                shape.Fill.PictureFill.FillType = PictureFillType.Stretch;
                shape.Fill.PictureFill.Picture.EmbedImage = imageData;
            }

            //結果文書を保存する
            presentation.SaveToFile("ImageToShape.pptx", FileFormat.Pptx2013);
        }
    }
}
もし画像のアスペクト比が 16:9 ではない場合や、標準のスライドサイズでない場合は、画像の実際のサイズに基づいてスライドを作成することができます。これにより、画像が過度に伸びたり圧縮されたりするのを防ぐことができます。以下は、Spire.Presentation for .NET を使用してカスタマイズされたスライドサイズで PowerPoint 文書に画像を変換する手順です。
using Spire.Pdf.Graphics;
using Spire.Presentation;
using Spire.Presentation.Drawing;
using System.Drawing;
using System.IO;

namespace CustomSlideSize
{
    class Program
    {
        static void Main(string[] args)
        {
            //Presentationオブジェクトを作成する
            Presentation presentation = new Presentation();

            //デフォルトのスライドを削除する
            presentation.Slides.RemoveAt(0);

            //ファイルパスを文字列配列で取得する
            string[] picFiles = Directory.GetFiles(@"C:\Users\Administrator\Desktop\Image");

            //PdfUnitConvertor オブジェクトを作成する
            PdfUnitConvertor convertor = new PdfUnitConvertor();

            //画像をループする
            for (int i = 0; i < picFiles.Length; i++)
            {
                //特定の画像を取得する
                string imageFile = picFiles[i];
                Image image = Image.FromFile(imageFile);

                //画像コレクションに追加する
                IImageData imageData = presentation.Images.Append(image);

                //画像の高さと幅をピクセル単位で取得する
                int height = imageData.Height;
                int width = imageData.Width;

                //ピクセルをポイントに変換する
                float widthPoint = convertor.ConvertUnits(width, PdfGraphicsUnit.Pixel, PdfGraphicsUnit.Point);
                float heightPoint= convertor.ConvertUnits(height, PdfGraphicsUnit.Pixel, PdfGraphicsUnit.Point);

                //スライドのサイズを設定する
                presentation.SlideSize.Size = new SizeF(widthPoint, heightPoint);

                //スライドを追加する
                ISlide slide = presentation.Slides.Append();

                //画像をスライドの背景画像として設定する
                slide.SlideBackground.Type = BackgroundType.Custom;
                slide.SlideBackground.Fill.FillType = FillFormatType.Picture;
                slide.SlideBackground.Fill.PictureFill.FillType = PictureFillType.Stretch;
                slide.SlideBackground.Fill.PictureFill.Picture.EmbedImage = imageData;
            }

            //結果文書を保存する
            presentation.SaveToFile("CustomizeSlideSize.pptx", FileFormat.Pptx2013);
        }
    }
}
結果ドキュメントから評価メッセージを削除したい場合、または機能制限を取り除く場合は、についてこのメールアドレスはスパムボットから保護されています。閲覧するにはJavaScriptを有効にする必要があります。にお問い合わせ、30 日間有効な一時ライセンスを取得してください。
Spire.PDF for Java 10.1.3を発表できることをうれしく思います。このバージョンでは、テキストを置換する機能を実装する新しい PdfTextReplacer インターフェイスが追加されました。 同時に、画像の削除、抽出、置換、圧縮の機能を実装するための新しい PdfImageHelper インターフェイスが追加されました。 また、透かしの描画効率も向上されました。詳細は以下の内容を読んでください。
| カテゴリー | ID | 説明 |
| New feature | SPIREPDF-6454 | 透かしの描画効率も向上されました。 |
| New feature | SPIREPDF-6459 | テキストを置換する機能を実現するための PdfTextReplacer インターフェースが追加されました。
PdfDocument pdf = new PdfDocument();
pdf.loadFromFile("sample.pdf");
PdfPageBase page = pdf.getPages().get(0);
PdfTextReplacer replacer = new PdfTextReplacer(page);
PdfTextReplaceOptions options= new PdfTextReplaceOptions();
options.setReplaceType(EnumSet.of(ReplaceActionType.WholeWord));
replacer.replaceText("www.google.com", "1234567");
pdf.saveToFile(outputFile); |
| New feature | - | 画像の削除、画像の抽出、画像の置換、画像の圧縮の機能を実現する PdfImageHelper インターフェイスが追加されました。 キーコードスニペット: PdfImageHelper imageHelper = new PdfImageHelper();
PdfImageInfo[] imageInfoCollection= imageHelper.getImagesInfo(page);
Delete image:
imageHelper.deleteImage(imageInfoCollection[0]);
Extract image:
int index = 0;
for (com.spire.pdf.utilities.PdfImageInfo img : imageInfoCollection) {
BufferedImage image = img.getImage();
File output = new File(outputFile_Img + String.format("img_%d.png", index));
ImageIO.write(image, "PNG", output);
index++;
}画像を置き換えます: PdfImage image = PdfImage.fromFile("ImgFiles/E-iceblue logo.png");
imageHelper.replaceImage(imageInfoCollection[i], image);
Compress image:
for (PdfPageBase page : (Iterable |
| Bug | SPIREPDF-6468 | 文書を保存するときにプログラムが 「java.lang.StringIndexOutOfBoundsException 」をスローする問題が修正されました。 |
Spire.PDF 10.1のリリースをお知らせいたします。このバージョンは、.NET Standard プラットフォームでの PDF から画像への変換機能が強化されました。さらに、PDF を印刷するときにコンテンツが明確に表示されない問題など、既知の問題も修正されました。詳細は以下の内容を読んでください。
| カテゴリー | ID | 説明 |
| Bug | SPIREPDF-6328 | PDF印刷時に内容が明確に表示されない問題を修正しました。 |
| Bug | SPIREPDF-6414 | 署名を含む PDF ドキュメントを読み取り、新しいドキュメントに保存した後に署名が破損する問題を修正しました。 |
| Bug | SPIREPDF-6431 | PDF フォームフィールドの値を変更した後に値が 90 度回転する問題を修正しました。 |
| Bug | SPIREPDF-6443 | .NET Standard プラットフォームで PDF を画像に変換するときにテキストが明確に表示されない問題を修正しました。 |
PostScript(ポストスクリプト)は、1984 年に Adobe が設計したページ記述言語であり、印刷のために使用されます。PostScript 言語で記述されたファイルには、テキスト、ラスター/ベクターグラフィックスが含まれることがあり、PostScript をサポートするどのプリンターでも、アプリケーションで開くことなく印刷することができます。一部の場合では、Word 文書を PostScript に変換する必要があるかもしれません。この記事では、Spire.Doc for Java を使用して、Java で Word 文書を PostScript ファイルに変換する方法を説明します。
まず、Spire.Doc for Java を Java プロジェクトに追加する必要があります。JAR ファイルは、このリンクからダウンロードできます。Maven を使用する場合は、次のコードをプロジェクトの pom.xml ファイルに追加する必要があります。
<repositories>
    <repository>
        <id>com.e-iceblue</id>
        <name>e-iceblue</name>
        <url>https://repo.e-iceblue.com/nexus/content/groups/public/</url>
    </repository>
</repositories>
<dependencies>
    <dependency>
        <groupId>e-iceblue</groupId>
        <artifactId>spire.doc</artifactId>
        <version>12.1.0</version>
    </dependency>
</dependencies>以下は、Word ドキュメントを PostScript ファイルに変換する手順です:
import com.spire.doc.Document;
import com.spire.doc.FileFormat;

public class ConvertWordToPostScript {
    public static void main(String[] args) {
        // Documentクラスのオブジェクトを作成する
        Document doc = new Document();

        // Word文書をロードする
        doc.loadFromFile("サンプル.docx");

        // 文書をPostScriptに変換して保存する
        doc.saveToFile("output/WordからPostScriptへの変換.ps", FileFormat.Post_Script);
        doc.close();
    }
}
結果ドキュメントから評価メッセージを削除したい場合、または機能制限を取り除く場合は、についてこのメールアドレスはスパムボットから保護されています。閲覧するにはJavaScriptを有効にする必要があります。にお問い合わせ、30 日間有効な一時ライセンスを取得してください。
Spire.XLS 14.1のリリースをお知らせできることをうれしく思います。このバージョンでは、XLT、XLTX、および XLTM 文書形式が FileFormat 列挙に追加され、ワークシートを画像に変換するときに使用されるメモリの量も改善されています。 さらに、Excel から PDF および CSV への変換機能が強化されました。 セルの取得に失敗するなど、いくつかの既知の問題も修正されています。詳細は以下の内容を読んでください。
| カテゴリー | ID | 説明 |
| New feature | SPIREXLS-5036 | ワークシートを画像に変換するときに使用されるメモリの量が改善されました。 |
| New feature | SPIREXLS-5006 | XLT、XLTX、XLTM 文書形式を FileFormat 列挙に追加しました。 |
| Bug | SPIREXLS-5016 | Sheet.AutoFilters.Clear()実行時にプログラムが「System.ArgumentOutOfRangeException」をスローする問題を修正しました。 |
| Bug | SPIREXLS-5018 | XLSX ドキュメントをロードし、変更せずに新しい XLSX ドキュメントに直接保存した後、MS Excel ツールを使用して保存された XLSX ドキュメントを開くと、一部の内容が間違っているというメッセージが表示される問題を修正しました。 |
| Bug | SPIREXLS-5022 | ワークシートにデータを挿入し、保存したXLSX文書をMS Excelツールで開くと、内容の一部が正しくなくなる問題を修正しました。 |
| Bug | SPIREXLS-5023 | セルの取得に失敗する問題を修正しました。 |
| Bug | SPIREXLS-5025 | Excel を PDF に変換した後にページング方式が正しく行われない問題を修正しました。 |
| Bug | SPIREXLS-5028 | ExcelをCSVに変換すると内容がずれる問題を修正しました。 |
| Bug | SPIREXLS-5032 | Linux システムで .Net Standard パッケージを使用して Excel を HTML に変換した後、凡例のテキストが文字化けする問題を修正しました。 |
| Bug | SPIREXLS-5034 | Linux 環境でファイル読み込みプログラムが「No printers are installed」エラーをスローする問題を修正しました。 |
| Bug | SPIREXLS-5039 | ワークシートを画像に変換するときにピボット テーブル データが正しくない問題を修正しました。 |
| Bug | SPIREXLS-5061 | Excel を PDF に変換するときにプログラムが「Shape failed to render!」エラーをスローする問題を修正しました。 |