表は、Word 文書内で情報を構造的に整理・提示するための非常に強力なツールです。行と列から構成され、グリッド状の構造を形成します。表は、スケジュールの作成、データの比較、情報を整然と表示するなど、さまざまな用途で広く利用されています。本記事では、Spire.Doc for Python を使用して、Python で Word 文書に表をプログラム的に作成する方法を解説します。
Spire.Doc for Python のインストール
この操作には Spire.Doc for Python と plum-dispatch v1.7.4 が必要です。これらは、Spire.Doc for Python の公式ウェブサイトから手動でダウンロードするか、以下の pip コマンドでインストールできます。
pip install Spire.PDF
前提知識
Spire.Doc for Python では、Word 文書内の表を表現するために Table クラスが提供されています。表オブジェクトは、コンストラクターを使用する方法、または Section.AddTable() メソッドを使用して作成できます。表オブジェクトを作成した後は、Table.AddRow() メソッドを使って行を動的に追加することも、あらかじめ行数と列数を指定して一括でデータを設定することも可能です。
また、Spire.Doc for Python は HTML 文字列から表を作成する機能もサポートしています。この方法では Table オブジェクトは返されません。そのため、HTML 文字列から作成された表に対して Table クラスのプロパティやメソッドを使用することはできません。表の内容やスタイルは、HTML 文字列内であらかじめ設定する必要があります。
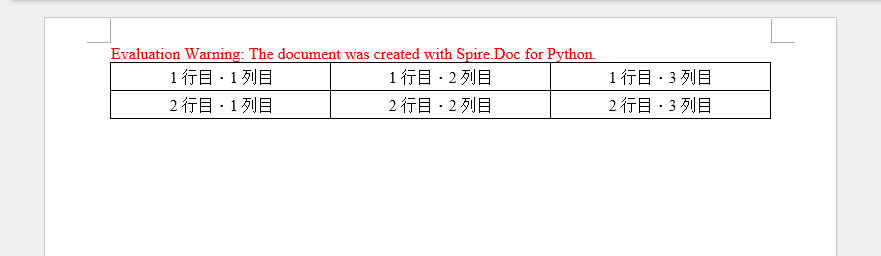
Python で Word にシンプルな表を作成する
この例では、Table クラスを使用して基本的な表を作成し、行を 1 つずつ追加する方法を示します。主な手順は以下のとおりです。
- Document オブジェクトを作成する
- Document.AddSection() メソッドを使用してセクションを追加する
- Table オブジェクトを作成する
- Table.AddRow() メソッドを使用して行を追加する
- Row.Cells[index] プロパティを使用して特定のセルを取得する
- TableCell.AddParagraph().AppendText() メソッドでセルにテキストを追加する
- Section.AddTable() メソッドを使用して表を文書に追加する
- Document.SaveToFile() メソッドを使用して .docx ファイルとして保存する
from spire.doc import *
from spire.doc.common import *

# Document オブジェクトを作成します
doc = Document()

# セクションを追加します
section = doc.AddSection()

# テーブルを作成します
table = Table(doc, True)

# テーブルの幅を設定します(100%)
table.PreferredWidth = PreferredWidth(WidthType.Percentage, int(100))

# テーブルの罫線スタイルを設定します
table.TableFormat.Borders.BorderType = BorderStyle.Single
table.TableFormat.Borders.Color = Color.get_Black()

# 行を追加します(3 列)
row = table.AddRow(False, 3)
row.Height = 20.0

# セルにデータを追加します
cell = row.Cells[0]
cell.CellFormat.VerticalAlignment = VerticalAlignment.Middle
paragraph = cell.AddParagraph()
paragraph.Format.HorizontalAlignment = HorizontalAlignment.Center
paragraph.AppendText("1 行目・1 列目")

cell = row.Cells[1]
cell.CellFormat.VerticalAlignment = VerticalAlignment.Middle
paragraph = cell.AddParagraph()
paragraph.Format.HorizontalAlignment = HorizontalAlignment.Center
paragraph.AppendText("1 行目・2 列目")

cell = row.Cells[2]
cell.CellFormat.VerticalAlignment = VerticalAlignment.Middle
paragraph = cell.AddParagraph()
paragraph.Format.HorizontalAlignment = HorizontalAlignment.Center
paragraph.AppendText("1 行目・3 列目")

# 2 行目を追加します
row = table.AddRow(False, 3)
row.Height = 20.0

cell = row.Cells[0]
cell.CellFormat.VerticalAlignment = VerticalAlignment.Middle
paragraph = cell.AddParagraph()
paragraph.Format.HorizontalAlignment = HorizontalAlignment.Center
paragraph.AppendText("2 行目・1 列目")

cell = row.Cells[1]
cell.CellFormat.VerticalAlignment = VerticalAlignment.Middle
paragraph = cell.AddParagraph()
paragraph.Format.HorizontalAlignment = HorizontalAlignment.Center
paragraph.AppendText("2 行目・2 列目")

cell = row.Cells[2]
cell.CellFormat.VerticalAlignment = VerticalAlignment.Middle
paragraph = cell.AddParagraph()
paragraph.Format.HorizontalAlignment = HorizontalAlignment.Center
paragraph.AppendText("2 行目・3 列目")

# セクションにテーブルを追加します
section.Tables.Add(table)

# ドキュメントを保存します
doc.SaveToFile("output/CreateTable.docx", FileFormat.Docx)
doc.Close()
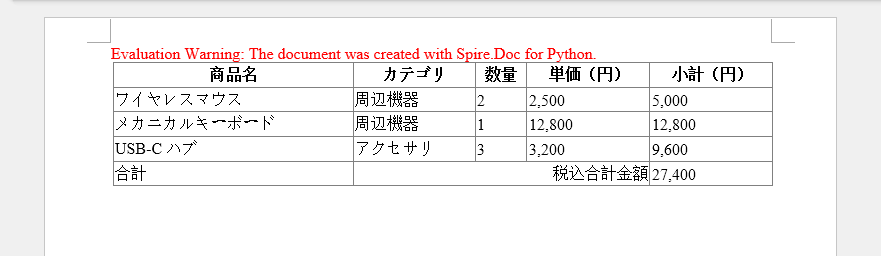
Python で HTML 文字列から表を作成する
HTML 文字列から表を作成するには、Paragraph.AppendHTML() メソッドを使用します。手順は以下のとおりです。
- Document オブジェクトを作成する
- Document.AddSection() メソッドを使用してセクションを追加する
- 表を生成するための HTML 文字列を指定する
- Section.AddParagraph() メソッドを使用して段落を追加する
- Paragraph.AppendHTML() メソッドを使用して HTML 表を段落に追加する
- Document.SaveToFile() メソッドを使用して .docx ファイルとして保存する
from spire.doc import *
from spire.doc.common import *

# Document オブジェクトを作成します
document = Document()

# セクションを追加します
section = document.AddSection()

# HTML 形式のテーブル文字列を定義します
HTML = (
    "<table border='1' style='border-collapse:collapse;width:100%'>"
    "<tr>"
        "<th>商品名</th>"
        "<th>カテゴリ</th>"
        "<th>数量</th>"
        "<th>単価(円)</th>"
        "<th>小計(円)</th>"
    "</tr>"
    "<tr>"
        "<td>ワイヤレスマウス</td>"
        "<td>周辺機器</td>"
        "<td>2</td>"
        "<td>2,500</td>"
        "<td>5,000</td>"
    "</tr>"
    "<tr>"
        "<td>メカニカルキーボード</td>"
        "<td>周辺機器</td>"
        "<td>1</td>"
        "<td>12,800</td>"
        "<td>12,800</td>"
    "</tr>"
    "<tr>"
        "<td>USB-C ハブ</td>"
        "<td>アクセサリ</td>"
        "<td>3</td>"
        "<td>3,200</td>"
        "<td>9,600</td>"
    "</tr>"
    "<tr>"
        "<td>合計</td>"
        "<td colspan='3' style='text-align:right'>税込合計金額</td>"
        "<td>27,400</td>"
    "</tr>"
    "</table>"
)

# 段落を追加します
paragraph = section.AddParagraph()

# HTML テーブルを段落に追加します
paragraph.AppendHTML(HTML)

# Word ドキュメントとして保存します
document.SaveToFile("output/HtmlTable.docx", FileFormat.Docx2013)
document.Close()
HTML が完全なドキュメント形式の場合は、表として挿入するのではなく、Word 文書へ直接変換する方法もあります。詳細については「Python を使用して HTML ファイルを Word 文書に変換する方法」をご確認ください。
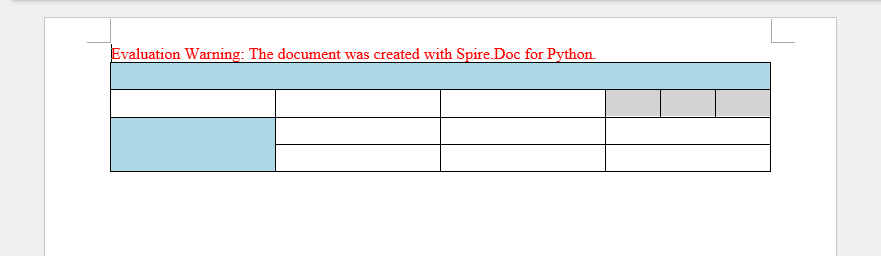
Python で表のセルを結合・分割する
表を操作する際、セルの結合や分割はデータの見せ方を柔軟にカスタマイズするための重要な機能です。この例では、Spire.Doc for Python を使用して、隣接するセルを 1 つに結合する方法と、1 つのセルを複数の小さなセルに分割する方法を紹介します。
- Document オブジェクトを作成する
- Document.AddSection() メソッドを使用してセクションを追加する
- Section.AddTable() メソッドを使用して表を追加する
- Table.ResetCells() メソッドを使用して行数と列数を設定する
- TableCell.SplitCell() メソッドを使用してセルを分割する
- Table.ApplyHorizontalMerge() メソッドを使用してセルを横方向に結合する
- Table.ApplyVerticalMerge() メソッドを使用してセルを縦方向に結合する
- Document.SaveToFile() メソッドを使用して .docx ファイルとして保存する
from spire.doc import *
from spire.doc.common import *

# Document オブジェクトを作成します
document = Document()

# セクションを追加します
section = document.AddSection()

# テーブルを作成します
table = section.AddTable(True)

# テーブルの行数と列数を設定します(4 行 × 4 列)
table.ResetCells(4, 4)

# テーブルの幅を設定します(100%)
table.PreferredWidth = PreferredWidth(WidthType.Percentage, int(100))

# 行の高さを設定します
for i in range(0, table.Rows.Count):
    table.Rows[i].Height = 20.0

# 2 行目・4 列目のセルを取得します
cell = table.Rows[1].Cells[3]

# セルを縦方向に 3 分割します
cell.SplitCell(3, 0)

# 1 行目を水平方向に結合します
table.ApplyHorizontalMerge(0, 0, 3)

# 1 列目の 3~4 行目を垂直方向に結合します
table.ApplyVerticalMerge(0, 2, 3)

# 見出しセル
table.Rows[0].Cells[0].CellFormat.BackColor = Color.get_LightBlue()

# 左側の結合セル
table.Rows[2].Cells[0].CellFormat.BackColor = Color.get_LightBlue()

# 分割されたセル
table.Rows[1].Cells[3].CellFormat.BackColor = Color.get_LightGray()
table.Rows[1].Cells[4].CellFormat.BackColor = Color.get_LightGray()
table.Rows[1].Cells[5].CellFormat.BackColor = Color.get_LightGray()

# ドキュメントを保存します
document.SaveToFile("output/MergeAndSplit.docx", FileFormat.Docx2013)
document.Close()
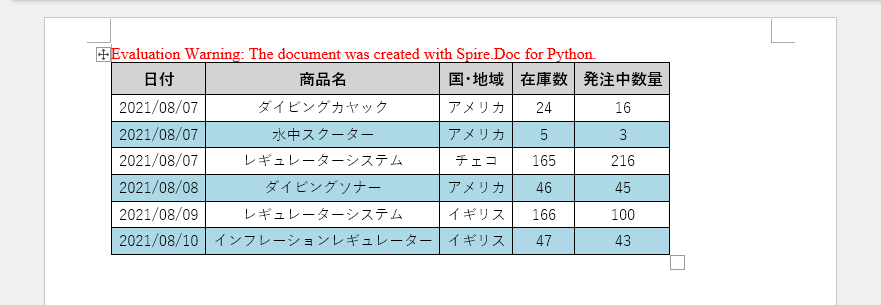
Python で Word の表にデータを入力する
この例では、5 行 7 列の表を作成し、リスト内のデータを各セルに書き込み、ヘッダー行とそれ以外の行に異なる書式を適用します。主な手順は以下のとおりです。
- Document オブジェクトを作成する
- Document.AddSection() メソッドを使用してセクションを追加する
- Section.AddTable() メソッドを使用して表を追加する
- 表に入力するデータを 2 つのリストで用意する
- データの行数・列数に応じて Table.ResetCells() メソッドで表のサイズを調整する
- TableCell.AddParagraph().AppendText() メソッドを使用して対応するセルにデータを書き込む
- TableCell.CellFormat.BackColor プロパティを使用して行ごとに異なる背景色を設定する
- Document.SaveToFile() メソッドを使用して .docx ファイルとして保存する
import math
from spire.doc import *
from spire.doc.common import *

# Document オブジェクトを作成します
doc = Document()

# セクションを追加します
section = doc.AddSection()

# テーブルを作成します
table = section.AddTable(True)

# テーブルに使用するデータを定義します
header_data = ["日付", "商品名", "国・地域", "在庫数", "発注中数量"]
row_data = [
    ["2021/08/07", "ダイビングカヤック", "アメリカ", "24", "16"],
    ["2021/08/07", "水中スクーター", "アメリカ", "5", "3"],
    ["2021/08/07", "レギュレーターシステム", "チェコ", "165", "216"],
    ["2021/08/08", "ダイビングソナー", "アメリカ", "46", "45"],
    ["2021/08/09", "レギュレーターシステム", "イギリス", "166", "100"],
    ["2021/08/10", "インフレーションレギュレーター", "イギリス", "47", "43"]
]

# テーブルの行数と列数を設定します
table.ResetCells(len(row_data) + 1, len(header_data))

# テーブルの幅を設定します(100%)
table.PreferredWidth = PreferredWidth(WidthType.Percentage, int(100))

# ヘッダー行を取得します
headerRow = table.Rows[0]
headerRow.IsHeader = True
headerRow.Height = 23
headerRow.RowFormat.BackColor = Color.get_LightGray()

# ヘッダー行にデータを入力し、書式を設定します
i = 0
while i < len(header_data):
    headerRow.Cells[i].CellFormat.VerticalAlignment = VerticalAlignment.Middle
    paragraph = headerRow.Cells[i].AddParagraph()
    paragraph.Format.HorizontalAlignment = HorizontalAlignment.Center
    txtRange = paragraph.AppendText(header_data[i])
    txtRange.CharacterFormat.Bold = True
    txtRange.CharacterFormat.FontSize = 12
    txtRange.CharacterFormat.FontName = "Yu Gothic UI"
    i += 1

# データ行に値を入力し、書式を設定します
r = 0
while r < len(row_data):
    dataRow = table.Rows[r + 1]
    dataRow.Height = 20
    dataRow.HeightType = TableRowHeightType.Exactly
    c = 0
    while c < len(row_data[r]):
        dataRow.Cells[c].CellFormat.VerticalAlignment = VerticalAlignment.Middle
        paragraph = dataRow.Cells[c].AddParagraph()
        paragraph.Format.HorizontalAlignment = HorizontalAlignment.Center
        txtRange = paragraph.AppendText(row_data[r][c])
        txtRange.CharacterFormat.FontSize = 11
        txtRange.CharacterFormat.FontName = "Yu Gothic"
        c += 1
    r += 1

# 行の背景色を交互に設定します
for j in range(1, table.Rows.Count):
    if math.fmod(j, 2) == 0:
        row2 = table.Rows[j]
        for f in range(row2.Cells.Count):
            row2.Cells[f].CellFormat.BackColor = Color.get_LightBlue()

# テーブルの罫線を設定します
table.Format.Borders.BorderType = BorderStyle.Single
table.Format.Borders.LineWidth = 1.0
table.Format.Borders.Color = Color.get_Black()

# テーブルを自動調整します
table.AutoFit(AutoFitBehaviorType.AutoFitToContents)

# Word ドキュメントとして保存します
doc.SaveToFile("output/Table.docx", FileFormat.Docx2013)
doc.Dispose()
一時ライセンスの申請
生成された文書から評価メッセージを削除したい場合や、機能制限を解除したい場合は、30 日間の試用ライセンスを申請 してください。